


Research and Analysis of Artifacts
- Can conservators do materials analysis?
- What resources exist for doing materials analysis?
- How should I collect and store samples/artifacts in case I need to do analysis?
- How do I avoid contaminating archaeological DNA samples with modern DNA?
- How do I avoid contaminating samples for Carbon-14 analysis?
- How do I store soil samples?
- What are x-rays, and how can they be useful to me?
Can conservators do materials analysis?
Most “program-trained” conservators (i.e. those who have gone through a university-based training program, usually at the Masters level) receive training in materials analysis as part of their degree, and many who work in large institutions have the opportunity to expand or practice that training. It is a skill that must be used and practiced to retain proficiency.
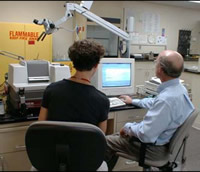
Molly Gleeson and Chris Stevenson reading a spectra from a glass sample. Photso by M. Myers. Used by permission of the Virginia Department of Historic Resources.
Materials analysis is a very broad term that covers a lot of different techniques of investigation, including examination of physical structures by microscopy or scanning electron microscopy (SEM); elemental analysis by chemistry, x-ray fluorescence (XRF), atomic absorption spectroscopy (AA) or mass spectrography; mineral identification by x-ray diffraction (XRD); molecular identification by fourier transform infra-red spectroscopy (FTIR); and many other forms of analysis.
With so many options available, the first question to ask should be “what do I need to know?” The questions asked will in many cases determine the type of analysis to be performed.
- What is it? This can be broken down a bit by materials:
- Metals and Minerals: What is the elemental composition? This can help identify raw materials (metal ores), finished products (metal alloys), and by-products (corrosion products, chemical traces). Spot-testing and elemental analysis are among the techniques most commonly used.
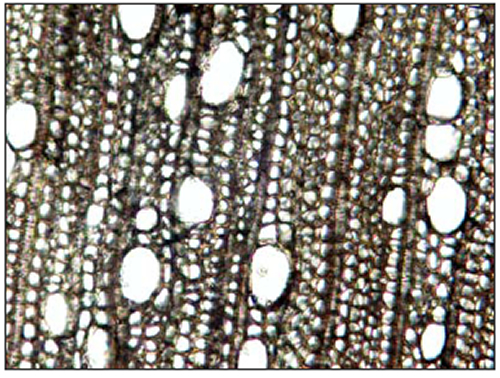
- Wood species can be identified by optical microscopy of small fragments or thin sections.
- Bone, antler, horn, leather, ivory, and tooth can be differentiated, and sometimes identified to the animal species by examination of cross sections and surface features.
- Organic trace molecules: some chemical spot tests, and more complex analyses with chromatography and mass spectrometry can identify and differentiate between carbohydrates, proteins, oils and fats.
Organic materials: What is the physical structure?
- Stone, glass, ceramic: What is the structure, or what are the elements? Thin section microscopy or elemental analysis can identify mineral “species,” or the raw materials used to make a glass or ceramic.
- Plastics: Which additives, plasticizers and fillers were used? This can be answered using FTIR and some chemical spot tests.
- Some objects may have tool marks that are visible under the microscope.
- Most metals have a visible microstructure that reveals their alloys and the ways they were smelted, forged, or cast.
- Ceramics have microscopic inclusions that can reveal their source materials, and their shaping and firing regimes.
- Organic materials: Carbon-14 or Oxygen isotopes.
- Minerals: Potassium-Argon isotopes.
- Ceramics: Thermo-luminescence dating.
Although most conservators do not have ready access to the large, expensive analytical devices needed to fully answer every question, they can still perform some very useful tests with simple tools, even on field excavations:
- Simple chemical spot tests can be used to identify metals and their alloys, inorganic salt species (particularly chloride salts, which are the driving engine in most forms of aggressive metal corrosion, or potassium salts, a by-product of animal wastes), and basic organic molecules like carbohydrates, proteins, and oils. These are usually “qualitative” tests, which will only indicate presence or absence, not the amount present.
- Slightly more sophisticated testing kits available for environmental testing can identify various organic and inorganic compounds, and will give “quantitative” results (actual amounts present).
- The quality of packing materials for archival storage of artifacts can be tested for pH (acidity/alkalinity), or the release of volatile solvents or acids.
- Optical microscopy from 10 to 400x magnification can be used to identify the source species of wood, most animal hard tissues, leather, and some mineral types.
The next level of analysis usually requires more complex equipment, training, and practice. This kind of equipment includes XRF, SEM (which usually have attachments for x-ray related elemental analysis), FTIR and other forms of spectroscopy, AA and other forms of spectrography, and more precise “wet” chemical analysis. This sort of equipment and expertise is usually found in most colleges and universities, dedicated research labs (like the Smithsonian Institution or the Canadian Conservation Institute), and private analytical labs. These analyses will give you quantitative results, which are precise measures of how much of the target material is present.
The final tier of equipment and expertise usually concern any form of analysis that requires nuclear or isotopic analysis, such as Carbon14 dating or Neutron Activation Analysis. These are found at specialized facilities usually run by universities or large corporations.
What resources exist for doing materials analysis?
Many simple questions can be answered by conservators who have access to a microscope and a simple chemical kit, or with environmental testing kits available from most scientific suppliers. Many such tests are detailed in the book Material Characterization Tests for Objects of Art and Archaeology.
For more detailed instrumental analysis, the National Center for Preservation Training and Technology has a searchable database of analytical service providers:
http://www.ncptt.nps.gov/ncptt2/clear_Analytical_Material.stm
Other service providers can be found by simply searching on-line – a search for “Carbon dating laboratories” found this website:
http://www.radiocarbon.org/Info. Searches using the names of other techniques also found relevant sites.
It is also worthwhile contacting the chemistry, engineering, or geology departments of local colleges and universities. Many will rent time on their equipment when the students are not using them, or the students may be able to help as part of their research.
Many state and county governments also maintain environmental and agricultural offices, which may be able to identify geological, faunal, and botanical specimens. The Forest Products lab in Madison, WI, will identify a limited number of samples for free each year. Further information on their services is available at:
http://www2.fpl.fs.fed.us/WoodID/idfact.html
Additional Resources:
Odegaard, N, Carroll, S., Zimmt, W. (2000) Material Characterization Tests for Objects of Art and Archaeology. Archetype: London
How should I collect and store samples / artifacts in case I need to do analysis?
The care required in collecting and handling samples will vary depending on the analytical technique, and the sample itself. In general, the more specific and precise the questions you are likely to ask, the more stringent your collection and storage of samples should be. For some techniques, such as DNA analysis, the analytical specialist may insist on taking the samples themselves.
Most materials that are going to be studied have to undergo significant preparation prior to study. This may include pulverizing, polishing, sectioning, scraping – all considered “destructive” testing. In general, it is best to keep all samples away from contamination with modern or foreign materials by storing them in archivally stable containers (e.g., glass vials). Metal or geological samples should be kept in dry or desiccated storage to prevent continuing corrosion and degradation. If dry, organic sample should be kept dried and at controlled temperatures. If the organic material is wet, its condition and its storage conditions should be discussed with the analyst. Desiccation or freezing prior to analysis may cause physical changes that might compromise the analysis (such as collapse of internal wood structure making it difficult to identify), while desiccation and freezing during analysis may result in physical damage (such as shrinkage and warping) that will affect the long-term preservation of the object.
How do I avoid contaminating archeological DNA samples with modern DNA?
If you suspect that you will require DNA analysis during the course of your excavation, it is essential to contact a lab that specializes in analysis of ancient DNA before excavation begins. There are differences of opinion between labs and they all have slightly different procedures. However, they all suggest that it is most important to isolate samples for DNA analysis immediately on excavation. Teeth are preferred, followed by skull fragments, vertebrae, and then small intact bones. These can be stored in polyethylene ziplock bags labeled ‘For DNA analysis, do not wash or X-ray’. Some also recommend freezing these samples to prevent further degradation of the DNA. A sample of the excavator’s DNA should also be saved. Most specialists recommend a drop of blood on a blood storage card, although hair samples may also be saved.
DNA analysis has often been carried out on old museum material, after following certain procedures (sterilization via chemical/UV bleaching of bone surfaces, and the collection of material for analysis from internal surfaces only). However the published results for human bone material from old collections are not considered reliable by all labs. Since modern contamination makes analysis more difficult and more time consuming, all specialists would prefer to have non-contaminated bone material. Recommended practices include:
- Not washing bone if DNA analysis may be required. Washing will drive modern DNA deep into bone. If material must be washed, use sterile water or alcohol.
- Not cross-contaminating skeletal material. Every bone (or every individual, if possible to identify) should be treated separately -i.e. washed separately, using separate brushes, preferably sterile.
- Wearing gloves, sterile if possible. Cloth gloves are not recommended. Some specialists also recommend facemasks and hairnets. To prevent cross-contamination wear a different pair of gloves for each bone or each individual.
- Minimizing handlers and saving blood samples from these people. During the last step of DNA analysis, if a mixture of DNA is found, known sequences from handlers can be eliminated.
Further information about DNA analysis may be found at the following website: http://www.cstl.nist.gov/biotech/strbase/pub_pres/StorageDNA_%20Aged.pdf
How do I avoid contaminating samples for Carbon-14 analysis?
The following link provides detailed information about handling and collection Carbon-14 samples:
Carbon-14 samples
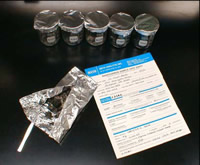
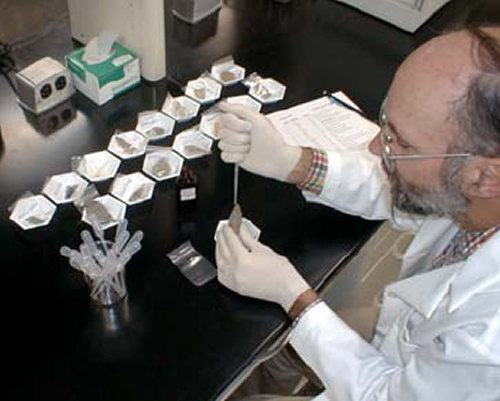
Photo by M. Myers. Used by permission from the Virginia Department of Historic Resources
An excerpt follows: “great care must be taken in collecting and packing samples to avoid contamination by more recent carbon. For each sample, clean trowels should be used, to avoid cross contamination between samples. The samples should be packaged in chemically neutral materials to avoid picking up new C-14 from the packaging. The packaging should also be airtight to avoid contact with atmospheric C-14. Also, the stratigraphy should be carefully examined to determine that a carbon sample location was not contaminated by carbon from a later or an earlier period.”
By “chemically neutral” authors generally mean a material that has no carbon of its own that will contaminate the sample: aluminum foil or glass sample vials are standard. Do not use polyethylene or other plastic containers as they contain carbon. Any handling must also be with clean metal tools.
How do I store soil samples?
Chemical residues, phytoliths, micro-faunal assemblages, and other materials are usually sought in soil samples. Current standards of storage may not always take into account advances in analytical chemistry that might extract data from old samples. Similarly, conservation recommendations for the immediate stabilization and long-term storage of samples have not been tested in laboratory conditions, although there are studies on-going. It is assumed that stable (low) temperature and relative humidity are required to prevent chemical traces in soil samples from long-term degradation.
What are X-rays and how can they be useful to me?
X-rays are a form of high-energy ionizing electromagnetic radiation. They are produced when fast moving electrons strike a metal (usually tungsten) target in a specially constructed tube. The X-rays produced then travel in a straight line towards the object under investigation. X-rays are produced only when electricity is applied. An X-radiographic machine is NOT radioactive, and is completely harmless when the power is turned off. However, X-rays are harmful to living tissues, and X-ray producing machinery is regulated by the government. Only trained personnel should operate this equipment.
X-rays were discovered by Wilhelm Röntgen in 1896 and provided a new way of not only looking at things but also looking through them. They were quickly applied to archaeological materials-in 1898 a Peruvian mummy and other artifacts in the University of Pennsylvania’s collection were x-rayed. Since then X-radiography has been used widely in archaeology and conservation.
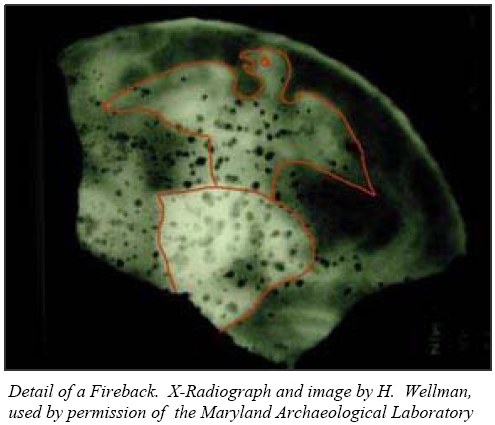
Detail of a Fireback. X-Radiograph and image by H. Wellman, used by permission of the Maryland Archaeological Laboratory
X-rays penetrate matter, and are attenuated (absorbed and scattered) to different degrees depending on the material, its density, and its thickness. This phenomenon is made visible to the eye by creating shadow radiographs. Typically, a piece of film is placed behind the object. The X-rays that pass through the object strike the film, exposing it like sunlight wexpose photographic film. Once the film ideveloped, the areas that have receivedrays will appear black whereas the areas that have not will appear white. Variations of gray between the two extremes inchanges in the density of the material or differences in materials.
The difference in radio-opacity of various materials and their corrosion and degradation products allows conservators and archaeologists to not only see individual components of a piece but also to get information about the condition of the object.
Archaeological objects are typically x-rayed for several reasons:
- To identify corroded or concreted objects: X-radiographs can reveal surfaces and shapes obscured by thick layers of corrosion and burial soil. Maker’s marks or inscriptions, inlay, and other forms of decoration can be identified in an x-radiograph.
- To assess the condition of an object: areas of corrosion, cracks, wear, and other types of weakness are very obvious on a properly exposed x-radiograph.
- To document an object: not all objects can be completely conserved, or may be preserved in an unconserved state for future study. X-radiographs are a good way to capture an image of an object at a point in time. This image can be compared to images taken in the future to determine if objects continue to degrade in storage.
X-ray units consist of several key components: the x-ray tube, a control unit, a suitable cooling unit and the shielding, usually lead (to contain the x-rays in an enclosed space). Medical and dental x-ray units typically produce x-rays of lower intensity than industrial units; for large or dense metal objects, an industrial unit may be necessary. An x-ray unit typically used for archaeology and museums might be house in a shielded cabinet, which limits the size of the object that can be x-rayed, or it might be housed in a specially constructed room dedicated to radiography activities. A room allows radiography of larger objects but requires a dedicated space and significant amount of shielding and is much more expensive than a cabinet. Image capture is achieved by one of two methods: on film, where an image is created on a piece of radiographic film, or filmless capture, which uses a reusable light-sensitive cartridge to capture a digital image. Filmless capture is a relatively recent technology and is significantly more expensive than film capture; however a digital image may be manipulated in ways that film cannot and there are fewer issues of chemical use and disposal. Film radiographs are remarkably stable but are subject to deterioration in damp conditions (the emulsion on the film can swell and stick to other materials) or when exposed to excessive amounts of light (they will fade).
Although x-rays are a powerful tool for the identification and assessment of objects, interpretation of the x-radiographs is not always straightforward. One problem is that recording a three-dimensional object on a two dimensional film typically results in a loss of depth, which can make interpretation difficult. There are ways to adjust for this such as the creation of stereo-radiographs or the use of Computer-aided Tomography (CT), which measure the relative transmission of x-rays through an object in differential directions and then computes this information to construct a cross-sectional x-ray. When examining a traditional x-ray always consider the artifact and the x-ray in tandem to ensure that all the dimensions of the piece are being considered. Another problem with x-rays is that it may not be possible to see all the components of an object with a single exposure. This is particularly problematic with objects made of materials with very different densities, such as metals and organics. For example, an x-ray beam strong enough to penetrate a thick metal object will produce a radiograph that shows the metal object very well, but will have penetrated the less dense organic material so fully that no image of the organic material is created. Therefore in order to see the organic material, the object must be x-rayed again with a less powerful exposure (usually a lower intensity or a shorter exposure time), which will not provide a good image of the metal component. Other techniques such as xeroradiography or neutron radiation are sometimes used to assess these types of objects. Neutron radiation will pass through the metal and be absorbed by the organic component. This allows the assessment of an organic material beneath a metal sheath for example. These techniques also have disadvantages, and require a different set of equipment and skills.
Additional resources:
X-Radiography as a Conservation Assessment Tool for Archaeological Collections
A PowerPoint presentation by Howard Wellman, Maryland Archaeological Laboratory.
Lang, J & Middleton, A (1997) Radiography of Cultural Materials. London: Butterworth-Heinemann
Copyright © 2006 Colleen Brady, Molly Gleeson, Melba Myers, Claire Peachey, Betty Seifert, Howard Wellman, Emily Williams, Lisa Young. All rights reserved. Commercial use or publication of text and graphic images is prohibited. Authors reserve the right to update this information as appropriate.