

Bottle Finishes (aka
"Lips")
& Closures
 
Bottle Finishes (aka
"Lips") |
| Main Subject Pages |
| Home |
| Dating |
| Typing/Shapes |
|
Glassmaking ▪Makers Marks |
| Colors |
|
Finishes & Closures ▪Finish Types 1 ▪Finish Types 2 ▪Finish Types 3 ▪Bottle Closures |
| Body & Seams |
| Bases |
| Fragment ID |
| Glossary |
| References |
| Links |
| FAQ's |
| About this site |
| Website Map |
HOME: Bottle Finishes & Closures - Part I
INTRODUCTION
Bottle
finishes or "lips" are almost as varied as the bottle shapes themselves.
The term "finish" originates with the mouth-blown bottle production
process where the last step in completing a finished bottle was to "finish the
lip." Other alternative names for the finish besides lip was "top,"
"mouth," or "corkage" (Howard 1950; White 1978). A
period term for finishing a bottles was "goffering" (U. S. Patent Office 1886).
Conversely, with semi-automatic and fully automatic bottle machines, the lip or
finish was (and still is)
the first forming step in the bottle making process. The finish is fully formed in the
first "blank" or
parison mold which only pre-forms the remainder of the bottle
body. The blank mold concept was the revolutionary invention (patented in
1882) of
Philip Arbogast
of Philadelphia, PA. although the implementation of the blank mold - which forms
the "finish" of the bottle - was not realized until the 1890s (Howard 1950). Completion of the body shape occurs in the second "finishing" or
blow mold.
A closure is the device that in conjunction with the finish (usually), was used to seal the contents inside the bottle. The finish and closure are interrelated entities of any bottle. The closure must conform to the finish in order to function, and vice versa. The invention of some closures correspond to certain finishes and a closure may be adapted to old finishes; or both the finish and closure are invented together (Berge 1980).
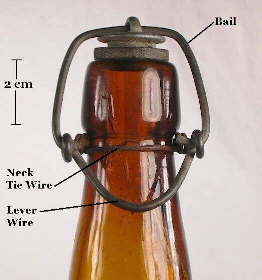 The most common closures during the mouth-blown
bottle era (19th & early 20th centuries) were various shapes and sizes of the
simple cork. However, the variety of closures that can be found on bottles
produced during the time span that this website covers (1800 to the mid 20th
century) at least rivals the diversity of finish forms and variations.
The closure pictured to the right is a Lightning type stopper on a type of "blob" finish
dating from the 1890s. Although some closures are briefly mentioned on this page, they are primarily
covered on a related but separate; a link to the Closures page is just below.)
The use of the word "finish" to describe the entire lip and collar has carried on and is the preferred term for describing everything above the upper terminus of the neck for all bottles - mouth-blown and machine made. White's (1978) excellent reference on bottle nomenclature and Ketchum's (1975) general bottle collecting book included the entire neck above the shoulder as part of their definition of a finish, though the neck is not included by most other authors (Toulouse 1969b; Deiss 1981; Creswick 1987; Jones & Sullivan 1989; Fike 1998 & others). For this website, the neck is not considered part of the finish though it is very important to discuss in conjunction with the finish. See the Bottle Morphology page for more illustrated information on descriptive bottle terminology, including the primary finish components if the finish has more than one physical part - the lip (upper finish part) and collar (lower finish part). If a two-part finish, the lip is also frequently referred to simply as the upper part and the collar as the lower part. If a three-part finish, the middle part is referred to as that - the middle part.
Determining the method or process employed in the finishing of a bottle can be a useful diagnostic tool in helping date or age a given bottle. Similarly, both the type or style of finish and the method of closure (i.e., how the bottle was sealed) can variably assist with the determination of age as well as what the bottle was likely used for (i.e., what "type" of bottle it is).
Information on these subjects is the purpose of
this page (Part I) and the two associated web pages (Parts II & III), which are
described as follows:
|
"Bottle Finishes & Closures" Related Pages Part I: Methods
of Finishing a Bottle - This section deals with the actual
finishing process, i.e., how finishes were formed and manipulated and the dating
of different finishing methods for mouth-blown bottles. The changeover
period from mouth-blown to machine-made bottles is also discussed as it
relates to finish method dating accuracy. (This part is located
on this page below.) Click on the hyperlinked subjects above to move directly to the beginning of the specific page. |
If you have not read the introductory portions of
the Dating page, please click on
Cautionary Note which covers the limitations of the morphology
based dating of historic bottles as well as other pertinent dating information. Also see the dating
Examples
page for specific examples on the process of dating a bottle. That page also provides some information on what a user
can do to pursue more information once they arrive at the end of the dating (and
typing) tools available on this website. For illustrative purposes, two
bottle dating examples are are also included on this page to
help explain the specific processes and limitations inherent in finish related dating.
|
Part I: Methods of Finishing a Bottle A. Mouth-blown bottles: An assortment of methods were employed on mouth-blown bottles to manipulate the glass at the end of the neck - or glass added to the upper neck - to produce a finish or lip and complete a finished bottle. Some finishing methods could only produce one or two types of finishes. Other methods produced just about any type or style of finish. In general, the earlier finishing methods are the most restrictive with the later methods the most versatile. The major finishing methods are covered here beginning with the generally earliest methods and moving towards the most recent. This section has the following major parts:
B. Machine-made bottles: All machine-made bottle finishes - both automatic and semi-automatic - were/are produced in a similar fashion, but in way much differently than with mouth-blown bottles. Thus, Part I concentrates primarily on mouth-blown finishing methods since there is much less to discuss with machine-made finishes. However, bottle type specific date ranges for the transition from mouth-blown bottles/finishes to machine-made bottles/finishes are discussed at length towards the bottom of this page. This discussion is relevant here because these transition dating estimates can often provide for excellent dating "breaks" for many classes of historic bottles. |
At some point in the production of all mouth-blown bottles, the fully expanded bottle must be removed from the blowpipe. Before removing the blowpipe, the bottle must first be grasped or held in some fashion; a subject covered more extensively on the Bottle Bases page. Also see snap case or pontil rod. Once securely held, the process of removing the blowpipe begins...
Cracking-off, bursting-off and shearing
|
Mechanical Cracking-Off Method One interesting variation of the "cracking-off" method is found in William F. Modes (of Modes Glass Company and Streator Bottle & Glass Company fame) 1887 patent for a "Mold for Blowing Turned Bottles." This patent included two significant innovations. The first was a rotating mold base plate which would allow for embossing on the base of a turn-mold bottle. The other dealt with an "...adjustable cutter placed at the top of the mold, whereby it, by the rotation of the glass in the mold, will so nearly sever the surplus material when the glass is soft that a little jar will break off the part to be removed. The means now employed for severing the surplus glass is a file kept wet with water, involving considerable labor as compared with my cutter, and the work is not so well done." While the bottle was rotated the "cutter" would score the glass at the desired ("adjustable") cracking-off point which was consummated with a sharp tap on the blow-pipe. This is one of the many innovations that gradually moved the process of bottle making inexorably towards full mechanization. To view the entire patent click on the following link: Patent #364,840 - "Mold for Blowing Turned Bottles" - June 14, 1887. |
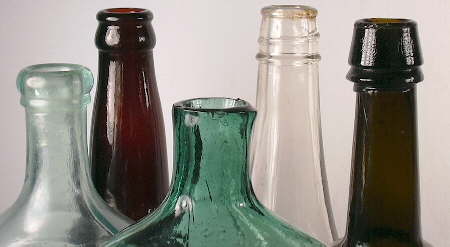
Mouth-blown bottles were removed from the blowpipe via one of three primary methods: the cracking-off process, the bursting-off method, or by shearing (cutting) the neck off from the blowpipe. All of these methods of blowpipe detachment are usually indistinguishable from each other on the finished item since the vast majority of bottles received post-blowpipe manipulation at the removal point (Munsey 1970). The finish on the green bottle in the center of the picture at the top of this page is an example where it is impossible to tell how the blowpipe was removed since the finish received post-blowpipe re-firing and possibly some tooling.
Cracking-off ("cracked-off," "wetting off") is the process of applying a small amount of water, usually via a wet wooden paddle a cold and/or wet piece of iron, to the point on the hot just blown bottle where the glassmaker wishes to remove it from the blowpipe. Applying water or cold/wet iron (compared to the very hot glass) weakens the glass at the point of application and all that is needed to sever the bottle from the blowpipe is a sharp tap on the blowpipe itself with one of the glassmaker's tools (U. S. Patent Office 1887; Kendrick 1968; Innes 1976). (Note: The box to the right describes a partial mechanical variation of this age-old technique.) The result of this process is a variably rough and sharp tubular end to the neck which was usually at least fire polished.
The picture above shows a non-fire polished, cracked-off finish on a 1850s era "scroll" flask which was classified as GIX-15 by McKearin & Wilson (1978). On some early American bottles - typically 1860s or before like the pictured flask - this was the rough though completed finish. Based on empirical observations, American-made bottles with this most cursory of finishes rarely date after the 1860s.
The bursting-off (aka "burst-off" or blow-over) method results in a similar, roughly broken off, unfinished appearance to the bore (image to the right below). This process entailed the blowing of a relatively large bubble in the glass just above the mold top (i.e., above the upper end of the bottle neck beyond the mold edge) which thinned the glass sufficiently to allow the bubble to "burst" with either a subtle twist of the blowpipe, by pulling up on the bubble, and/or a larger puff of air from the blower (gaffer). The bursting of the bubble detached the blowpipe instantly (Howard 1950). The bottle is then removed from the mold via tongs or a metal (or wooden) rod stuck in the bore.
Many bottles imported from Europe - particularly British made ink
and small sauce bottles -
can have this as the completed, albeit crude, finish and can date as late as 1920 (Wills
1974; Boow 1991). The
burst-off finish looks very similar to the cracked-off finish but does have some
subtly differing characteristics, as follows:
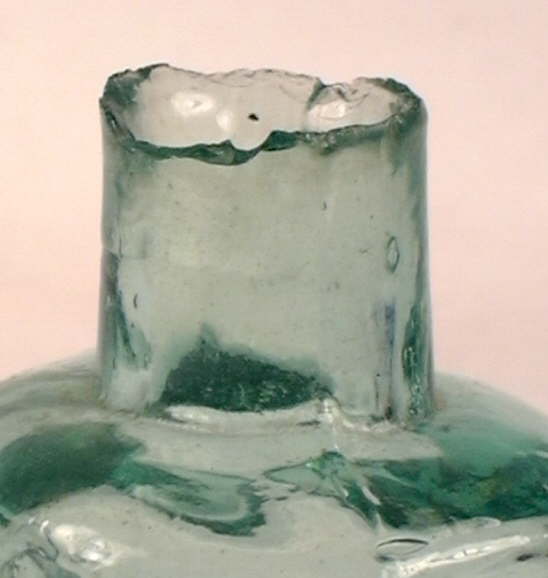
These type bottles are occasionally encountered on American historic archaeological sites, though most of the crudely made, burst-off bottles seen today were relatively recently imported from England for the American collector market. These cheaply produced bottles primarily date from the 1890s to 1920s era when bottle machines were rapidly dominating the market and are reflection of the economic pressures that eventually overwhelmed factories that still used older methods (Wills 1974; Boow 1991). The image to the right is an example of a burst-off finish on an English ink bottle made during the early 20th century. The burst-off finish seems to infrequently occur on American made items from the mid to late 19th century; the rough surface was usually ground down - a process described below (Jones & Sullivan 1989).
The quick burst-off blowpipe removal method was likely utilized from the earliest days of glassmaking in the U. S., though most bottles would have received additional post-molding re-firing and/or manipulation to produce a refined finish that was more conducive to different closures. The following is an excerpt from Trowbridge (1870) describing the blow-over/burst-off method in creative detail:
The blower gathered the melted glass, rolled it on a marver, blew into it slightly, then dropped it, in a long, purse-shaped, glowing lump, into the open mould. This was immediately closed by the boy; then the blower blew until a bubble, pushed up on the top of the mould, expanded to the size of a football, and to the thinness of the thinnest transparent film, and finally burst with a loud pop, flying into shreds of tinsel, light as feathers. The mould was then opened and a caster-vial with figured sides was exposed...
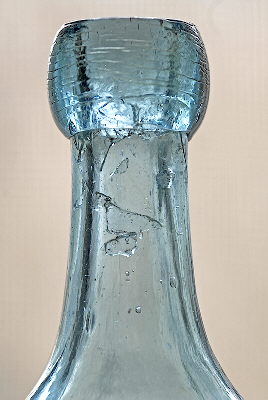
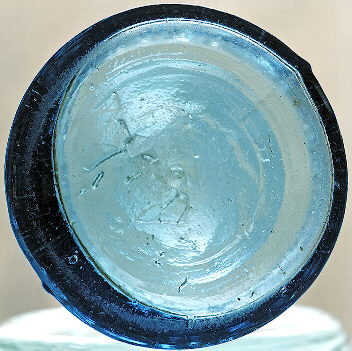 As
noted above, when a bottle was burst-off from the blowpipe (an obvious hazard
for the mold operator!) the thin glass from the burst bubble collected in and
around the mold. The residual glass on the end of the blowpipe (called the
"moil") was beat off the tip to keep the blowpipe working properly; this is
shown in the film clip linked below. The remainder of the thin fragmented
bubble glass scattered around the immediate work area though some occasionally
fell into the bore of the bottle adhering to the upper neck and even base of the
bottle. The image to the left shows fragments of very thin glass adhering
to the inside of the neck below the blowpipe removal point and applied finish.
The view to the right (click to enlarge both images) shows similar fragments
inside the bottle on the base. Click
base fragment view looking down the bore to see the glass fragments inside
on the base looking down the neck of the bottle. This feature could only
be caused by the burst-off fragments becoming "stuck" to the hot glass
immediately after the bubble burst and is proof that the burst-off method was
used for blowpipe removal. (Note: Sometimes such pieces are also seen
imbedded on the outside of the body or base of the bottle indicating that some
could fall into the mold and be picked up by the next bottle blown.)
The bottle illustrated here is a blob soda which is embossed with J. BORN / MINERAL WATER / CINCINNATI on one side; a large letter B and THIS BOTTLE NOT TO BE SOLD on the reverse. It dates from the mid 1850s to the 1860s based on these being found both with and without iron pontil scars indicating manufacturing during the transition time from pontil rods to snap tools (von Mechow 2016). Click full sized view of this soda bottle to see such. (All of these bottle photos courtesy of Richard D. Martin.)
The link below is to an amazing early 20th century film clip of a mouth-blown "shop" blowing bottles. The overall process of blowing is described on other website pages, though of particular note here is that the gaffers in this shop are using the burst-off method to detach the blowpipe. Note that the gaffer quickly inflates the bottle and a large blow-over and efficiently bursts off the blowpipe by pulling it skillfully away from the mold while twisting and/or snapping it abruptly. One can almost hear the "pop" as described by Trowbridge (1870) above! This film clip indicates that manually shearing or cracking off wasn't always used or necessary. In fact, the burst-off method was probably quite common, very fast and possibly the primary way bottles were detached from the blowpipe. Although this film clip may have been done to show the quickness that blowers could achieve mouth-blowing bottles, it is likely that the bottle produced would normally have been finished further by hand and the blow over and burst-off "finish" not left as is. Film clip is compliments of the Owens-Illinois Glass Company (thanks to Phil Perry).
Early 20th century mouth-blown bottle making film clip.
Shearing was both a finish style and blowpipe detachment method produced by detaching the blowpipe from the bottle with some type of shears which typically resembled tin snips (Hunter 1950). The shears cut the hot glass analogous to cutting thick plastic with scissors (Barber 1900). It is likely that the shears which glassmakers used were more frequently used to score the glass at the desired break-off point so that a tap of the blowpipe would detach the the bottle (Jones & Sullivan 1989); similar to the cracking off described earlier. The resulting finish - if little manipulation was applied besides some very cursory tooling to smooth out the edge - is called a sheared lip or finish. The term "sheared lip" is commonly used by collectors and archaeologists to refer to simple cracked-off finishes, true sheared finishes, and to the fire polished versions of both methods (described next). Sheared finish bottles date similarly to the cracked-off finishes, i.e., usually prior to 1870. Click sheared finish for a picture of a finish that is typical of what is called sheared.
|
Once cracked-off, burst-off or sheared from the blowpipe the vast majority of mouth-blown bottles received additional hand manipulation devoted to forming a finish that made the bottle opening (bore) more uniform or suitable for some closure method. The primary post-blowpipe finish manipulations are described as follow, beginning with the generally oldest methods. |
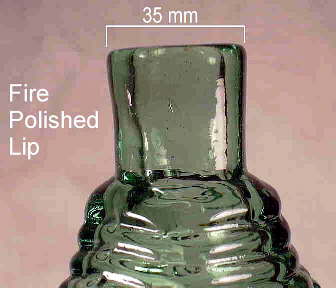 Once
the bottle was removed from the blowpipe as described above, one
additional finishing step was usually added even if no specific finish
type was to be formed. The
upper neck of the bottle was reheated in a furnace to smooth out the crude or sharp edges where
the blowpipe was detached. The result of fire polishing is a finish or lip edge that
is smooth and glossy with the rim being rounded and slightly
thickened (Jones & Sullivan 1989). The picture to the right is a close-up picture of a finish with these features on an early American
figured flask (ca. 1820 and classified as GVIII-2 by McKearin & Wilson [1978]). This method of
completed finish - cracking-off, bursting-off, or shearing followed by fire polishing - was commonly
used on
figured flasks dating from the first half of the 19th century and is very rarely
found on bottles produced after about 1860 (Deiss 1981). Click
sunburst
flask to view a picture of the entire flask noted above.
Note: Re-firing in the finish area was a common pre-finishing task to soften the glass for finish formation or manipulation with fire polishing a common post-finishing treatment to smooth out the irregularities of most types of applied and tooled finishes on mouth-blown bottles. The process was likely used well into the 20th century until mouth-blown bottles were replaced by automatic bottle machines. This is different than the simple cracked-off/sheared then fire polished finish described here. (Incidentally, it appears that in the earlier days of bottle making machines, bottles were sometimes fire polished at the finish (or entire body) to smooth out irregularities of the sealing surface and/or to achieve a polished finished appearance to the bottle [Lockhart et al. 2009b])
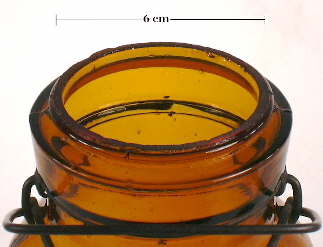 Along with fire polishing, the grinding
down of the cracked-off (or burst-off blow over) top surface of the lip or rim was one of the simplest
methods for "finishing" a bottle since the functional parts of this finish were
fully mold formed and not
tooled to shape. Once removed from the blowpipe and
annealed, the rough rim was ground down flat to "finish" the bottle and sometimes to
facilitate closure sealing. The ground finish pictured to the left is on a
Lightning fruit jar
which dates from between 1882 and the early 1900s (Toulouse 1969a; Creswick
1987). Note: The sealing surface for this jar was a rubber gasket placed
on the horizontal ledge just below the ground finish rim, not the
ground rim surface itself. This is typical for ground rim/lip fruit jars
including the famous Mason fruit jar which sealed on the shoulder below the
external threads.
This finishing process produces the following general diagnostic characteristics: the extreme upper horizontal surface of the lip (rim) is flat (not rounded at all) and slightly rough to the touch - like fine grit sandpaper; there are usually tiny chips or roughness along the inside and outside edges resulting from the grinding process; there is often a slightly opaque, white-ish appearance to ground surface; and the vertical side mold seam end right at the top outside edge of the ground rim and do not curl over the top of the rim.
The following is quoted from Toulouse's book Fruit Jars (1969a) describing the process of grinding fruit jar rims as well as the general working conditions in glass manufacturing plants of a century ago:
The grinding operation was a boy's job. The boys squatted around a horizontally rotating grinding wheel on which the abrasive of sand and water flowed from a central spout. Jigs and fixtures held the jars upright on the wheel, and the boys supplied the pressure necessary to hold the jar top firmly on the wheel. The hours were long and (it)...was cold, wet, debilitating work, and a notorious child labor...that took its toll in health-wrecked men, if not an early demise of the boys... A boy was fortunate if he were transferred early enough to the job of "snapper up" at the molds, or "carry-in" boy to the lehrs. One of my men retired at the age of sixty-five after fifty-three years in the glass business; he had started at the grind shop at twelve.
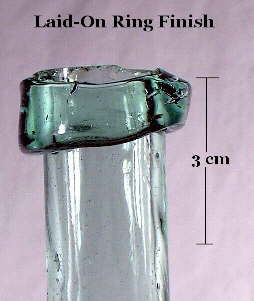 Laid-on ring
- (aka "string rim")
Once the blowpipe was removed, a string or band of glass was laid around the outside of the extreme upper neck forming the laid-on ring finish. Once applied, this band/string of glass received little or no post-glass application tool work. ( Click applying a string finish to view an illustration of this process.) The entire finish is comprised of the applied glass and sheared/cracked-off bore of the bottle. This ring of glass performed several functions - to give strength reinforcement to the bore of the bottle and to provide an anchor for wiring down a cork if necessary. This method of finishing produced primitive applied finishes which are the precursors to the applied finish (covered later).
The image to the right is of a mid-19th century French wine bottle finish which shows crudity typical with this type finish. There are many variations on the theme of the laid-on ring or string finish. If interested in viewing more examples, consult either Jones (1986: 49-71) or Jones & Sullivan (1989: 95-96). Laid-on ring finishes typically date from - or prior to - the 1860s and are particularly common on bottles made prior to 1850 (Deiss 1981). Be aware that there are many bottles that appear to have laid-on ring finishes but are actually either applied or tooled (covered later on this page). The subtle variations differentiating these can be difficult to even the trained eye, though the true laid-on ring is usually crudely asymmetrical, has no horizontally concentric tooling marks in evidence on the finish, and simply looks as though a strip of glass was wrapped around the upper neck just below the bore with little other handwork done - which is just what was done. (See the finish examples covered in Part II: Types or Styles of Finishes.)
Rolled or folded-in/out finish
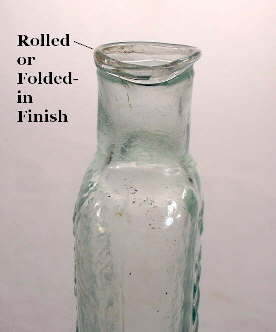 This
method of producing a finish is a very early use of some type(s) of finish
manipulation tools and is most common on early figured flasks, medicinal,
and food bottles dating from or before the 1870s (Deiss 1981). Once
the blowpipe was removed from the bottle, the hot glass at the removal
point was re-fired as necessary then either rolled/folded into the bore of the
bottle or folded out onto the extreme upper neck (with
jacks or some other simple tool) to smooth out and form
this simple finish
(Jones & Sullivan 1989). This folding certainly provided extra strength
to the rim and upper bore of the bottle by "doubling" over the glass.
The picture to the left shows a crudely rolled or folded-in finish on an 1850s pontiled medicinal bottle (DR. D. JAYNE'S / HAIR TONIC - PHILADA (Philadelphia, PA.)). The finish on the pictured bottle is crude enough so that parts of it appear to be rolled out, although when in hand, the glass is obviously inwards. For an example of an rolled finish that was distinctly folded out, click HERE. When rolled to the inside, this finish is also called an infolded lip (White 1978).
A variation of the above was the flared or flanged lip or finish. This method also entailed the use of some type(s) of simple tool(s) to manipulate the hot glass at the end of the neck to create a relatively thin finish which projects away from the top of the bore at a more or less 90° angle. According to Kendrick (1968), the mouth of a bottle "...could be expanded to form the flared lip, either by the use of a jack, or by inserting a cone-shaped plug into the mouth of the bottle as the pliable mass (glass) rotated." (Click forming a flared finish to view an illustration of a gaffer working at a chair forming a flared finish.) The picture below right shows a flared finish on an ink or utility bottle produced by an eastern American glasshouse (ca. 1845-1855).
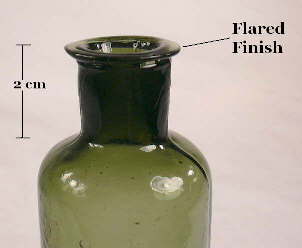 Based primarily on empirical observations,
but also corroborated in Deiss (1981), this
method of finishing was most commonly used in the U.S. between the 1820s and
about 1870,
though it can date back to antiquity in Europe (Toulouse 1969b; Van den Bossche
2001).
This early flared finish can be difficult to discriminate from finishes produced by
the methods covered below. To the experienced eye it can be distinguished from later
applied or tooled flared finishes by the
thinness of the glass that forms the flared portion; much thinner glass than produced
by these other methods. See Part II: Types or Styles of Finishes for more information; this finish is included within the
discussion of
wide prescription finish.
Note: Although this type finish was "tooled" (i.e., formed with tools) and formed from the reheated glass at the sheared or cracked-off neck opening (i.e., below the shearing/cracking off point), it was differently manipulated than the later tooled finishing method discussed below which was formed with a more technologically advanced finishing (aka "lipping" tool. This is discussed more in the tooled finishes section below.
Both the rolled and flared finishes
were formed from the reheating and working of the glass at the blowpipe
detachment area with some type of primitive tool(s) and not to have entailed the addition of any extra, post-blowpipe
removal glass to
the finish (Toulouse 1969b). This differentiates these methods from the next important one...
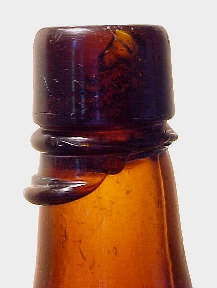 Between the early 1800s
(the beginning of the era covered by this website) and the
late 1880s -
particularly between about 1830 and 1885 - the most common way of finishing an
American-made
bottle entailed an application of additional glass at the point where the
blowpipe was removed (U. S. Patent Office 1860; Howard 1950; Jones 1986). Specifically,
a variably thick (depending on the finish type and size desired) strip or
"string" of hot glass was added at or immediately below the blowpipe removal point via
a pontil rod or other tool (ring
iron) as the bottle was rotated by another
glassworker holding it by the base with either a pontil rod or a
snap or snap-case tool (McKearin & Wilson 1978; Jones & Sullivan 1989).
 This applied hot glass (refired as necessary to keep it
soft) was then manipulated with a
significantly more technologically advanced "finishing tool" (aka "rounding
tool," "pressing tool" or "lipping tool") to form a wide variety of different finish types
that could be more complex and varying than the earlier laid-on rings, and other
simple finishes noted above, which were formed with very simple tools (U. S. Patent Office 1875,
1876a; 1893). To the right is an illustration from an 1876 patent
which shows a typical calipers type finishing tool used to create a type of
applied, one-part "blob" finish used for carbonated beverages. (Click
J. Lamont's May 29, 1876 Patent #183,267 to see the entire patent.) As
with other finishing tools for applied finishes, the illustrated design only
formed the dimensions of the finish itself and did not really affect the upper
neck below the finish - an important distinction when comparing applied
finishing to the "tooled" finishing methods discussed later. The image to
the above left is of an 1870s to early 1880s era applied finish with obvious
"slop-over" of the applied glass onto the upper neck which was beyond the reach
of the finishing tool - a very common attribute of applied finishes.
(Applied finishing attributes are discussed at length below.)
The following excerpt is from an 1860 jar mold patent (#30,063) describing the process that was used to form bottles at that time. In this case, the brief though succinct narrative describes the mouth-blown production of jars with applied finishes. At that time the most common finish type on jars were the groove ring wax seal finish (an example of which is pictured further down this page to the left) although the process for forming and finishing most bottle types at that time was identical to the patent description:
"...it has been customary to mold the body and neck of the jar in molds of two parts essentially like...(the mold in the patent). After the jar has been thus formed and removed from the mold a portion of melted glass is taken and united to the top of the jar and the...(finish)...is then...(formed with)...the plastic glass by a tool adapted to the purpose. This process is necessarily slow and laborious and the work when completed is not so uniform and complete as when the jar is finished in the mold and at one operation...(which was the purpose of the specific patented mold). (U. S. Patent Office 1860)
This clearly describes the application and subsequent tooling to shape of the finishing glass for an applied finish and even notes the crudity ("...not so uniform...") that is often a result of such an operation. This patent is available on this website at this link: http://www.sha.org/bottle/pdffiles/hemingray1860.pdf
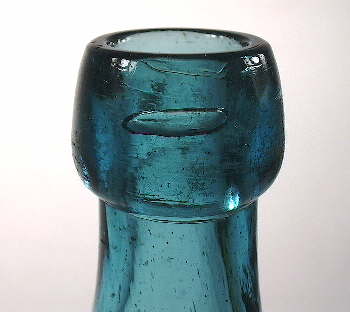 The
amber, applied,
two-part brandy finish pictured at the beginning of this section (above left) shows distinct evidence of the tooling
which "overshot" the lower edge of the finish (collar) and flattened down some
of the applied glass spillover on the neck. (Height of this finish is
about an inch [2.5-3 cm].) The image to the immediate left shows an elongated or
"stretched" horizontal bubble within a one-part blob finish indicating how the
glass was wrapped around the cracked-off/sheared neck. Interior bubbles in
glass will often lie parallel to the direction in which the glass was stretched
when hot if that stretching was intense enough. (Note: Bubbles in the body of a
mouth-blown bottle will usually be more vertically elongated reflecting the
vertical stretching of glass as the bottle is expanded [empirical
observations]).
This more entailed tooling of the finish glass and generally more complex design of most applied finishes is what differentiates this method of finishing from the simple "laid-on ring" finish described earlier. (Note: A laid-on ring must be considered a type of simple and early applied finish since the "ring" was of applied glass, often received some cursory tooling, and had to have been wrapped around - applied to - the neck with a tool. This distinction is really only pertinent to bottles having the following one-part finish types: champagne, string rim, or flared ring.) Groove ring wax seal canning jars have a type of applied finish that is called a "pressed, laid-on ring" and was largely produced the same way as the applied finish described above, with the forming to shape done with some sort of pressing tool in a single operation (Toulouse 1969a; Creswick 1987). The picture below left is of a pressed laid-on ring finish on an 1870s canning jar.
The 7th edition (1842) of the Encyclopedia Britannica (Vol. X, p. 579) contains an English period explanation of the process of applying and tooling a finish beginning from the point where the bottle is detached from the blowpipe:
The finisher then warms the bottle at the furnace, and taking out a small quantity of metal (i.e., glass) on what is termed a ring iron, he turns it once round the mouth forming the ring seen at the mouth of bottles. He then employs the shears (finishing tool) to give shape to the neck. One of the blades of the shears has a piece of brass in the center, tapered like a common cork, which forms the mouth (bore or inside of the finish), to the other blade is attached a piece of brass, used to form the ring (outside of the finish). (From McKearin & Wilson 1978; clarification added parenthetically.)
 The
"shears" noted were an early variety of finishing tool which is not precisely
pictured or illustrated on this website. (An artists rendition
of the described "shears" may be found on
page 217 of McKearin & Wilson [1978] or page 52 of Deiss [1981] and is
reproduced at this link:
1842 finishing shears illustration).
The “piece of brass
in the center” is analogous to the plug shown on the illustrated
finishing
tools which fits into the bore of the bottle. The “piece of brass used
to form the ring” is analogous to the pair of jaws at the end of each
caliper arm. The various finishing tool illustrations on this page help to
visualize this. In any event, the 1842
description above briefly but clearly describes the post-blowpipe
application of additional glass which is then formed to shape with a tool -
i.e., an applied finish.
The
"shears" noted were an early variety of finishing tool which is not precisely
pictured or illustrated on this website. (An artists rendition
of the described "shears" may be found on
page 217 of McKearin & Wilson [1978] or page 52 of Deiss [1981] and is
reproduced at this link:
1842 finishing shears illustration).
The “piece of brass
in the center” is analogous to the plug shown on the illustrated
finishing
tools which fits into the bore of the bottle. The “piece of brass used
to form the ring” is analogous to the pair of jaws at the end of each
caliper arm. The various finishing tool illustrations on this page help to
visualize this. In any event, the 1842
description above briefly but clearly describes the post-blowpipe
application of additional glass which is then formed to shape with a tool -
i.e., an applied finish.
The first finishing tool to be patented in the United States was at least as early as 1855 although other domestic and imported finishing tools were already long in use (U. S. Patent Office 1855; empirical observations). Click Amasa Stone's August 7, 1855 Patent #13,402 to see the original 1855 patent - illustrations and descriptive text.
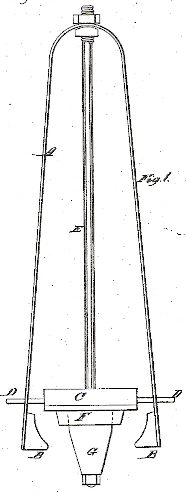
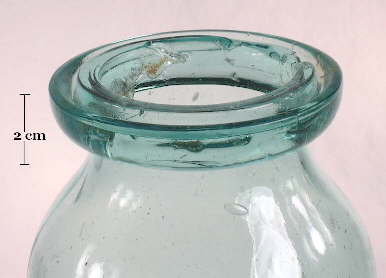 The
illustration to the right is from an 1856 patent for a finishing tool that
was certainly used to form an applied finish; in this case the groove-ring
finishes on wax seal canning jars (image to the left). This is the
second known patent for a finishing tool and is the finishing tool patent noted
as the first one by Toulouse (1969b). Like Stone's 1855 patent noted
above, this was
not for the concept of a finishing tool - tools which were already in use
and certainly not patentable - but instead for an improvement
in such tools for producing the "groove" in the groove-ring finish (part "F" in
the illustration formed the groove). Click
Amasa Stone's September 23, 1856 Patent #15,788 to see this entire
patent - illustrations and descriptive text. The "jaws" ("B"
in the patent illustration) of these tools formed the outside of the finish
when rotated and did not touch the upper neck of the bottle.
Horizontal concentric rings caused by the rotation of these tools are often faintly visible
on the outside surface of applied finishes. They are rarely visible on
the extreme upper neck of applied finish bottles - an extremely common
attribute of the "tooled" type finishes covered later
- since the jaws did not extend beyond the base of the finish.
Finishing
tools for other applied finish conformations (e.g., mineral finish, blob
finish, etc.) had differently shaped "jaws" than that shown in this
illustration for jar finishes.
(As a side note, click on the following link - Hiram Frank - Patent #130,207 - which is of an 1872 patent illustrating a finishing tool similar to that illustrated except designed to produce a finish with internal finish threads which accepted a threaded glass stopper [U. S. Patent Office 1872; Lockhart et al. unpublished manuscript 2007].)
The collector term - and the term used on this website - for this general category of finishing and finishes is an applied finish or sometimes a "true" applied finish. These could also be termed "applied & tooled" finishes since tooling of the added glass was necessary to create the desired finish shape and size (Deiss 1981; Roller 1983; Boow 1991). For simplicity it is just referred to as an applied finish on this website. This type of finish also goes by an array of mostly collector originated terms including "crudely applied lip," "glob top," "globby top," "drippy top", etc. It should be noted that applied finishes - especially earlier examples (1830s to 1860s) - tend to be more substantial or bulky and crude compared to later applied finishes and the "tooled" finishes discussed next, though there are (of course) many exceptions. This is likely because of the quickly evolving and improving techniques and tools as time progressed during the last half of the 19th century - a period of explosive innovation in the American glass making industry (Scoville 1948; Deiss pers. comm. 2003).
Some authors, however, have criticized the use of the term "applied lip" as it tells "...nothing of the method (used to produce the finish)..." (Toulouse 1969b) or that "...the term is so broadly interpreted as to render it meaningless" (Jones & Sullivan 1989). This certainly has been true. Many people - collectors and archaeologists alike - too broadly use the term "applied lip" or "applied finish" to refer to any finish on a mouth-blown, non-machine-made bottle where the side mold seam does not terminate at the very top of the finish. The origin of this broad interpretation appears to have come from John C. Tibbitts book "1200 Bottles Priced" who described an applied lip "...to include any lip or mouth that was hand worked after the bottle was broken off from the blowpipe. Among others, it includes sheared lip, rolled lip, applied collar on sheared lip, applied collar below sheared lip, applied blob, etc." (Tibbitts 1964). Tibbitts so broadly defined an applied lip as to include virtually any finish on a mouth-blown bottle including what this website calls a "tooled" finish (discussed in the next section).
As described on this website, the production of a "tooled" or "improved tooled" finish (next section) entailed a different manufacturing process than a "true" applied finish. It is important to clearly differentiate "tooled" and "applied" finishes for dating purposes; thus this page. Simply expressed, an “applied” finish entailed the application of additional glass and a “tooled finish” typically did not.
This website primarily uses the term applied finish, though may use the terms "true" applied finish or even applied lip to refer to a separately applied finish which has the following diagnostic features:
|
Diagnostic characteristics of an
applied finish include several or all of the following:
Sometimes - especially with bottles from the first half of the 19th century - all or a portion of the neck was formed by the skill of the glassblower and not actually molded, i.e., only the base, body, and shoulder were molded. No neck side mold seam would be possible on these bottles. The Ricketts molded bottle at this link - 1822 Ricketts liquor bottle - has no mold seam on most of the neck as the mold ended just above the top of the shoulder. In fact, the mold termination point is slightly visible on the pictured bottle as a horizontal line very low down on the neck. Free-formed necks were a common feature of earlier Ricketts bottles.
Note: If the side mold seam does extend
perceptibly into the finish itself -
and the bottle does not have a ground rim (top of the finish) or a sheared/cracked-off
finish - it is always a tooled finish (next section).
This latter concept is one of the few absolutes in the bottle ID world. e. Some applied finishes will exhibit a few to a grouping of small, short fissures or cracks (crazing lines) in the area where the glass was applied to the sheared/cracked-off neck end. This feature is unusual, though not unknown, on tooled finishes and can be quite indicative of the presence of an applied finish. This feature is the result of the difference in temperatures between the applied finishing glass (hot from the glass pot) and the slightly cooler glass of the upper neck, which would have cooled a bit after being cracked-off the blowpipe. NOTE: Most applied finishes will NOT have all five of the features above in evidence. A combination of features (a), (b), and (d) are the most commonly found visible features, with (c) being felt frequently if a finger will fit in the bore. Sometimes a very well executed applied finish ("neatly applied" in collector jargon) will only show the side mold seam disappearing at the base of the finish (a) with maybe some faint tooling marks on the finish itself (d) but not the extreme upper neck. |
The specific dating of bottles with applied finishes is covered after the next section, as the dating of the transition from applied finishes to tooled finishes is somewhat bottle type specific. But before that subject can be covered the "tooled" finishing method must be discussed (next).
 This method of finishing is a result of the
glass for the finish-to-be typically* being blown with the rest of the bottle, not
added in a separate hand application as with the applied finishing method
described above. (See "Important Note" below.) Once the blowpipe was severed from the bottle neck, the
finish was shape formed and made smooth and precise by the reheating or
re-firing of the end
of the neck - with no additional glass added - and hand (mechanically)
compression tooled to shape with a "lipping" or "finishing" tool (Deiss 1981; Roller 1983;
Ring & Ham 1998). To the below left is an image of a typical tool used for
tooled finish forming that dates from between about 1890 and 1910.
(More information on this tool is found a bit further down the page). It was inserted in the neck of the bottle and rotated (or the bottle rotated
with the snap tool) while squeezing the
jaws to form the finish to the desired conformation. It should be noted
that this conformation of finishing tool may have been used for the final forming of
either
tooled or applied finishes. Click
Patent No. 295,848 to view an 1884 patent illustration of a tool that was
most likely used for a tooled finish as described here and which is
explained below (U. S. Patent Office 1884b). Tooled finishes are also called "wiped" finishes by
some - a fairly descriptive term for the process (Preble 1987; Fike 1998).
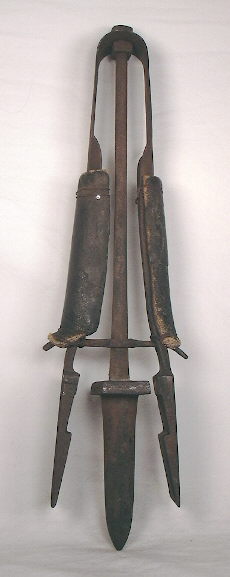 Important Note: On this
website, the term "tooled finish" is not used to describe the primitive tooling
of the simple finishes noted earlier on this page, i.e., the flared finish,
rolled finish, and often the sheared/cracked-off and re-fired finish.
Indeed, these earlier type finishes/methods were typically at least partially
formed with the use of primitive tools so are in a sense a type of "tooled" finish.
Instead, the term "tooled finish" as used on this website refers to the more distinctive finishes
fully formed from non-added glass by use of finishing tools like that
pictured to the left and illustrated at the
link in the above paragraph. This is a fine distinction, but has important
ramifications to the proper dating of bottles.
(*There are indications that some "tooled finishes" - most likely the earliest ones in the 1870s or possible before - were formed from the application of additional glass to the cracked-off/sheared end of the neck. This glass would have then been substantially re-fired in the glory-hole and tooled to the desired shape with all evidence of the applied glass masked by the combination of re-firing and tooling. How these bottles would be differentiated from the regular tooled finishes formed without added glass as described here is unknown and likely can not be. In any event, the identification and dating information described here would still be pertinent to these bottles which exhibit "tooled finish" diagnostic characteristics [Toulouse 1969b].)
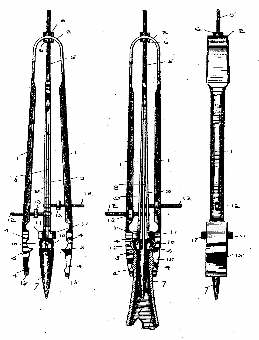 The
patent illustration shown to the right is from an 1893 patent for a "Finishing-tool for Glass
Bottles" which was patented by Thomas K. Sheldon (of Sheldon-Foster Glass Company
fame) and Mirabeau Lynn, both of Indianapolis, IN. (U. S. Patent
Office 1893). This tool was
clearly designed to form "tooled finishes" as described above and as used
on this website, i.e., a tooling to shape of the re-heated glass at or
just below the point that the blowpipe was removed with no application of
additional glass. The patent narrative states the following about
the tools use, which includes a great general description of the tooled
finish type creation process:
The manner of operating our device is as follows: The bottles, which have been completed, and whose necks, mouths and extensions it is desired to finish, are heated to such an extent that the necks become soft and plastic to a degree as to be readily formed or molded in any desired shape. The spindle of the finishing tool is then inserted in the mouth of the bottle, and the spring jaws gradually closed until the finishing dies (Authors note: The finishing dies are the part of the tool that is shown in the illustration to the left encasing the finish of the bottle.) come in contact with the glass. At the same time the bottle is turned, the dies operating on the outside of the bottle neck, and gradually bringing it in the shape of the dies... After the end of the bottle has been finished off as mentioned, by releasing the pressure of the spring jaws...(the tool) may be drawn out of the bottle, which is done and cold enough to retain its shape and may then be removed, and another bottle operated on. (U. S. Patent Office 1893)
Click Patent #500,960 - Finishing-Tool for Glass Bottles - July 4, 1893 to view this entire 1893 patent including the narrative section which explains the construction and use of this finishing tool. Below is an excerpt from a 1917 U. S. government report that describes the re-heating and compression tooling process, conformation and use of a snap tool, the blow-over (aka "burst-off") method of blowpipe removal and confirms that commonly (always?) the bottle itself was rotated and the tool held still which was also described in the 1893 description above:
Continued blowing after the glass has taken the shape of the mold causes the glass above the top of the mold to break. After the mold has been opened and the bottle removed, a snapper-up seizes it with a pair of pincers and places it neck upward in a "snap," a sheet-iron can with an iron handle about 3 feet long, which is of the same size and shape as the bottle. The snapper up rubs the jagged neck of the bottle on a piece of sheet iron and then inserts the bottle, still in the snap, into the "glory hole," or reheating furnace, the neck of the bottle just touching the flame. When the neck has been heated sufficiently to make it workable, the bottle is taken out of the glory hole. With his left hand the finisher rolls the handle of the snap on the horizontal arm of his bench, and with his right hand he finishes the neck of the bottle by means of a tool, one part of which, inserted in the neck, opens it out and the other part, a pair of hinged jaws, makes the lip as the bottle is turned. Three men, constituting "a shop," usually work together, two of them gathering the glass and blowing the bottle and the third finishing the neck. The three may interchangeably perform these operations. (Palmer et al. 1917)
Empirical observations by the author indicate that there were two distinct variations of the tooled finish based on mold conformation and finishing activity - the "standard" and the "improved" tooled finishes - both of which can be accurately referred to as "tooled finishes." However, by making a distinction between the two subtle variations there is some bottle dating refinement possible. These types are described as follow:
 "Standard"
tooled finish:
In the collector and (usually) archaeology worlds - and on this website - this is usually just called a tooled finish. This
simple and generally oldest tooled finishing method entailed a mold where the
finish conformation was not significantly pre-formed in the mold.
The shape of the base, body, and neck of the bottle were formed by the
mold, but not the precise shape of the finish. To put it
differently, there was limited
(or none or can't be determined) pre-forming of the finish by the mold itself as the finishing tool
was utilized to completely form the finish conformation. Although the earliest
of the two tooling methods, it also continued in used up until being
replaced by machine-made methods, overlapping the "improved" tooling
method described next.
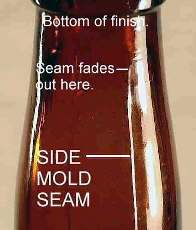
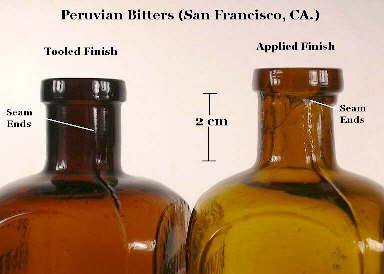
 The "standard" tooled finish is
identified by a side mold seam that distinctly ends or fades out on the neck
distinctly below the bottom
edge of the finish. This is illustrated by the images to the
above left and to the right (click both to enlarge). Click two-piece
post-bottom mold to see an illustration of a typical bottle mold.
This illustration shows that the upper neck portion of the mold does not
accomplish any molding of the
finish shape, just the neck shape. This type mold could have produced a bottle finished with
either an applied finish (using glass applied to the neck end which was
tooled) or a tooled finish (by
re-heating and compression tooling the end of the straight neck without
additional glass added). With the latter process, the glassblower would have
cracked-off/sheared the blowpipe high enough to leave "extra"
glass to work with - by reheating and compression tooling - in creating a finish.
Click on
Patent No. 295,848 to view the patent illustration and description for
a "Tool for Forming Bottle Lips and Necks" that was granted to J. B.
Wilson in 1884
(U. S. Patent Office 1884b). This
particular tool conformation, as the patent name notes, was designed to
tool both the finish and the upper neck of bottle producing a "standard"
tooled finish where the upper portion of the neck as well as the finish
would exhibit horizontal compression tooling marks.
The original iron finishing tool shown earlier in this section (to the above left) is clearly one that would have produced a "standard" tooled finish as the jaws extend well beyond the base of the finish and would likely have left evidence of their use on the upper neck of the bottles it was used on. This particular tool is a larger than average example designed for the oversize finishes on demijohns and carboys. This particular tool is engraved with the initials “I.G.Co.,” which almost certainly stands for the Illinois Glass Company (Alton, IL.) whom were in business from 1873 to 1929 (Toulouse 1971; Lockhart et al. 2005d) and a known producer of large capacity demijohns (Illinois Glass Co. 1906). The image to the left below shows a close-up of the jaws and central plug/spindle of the finishing tool with the jaws open to insert into the bore of the bottle to be finished. The middle image shows the tool with the jaws clamped shut in the finish forming position.; it would form the finish conformation as it was rotated around (or the bottle rotated and the tool held steady). The middle image clearly shows the conformation of the intended finish as the open space between the jaws and the central plug - a finish which would have resembled that in the image to the right below.
The "standard" tooled finish could be considered a transition type tooled finish that was easily adapted to bottles produced in molds that were previously finished with an applied finish. The picture of the two Peruvian Bitters (to the left above) shows the finishes of two mid-1880s Western (San Francisco, CA.) bitters bottles which were blown in the same exact mold but one (right) has an applied finish and the other (left) a "standard" tooled finish (Wilson & Wilson 1969; Wichmann 1999; empirical observations). (These two bottles are also date estimated and discussed at length in the section below entitled A Mouth-blown Finish Related Dating Example.) Later bottle molds produced with the intention of using the "standard" tooled finishing method were almost certainly made with a slightly longer neck in order to provide adequate glass for the process. The following quote is from a 1904 publication (National Glass Budget) indicating such along with a reference to the former method of producing applied finishes:
Formerly the bottle lip was finished by laying on a thread of hot glass, and each blower finished his own bottle. This method of finishing was slow, and required skill and strength of arm, so that when the neck was lengthened and the bottle finished at the glory hole by stoving back the reheated neck so as to form the ring, it increased the output, and made the work lighter. (Anonymous 1904; emphasis added).
"Improved" tooled finish: This tooled finish variation is referred to on this site as either an "improved finish," "improved tooled finish", and the process the "improved tooled finishing" method. Towards the later end of the mouth-blown era (late 1890s through the 1910s) many molds did significantly pre-form most or all of the basic external finish shape, i.e., the upper neck portion of the mold cavity had the finish shape included. Kendrick called this type mold a "closed" mold as versus an "open" mold which did not form any of the actual finish conformation (Kendrick 1963). (Bottles produced in this latter mold could be finished with either an applied or standard tooled finish, as described above.) After the bottle was removed from the mold, the finish shape and bore conformation was made more precise – to ensure proper closure fit - with minor re-firing and/or tooling of the extreme upper portion of the finish (Deiss 1981).
The improved tooled finish is identified by a side mold seam that ends or fades out well into the conformation of the finish itself, often just short of the rim of the finish. Click catsup threaded improved tooled finish to view an example which would have been formed by a mold similar that illustrated below. The concentric tooling marks are evident only in the upper portions of the finish. Sometimes these tooling marks are vague or non-existent, indicating that at times the upper finish was simply refired after removal from the blow-pipe or re-fired after the tooling to smooth the finish. These type finishes were definitely not formed by added glass and strongly indicative that the vast majority of tooled finishes of both types - "standard" and "improved" - were not formed via the addition of added glass.
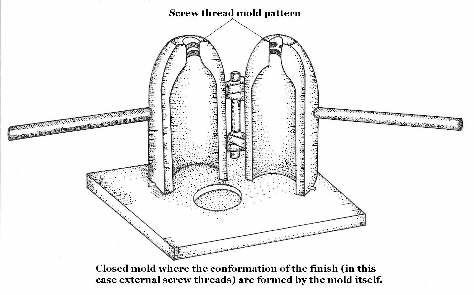 The
illustration to the left shows a "cup-bottom" closed mold which has the
conformation of the external screw thread finish incorporated into the mold
itself, i.e., an improved tooled finish. (This mold type is also
referred sometimes to as a
blow-over mold.) A bottle produced in this type of mold would have had either some
post-molding/post-blowpipe re-firing and/or tooling done to the extreme upper finish portion above the screw
threads or the lip surface (i.e., rim) would have been ground flat to remove the rough edges
created when the blowpipe was cracked-off.
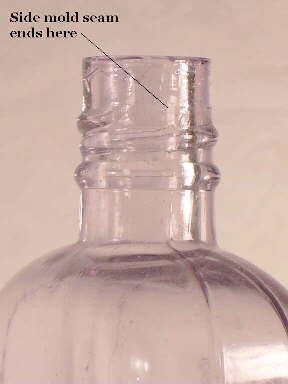 One of these processes would have had to be done to make the upper finish
suitably smooth and consistent enough to reliably seal with a screw cap. The
picture to the right (click to enlarge) shows the type of finish (on a ca.
1905-1915 flask) that would have been produced by this type of mold. It is mouth-blown with molded external threads which also exhibits
tooling marks in the finish area above the top of the screw threads. A
bottle with this type of external screw thread finish almost certainly dates
from the 1900-1920 era; this type finish was used frequently on later
mouth-blown liquor flasks
like that pictured as well as some other types of bottles, particularly those
intended for
catsup. Click
external screw cap to view the discussion of mouth-blown external screw
thread finishes and caps on the "Types of Bottle Closures" page.
Click on the following link -
true applied external screw cap finish - for a discussion of a very
unusual true applied finish with external screw threads - an extremely
uncommon occurrence.
The picture below (click to enlarge) shows the "improved" tooled finish characteristics close-up. The location of the seam on this bottle makes it readily apparent that the basic finish form, including the lower ring, was formed by the mold without the addition of added glass. The pictured "straight brandy" finish is on an Oregon Importing Company (Portland, OR.) cylinder liquor bottle that dates between 1904 and 1915 (Thomas 1998a). The "improved" finish almost always identifies a bottle as having been produced after 1895-1900 (empirical observations).
Almost certainly the first important, fully molded glass container finish was in 1858 with the invention and production of the Mason canning jar (Deiss 1981). These revolutionary jars were produced from a blow-over mold where the outside screw thread finish was molded along with the body and base. The rough cracked-off top surface of this finish subsequently ground off to make it uniform and flat (ground finishes are covered in Part II). In general, with the exception of simple straight finishes (simply sheared or cracked-off upper neck ends which were mold-formed) and canning jars, bottle molds with incorporated finishes (in whole or in part) were little used until the late 1870s, receiving only limited use until the 1890s when they became fairly common until machine manufacture dominated the bottle making world in the mid to late 1910s (Deiss 1981; empirical observations).
Additional Tooled Finish Information
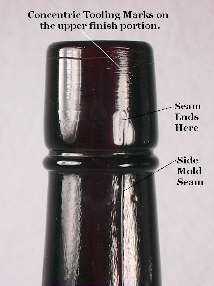 As already noted, all tooled finishes
potentially show some concentric tooling marks with the "standard" tooled
finish having these marks extending onto the neck below the finish. Due to
the amount of tooling on most bottles produced with this finishing method, the
upper side mold seam is often substantially "wiped out" making it difficult to
determine how much shape forming the finish received in the mold versus how much
was purely from the tooling actions. All though just a speculation by the
author, it is quite possible that
many tooled-finishes-to-be had at least the basic finish conformation formed in the mold
as that would have been an easy way to provide the proper quantity of glass in
the correct area for adequate finish completion.
The
subsequent re-firing and finishing tool action to "finish" the finish eradicated
most or all of the signs of the side mold seam for as far as the tool reached on
the outside of the neck. The absence of the mold seam in the finish itself likely makes
many "improved" tooled finishes actually appear to be "standard" tooled finishes.
In other words, if the mold seam is evident within the finish, one knows
that it is an improved" tooled finish; if the side mold seam is not evident
in the finish then one can't say for sure that it was not partially molded, only
that physically it is a tooled finish. This is belaboring a
fine point, but it does have dating implications.
In any event, the actual finish glass for all tooled finishes was not typically added to the neck terminus like with an applied finish - a technological advance which would have constituted a significant savings in the labor necessary to finish a bottle. To picture the difference in these finish classes another way, the blowpipe detachment point on an applied finish was at or just above the point where the finish and neck meet in the finished bottle; the blowpipe detachment point on tooled finishes was (or became) the top surface of the finish. Besides the labor savings, the tooled finish was a major innovation in that the bore and upper neck of bottle could be made more smooth, properly tapered, and of uniform dimensions as compared to the applied finish. This allowed for more reliable sealing of the bottle with a cork in particular since more of the inside surface of the finish was in contact with the cork (Deiss pers. comm. 2003).
The following tooling description is from Munsey (1971):
Tools specifically for finishing were developed around 1830 in England and around 1850 in America. These devices usually consisted of a rod, which was inserted into the mouth of the bottle, and an associated part that could be clamped to the outside of the mouth and neck. By rotating the device the lip was finished and the seams erased. Later these specific lip finishing devices were attached to workbenches and operated by hand- or foot-operated presses. If the bottle thus finished was rotated during the process the side seams were rubbed out but if the bottle was merely pressed the side seams were left intact and ran all the way to the top of the bottle.
These processes described by Munsey would be applicable to both applied and tooled finishes, though it is likely that the workbench operated finishing would have been much more common on the later tooled finishes. Beginning in the 1880s many versions of these bench-operated, rotating pressing tools were patented possibly indicating that the changeover period to tooled finishing was peaking. These relatively simple, hand or foot operated finishing "machines" clamped onto the finish and upper neck areas and generally erased the side mold seams anywhere the tool made contact with the glass (Toulouse 1969b). An example of such a machine is F. Scheidt's "Machine For Forming The Necks of Glass Bottles" which was patented in 1904. Click Scheidt's May 17, 1904 Patent #760,258 to see this machine. This patent's narrative noted that "The object of the invention is to provide a simple machine both in construction and operation and by means of which the bottle-necks may be quickly and accurately formed with unskilled labor" - a reference to the never ending pursuit of efficiency and cost reductions in the production of bottles (U. S. Patent Office 1904a).
On this website this class of finishes will be
simply referred to as "tooled" finishes, with the distinction
between the "standard" and "improved" versions made when useful. In the
existing literature this finishing method is sometimes referred to descriptively as a "wiped"
finish, presumably because the finishing tool "wipes" out traces of the upper side
mold seams (Preble 1987;Fike 1998).
|
Diagnostic characteristics of a tooled
finish include several or all of the following:
The terminal end of the side seams on a
tooled bottle will often bend slightly in the direction that the finishing tool was rotated. (NOTE: Empirical observations of several
hundred tooled finish bottles indicates that where the rotation can be
determined (almost half of the bottles were inconclusive) about 75% have
counterclockwise tooling marks and 25% clockwise. This could be a
function of either the
gaffer
being left or right handed or of how the workbench mounted finishing devices
rotated under hand or foot power, as noted in Munsey (1971) above. The
difference could also be related to whether the tool rotated around a
stationary bottle, or the bottle rotated on a stationary tool. There
appears to be no dating or glassmaker specific relevance to this feature;
just an item of bottle making interest. |
Most bottles with tooled
finishes typically date no earlier than 1885 to 1890. However,
some tooled finishes as described here date back to the 1870s, but
primarily with just certain
classes of bottles (e.g., druggist bottles). This is discussed in the next section. All
hand tooled finishes largely disappeared between 1910 and the early 1920s
with the ever increasing dominance of semi-automatic and then fully automatic bottle making
machines.
Dating notes on the changeover period from applied finishes to tooled finishes:
The changeover from applied finishes to tooled finishes was a relatively significant technological shift in bottle manufacturing. This changeover can often provide a useful dating break for bottles made during the last quarter of the 19th century. As noted on the Bottle Dating page there was a lot of time variation in making this transition depending on the type or class of bottle. There were also variations based on different glass makers, but these are extremely difficult or impossible to track down as most bottles can not be firmly attributed to a particular glass factory during this era. Empirical observations indicate that the mid 1870s is when the transition from applied finishes to the more technologically advanced tooled finishes significantly commenced. There are a relatively limited percentage of bottles known to pre-date the mid-1870s that have the tooled finish as defined above. Those that are known are primarily smaller bottles (discussed more below). Likewise, by the mid-1890s the changeover to tooled finishes was largely complete and a very large majority of American-made bottles dating after that time have tooled finishes.
The following information (darker tan box below) provides some general dating guidelines for this transition categorized by broad types or classes of bottles. It is based on the content managers extensive empirical observations over time in conjunction with an wide array of published references noted below the box which provide relatively precise company dating for various types and styles of historic bottles. As there are many exceptions to these general observations, specific bottle dating accuracy can only be achieved by using these finish related date ranges in conjunction with other diagnostic features as noted on the Bottle Dating pages. Be aware that the information found below is a brief synopsis of the bottle type specific date ranges for the changeover from applied to tooled finishes. Users are strongly encouraged to visit the various Bottle Typing (Typology) & Diagnostic Shapes pages for much more in-depth, finish manufacturing related, dating information pertinent to the specific bottle types they are pursuing information on. Please click on the following link to access the main "portal" page to the various bottle typing pages: Bottle Typing/Diagnostic Shapes
(Note: Most of the links in the box below will access a
pop-up picture of an example of the bottle type noted.)
|
Transition from Applied to Tooled Finishes - Bottle Type Dating Notes See the Important Note listed earlier relative to tooled finishes formed by more technologically advanced finishing tools vs. the early methods of forming a finish with simple glassmaker tools. 1. As a general statement about the transition from applied to tooled finishes, it is clear that the smaller the bottle the earlier that tooled finishes were first used. Conversely, the larger the bottle (up to around 12-13" in height) the later that tooled finishes seem to have been adopted. The total transition time from applied to tooled finishes is largely from the mid-1870s to the mid-1890s in the U.S.; this is discussed in the points that follow. Why smaller bottles were tooled sooner than larger bottles is not known though the trend is very evident in the observation of tens of thousands of bottles by the author. It is, however, certainly related to the specific manufacturing efficiencies inherent in the methods of production for different bottle sizes.
3. Ink bottles, smaller (≤7-8") narrow necked medicinals and cologne/perfume bottles also appear to have followed a similar applied to tooled finish transition timeline as the druggist bottles, i.e., tooled finishes dominate these types of bottles by the mid to late 1870s with some examples certainly dating as early as the late 1860s (empirical observations). 4. Larger, narrow necked medicinals (≥7-8") and soda/mineral water bottles appear to fall in the average changeover period of the mid-1880s with very few applied finishes being produced on these types after about 1890. Medicinals in the 7-8" tall "transition" range can have tooled finishes as early as the mid-1870s and applied ones as late as about 1890 (empirical observations). 5. Medium sized (8" to 10") oval, rectangular, cylindrical, "flask shaped," and square medicinals, bitters, liquor, and other relatively narrow neck type bottles appear to have not made a majority changeover to tooled finishes until the mid to late 1880s (empirical observations). For example, it appears that all of the liquor bottles from the South Carolina State Dispensary - which are known to have been made between 1893 to 1907 and are largely in this size/shape range - have tooled finishes (Huggins 1997; Teal & Wallace 2005).
7. Any type of bottle exhibiting the features of the "improved" tooled finish described earlier (side mold seam evident within the finish itself; see image to the left), and which does not have molded external screw threads with a ground rim, will virtually always post-date 1895 and most likely dates between 1900 and the end of the mouth-blown era in the early 1920s (empirical observations). Not all mouth-blown bottles from the 1900-1920 era have the "improved" tooled finish, but virtually all bottles with this finish manufacturing variation are from the early 20th century. Once again, it must be noted that the information above is a brief synopsis of the bottle type specific date ranges for changeover from applied to tooled finishes. Users are strongly encouraged to visit the various Bottle Typing (Typology) & Diagnostic Shapes pages for much more in-depth finish manufacturing related dating information pertinent to the specific bottle types they are pursuing information on. Please click on the following link to access the main "portal" page to the various bottle typing pages: Bottle Typing/Diagnostic Shapes |
The references consulted to create the
brief summary above include - but are not limited to - the following:
Toulouse (1967); Wilson & Wilson (1968,1969,1971); Shimko (1969); Willis
(1972); Switzer (1974); White (1974); Thomas (1974,1978,1998a & b); Fowler
(1975,1981,1986); Clint (1976); Zumwalt (1980); Holabird (1981); Wilson (1981); Feldhaus
(1986,1987); Fike (1987);
Preble (1987,2002);
Creswick (1987); Borton (1988); Pollard (1993); Fletcher (1994); Markota
(1994,1999); Peters (1996); Huggins (1997); Odell (1997,2000); Fike (1998);
Burggraaf & Southard (1998); Miller (1999); Wichmann (1999); Lockhart
(2001a,b & c); Preble (2002); Chapman (2003); Teal & Wallace 2005;
Kyte (2005); Oppelt
(2005), and others.
A Mouth-blown Finish Related Dating Example As a "case study" of finish/finishing related bottle dating estimates during the height of the changeover period (i.e., 1880s), consider the two Peruvian Bitters pictured below. These bottles are square, about 9" tall, have a stylized W&K company monogram embossed on the reverse, and were both produced from the same mold. This is evidenced under close inspection by both having identical embossing details (from the mold embossing engraving) and identical mold surface irregularities (iron casting roughness). Upon casual observation we can also reasonably conclude that these bottles were blown at separate times simply based on the color differences - they were likely blown from different batches of glass. Upon closer inspection we note that the bottle on the right has an crudely applied finish and the bottle on the left has a neatly tooled finish - see the finish close-up picture below (click to enlarge). The only other difference between the two bottles are some subtle differences in the bases of each indicating that the post-bottom mold plate was modified or replaced at some point in the molds life.
We can also somewhat reliably date the mold to the first half of the 1880s based on the distinctive "blob" style of a mold air-venting mark on the front shoulder; the back shoulder has the more typical pin-head type. Click "Blob" Type Air Venting for view a close-up picture of this unusual venting method. According to Thomas (1977), this style was estimated to be used during a narrow time frame of about 1883 to 1885. (For more information on air venting go to the Bottle Body Characteristics & Mold Seams page.) Since this was an estimate and molds were often used for some years, we could reasonably expand our dating estimate time frame a couple years on each end to increase the odds of being more correct - say 1881 to 1887. The apparent mold base plate modifications or replacement also supports a lengthy life span for the mold. Since we have both tooled and applied finishes on a bottle with this type air venting, and given the information we determined above, it is reasonable to estimate that the example with the applied finish (right) dates from about 1881-1884 and the tooled example from about 1885-1887. Further research finds a few more facts to consider in our investigation these bottles. The Peruvian Bitters were produced in at least 5 different molds reportedly beginning as early as 1871 to at least the early 1890' according to several collector publications (Wilson & Wilson 1969; Wichmann 1999). Our determined date range for these bottles superficially fits this information well. However, there is much more to this story...
However, it appears that their dating range estimate is based on two facts: the observation that the bottles produced by this mold are the crudest and oldest appearing of the different mold variations; and that the company which produced the product (Wilmerding & Kellogg) began their partnership in the early 1870s. As the bottles from this mold usually appear to have the earliest diagnostic features (true) this mold is probably the oldest of the several mold variants (likely true). This apparently lead the Wilson's to conclude that the bottles from this mold were first produced in 1871 with a likely mold life run until about 1877. This early date is very speculative as it is not certain that the product was first produced when the partnership was initiated. Even if we assume that the product was first produced and bottled in 1871, it is likely that it was first sold in unembossed bottles until such a time as adequate sales warranted the production of a proprietary mold - the mold our subject bottles were blown in. But there is still more... The Wilson's dating range is brought into question since it does not "fit" our venting and tooled finish timelines. An added complication to the Wilson's dating is that the context where both these bottles were excavated did "fit" our determined timelines very well, i.e., the associated bottles and fragments also dated from the early to mid-1880s. However, there is yet another twist in the story. One of these bottles (the applied finish example) and several other bottles found with these two had residue inside indicating that the bottles had been possibly reused as bluing containers! (It was not unusual up until at least World War 1 for bottles to be commonly re-used.) Now the dating is called into question again because of the potential for deposition lag at the site, i.e., the discovery of older items in a newer site. It is the opinion of the author that the pictured Peruvian Bitters most likely date in the early to mid-1880s as indicated through the use of the diagnostic features and the context they were found, not to the early to mid 1870s as stated in the Wilson's book. This example was not picked to critique their exceptional book; the Wilson's may have not seen an example from this mold with a tooled finish. The process of acquiring and refining historic bottle dating and identification information will never end. Similar to newer information adjusting Wilson's estimate, additional information in the future will adjust many "facts" found on this website. It's the nature of all research. At this point in time, which is about 120 years since the bottles were manufactured, it is impossible to say for sure what the exact age is; there are no company records to our knowledge indicating when orders for this bottle were filled. (ADDENDUM: After completing the dating example information above, continued research yielded an additional reference which discussed the history of the company and the product. Schulz, et al. (1980) noted, in addition to other historical information, that the company filed a trademark ownership application with the State of California for the product name Peruvian Bitters in July of 1880. The Peruvian Bitters was likely being made prior to the filing for trademark protection, but probably not very long before and very unlikely as early as the suggested 1871. This strongly supports the diagnostic dating range of the first half of the 1880s for this earliest of the Peruvian Bitters bottles. Some of this history was also summarized in Fike (1987).) The primary point of this example is to highlight some of the perils inherent in the dating process, not to discourage users from pursuing the dating of historic bottles. Examples are presented so that users are aware that the process of bottle dating is fraught with various accuracy risks and that it almost always takes information from various sources to arrive at a reliable date range. Some of this information is only available through research and some is not always possible to ascertain, like the noted context information for example bottles. However, we believe that the manufacturing based diagnostic information presented on this website offers the best information available for the general dating of the majority of American bottles made between 1800 and the 1950s. |
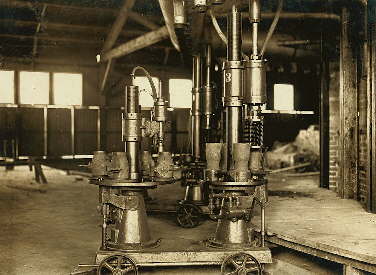 Ironically, the "finish" is the portion of
the bottle that is first formed in the machine manufacture of most
bottles and jars. With
all semi and fully automatic bottle machines, the initial gob of glass
is either sucked (Owens Automatic Bottle Machine), hand placed (semi-automatic
machines like the 1908 image to the right), or dropped (gob feeder automatic machines) into the initial parison
mold where it is usually held in place by the
neck ring (ring mold) portion of the parison mold.
The neck ring mold was the part of the initial parison mold that usually formed
the bottle finish and also held the parison while moving it to the second blow
mold where it (neck ring mold) was also a part of that mold complex.
The neck ring mold forms the finish at the beginning of the bottle production or molding process with all blow-and-blow machines and before the body of the bottle is expanded to desired size. This is also true of some press-and-blow machines, though many of these machines did not use the neck ring mold quite the same as blow-and-blow machines. One of the better technical discussions on the mechanics of machine bottle production - with excellent illustrations - is found in the Hand Book of Glass Manufacture (Tooley 1953), in a chapter entitled Feeding and Forming by H. H. Holscher of the Owens-Illinois Glass Company.
|
See the "Machine-made bottles" section of the the Glassmaking & Glassmakers page for more detailed information on both classes of machines. |
The link below allows a user to view an amazing short movie clip from 1910 that shows two different early Owens Automatic Bottle Machines in operation. The first machine is the "Machine #5" which the film clip script notes as having been made in 1906 in Toledo, Ohio. This was apparently the earliest of the viable commercial machines, and in fact, the clip was made to help promote and sell the machine to potential buyers. The first person shown operating Machine #5 is Emil Bock, a mechanical genius who worked with Michael Owens from the "bicycle pump" early machine experimentation days (1890s) and transformed Mike's ideas into workable steel machines. Michael Owens is the second person shown picking up and examining a couple beer bottles. This clip is also reported to be the only movie ever made showing Michael Owens who was reputed to be "camera shy." The last half of the clip shows a much larger, 15 head "AQ" machine in operation at an Owens-Illinois plant in 1959 (Walbridge 1920; Owens-Illinois Co. 1959; Perry pers. comm. 2007). Of particular note, the 1959 portion of the clip shows the sucking up and cutting off of the glass from the continuous tank by the parison or blank mold. Towards the end it also shows the shift of the parison from the parison/blank mold to the blow mold. Film clip is compliments of the Owens-Illinois Glass Company. (Many thanks to Phil Perry - a senior engineer with that company - who graciously provided this clip.)
1910 film clip of a early Owens Automatic Bottle Machine in operation.
There are numerous diagnostic features that differentiate a machine-made bottle from a mouth-blown bottle. These characteristics were covered in the machine-made section of the Bottle Dating page; click on machine-made bottle dating for more information. The diagnostic features which virtually all machine-made bottle finishes share are related to the neck portion of the parison mold (i.e., ring mold) which holds the formative bottle-to-be. These features are described as follows:
1. The
vertical side mold seams extend into and through the finish all the way
and (usually) to the
top surface (rim) of the finish; this feature shows in the picture
below right. It should be noted that on some bottles this seam
appears to stop right at the extreme upper outside edge of the finish
due to either fire polishing of the post-production finish or the
particular conformation of the neck-ring mold. (The latter type
ring molds result in finishes that usually have the side mold seams
ending at the mold seam described in #3 below.)
3. Another mold seam (often faint) at the very top of the finish (on the rim) which encircles the bore or opening though it can also be located near the outside edge of the rim. (This can not be seen in the picture.) Click here to see an illustration of this mold seam which is shown in the upper right side of the illustration. (This illustration may have to be enlarged to see the detail clearly depending on your browser type & settings). The vertical side mold seams from the body/neck/finish will typically terminate at this particular finish seam, though as noted in point #1 above, these rim related mold seams are often obscured by fire polishing. |
Since both semi-automatic and fully automatic bottle machines
can produce virtually any type or style of finish (Part II) employing the same
process described above, there is little additional information to cover on the
subject of machine finishing methods. (Click
machine-made finishes to see an illustration from a 1920 Illinois Glass
Company catalog that shows and array of different finishes offered on their
machine-made ware.) However, there is more to say about
the transition to and dating of machine-made bottles based on the types or
styles of finishes.
Dating notes on the changeover period from
tooled (mouth blown) finishes
to machine-made
manufacture:
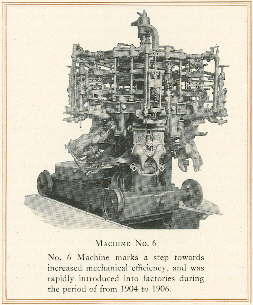 The proportion of machine-made to hand-blown bottles increased dramatically
after 1905 when the Owens Automatic Bottle Machine was first licensed for
production (Miller & McNichol 2002). A picture of the Owens
Bottle Machine #6 is to the right. As noted by William Walbridge, Vice
President of the Owens Bottle Company, this machine was "...rapidly
introduced into factories during the period of from 1904 to 1906"
(Walbridge 1920).
By 1917 only 5-10% of the bottles and jars produced in the U.S. were hand-blown; 90-95% were produced by automatic and semi-automatic methods and exhibit typical machine-made characteristics. The total number of bottles produced in the United States also dramatically rises from 7,777,000 gross in 1899 (all mouth-blown) to 24,000,000 gross in 1917, most of which were machine made (Barnett 1926; Miller & Sullivan 1981). These numbers help to determine general dating break probabilities between bottles with machine-made and tooled finishes. For example, given the incredible quantities of bottles produced by machines after 1917, a bottle with machine-made characteristics is highly likely to have been made after that date. Likewise, the probability that a bottle exhibiting mouth-blown diagnostic features (i.e., tooled finish) dating prior to 1917 is very high and after the 1920s, very low, though hand blowing shops were still operating to some extent up to World War II and even beyond for highly specialized orders or items (Toulouse 1971).
To summarize the above, hand tooled finishes almost totally disappeared between 1910 (tooled still dominated) and the early 1920s (tooled very uncommon) with the ever increasing dominance of semi-automatic machines early in that range to fully automatic bottle machines making almost all utilitarian bottles by the early to mid 1920s. This shift to automation was arguably the most significant change ever in the production of bottles. It is also a very significant event in our ability to date items. However, the changeover occurred during a lengthy period of time, and like the changeover from applied to tooled finishes, different types or classes of bottles made the changeover at different times.
The following information (in box) is some general dating guidelines for the transition to machine-made containers based on types or classes of bottles. It is only loosely finish based since there are many other physical differences between mouth-blown and machine-made bottles. These estimates are based on the content managers extensive empirical observations over time, in conjunction with an wide array of published references (noted previously above) which provide relatively precise company dating for various types and styles of historic bottles. As there are many exceptions to these general observations, dating accuracy can only be achieved by using these finish/neck related date ranges in conjunction with other diagnostic features as noted on the Bottle Dating pages (and information from the historical record). However, the following information is considered accurate for a majority of bottles within the type classes listed. See the Bottle Typing/Diagnostic Shapes page for information about the types or classes of bottles noted below and more information on dating.
|
Transition from Tooled to Machine-made Finishes - Bottle Type Dating Notes 1. As general rule, it is very clear that the smaller the bottle type and narrower the finish and neck the later was the conversion to automatic bottle machines. Conversely, the wider the neck and opening (bore) the earlier the conversion to some type of semi-automatic or fully automatic machine process. This is because the semi-automatic "press-and-blow" methods developed and put into use in the late 19th century were only useable for wide-mouth bottles. Semi-automatic machine capable of producing narrow necked bottles (the "blow-and-blow" method) were invented during the same period, but for various reasons were little if at all used until the Owens Bottle Machine was put into regular production in 1905 (Toulouse 1970; Deiss 1981; Miller & Sullivan 1981; Jones & Sullivan 1989; Miller & McNichol 2002).
3. Related to both #1 and #2 above, is that virtually all types/styles and sizes of proprietary druggist and drug store bottles appear to have been one of the last classes of bottles to convert to full machine production. Tooled proprietary prescription type bottles were still being produced at least as late as 1925 when they were substantially replaced by generic prescription bottles where the specific contents and origin were identified only by a paper label (Whitall Tatum & Co. 1924; Toulouse 1971). This was essentially the end of the very common embossed proprietary druggist bottles which had been ubiquitous for at least 60-70 years. There are several reasons for this class of bottles being the last to convert to machine-made manufacture: the fact that narrow-necked bottles were technically some of the latest to be converted to fully automated production and that the expense of setting up an automatic machine for small runs of bottles was prohibitive. Most druggists had entirely local markets, were small, and thus had relatively limited bottle supply needs. Since there were tens of thousands of small local druggists nationwide there was a continuing demand for small orders of bottles that kept the smaller, non-automated glassmakers (hand-blowing shops) in business for some time after machines ruled most of the rest of the bottle market. (Even larger companies with automatic bottle machines continued to offer small customers the services of their diminished, though still existing, hand shops. Much of the production from these shops consisted of proprietary druggist bottles (Whitall Tatum & Co. 1924; Toulouse 1971; Miller & Pacey 1985)). By the mid-1920s, the high costs of these small orders, the disappearance of the small hand-blowing shops, and the undeniable economics of generic machine-made wares spelled the end of proprietary druggist bottles. A very good date for the general disappearance of mouth-blown proprietary druggist bottles would be about 1920, though they could date at least as late as 1925. Since these bottle were not likely to be retained long, their presence on a site would strongly indicate a pre-1920s origin (Whitall Tatum & Co. 1924; Jones & Sullivan 1989; empirical observations).
5. Wine and liquor bottles and flasks appear to have followed a similar pattern as soda and beer bottles with the mouth-blown proprietary embossed examples having a later ending date than generic label-only bottles. One of the earliest Owens licenses (1905) was for brandy bottles, though the first "whiskey" bottle license was issued in 1910 (Miller & McNichol 2002). Empirical observations as well as relevant references indicate that the large majority of proprietary (company & product name embossed) liquor bottles made prior to National Prohibition (1920) were mouth-blown; very few were machine-made. Generic (unembossed, label only) liquor bottles were likely being made in quantity by 1910 to 1912 and dominated the total liquor bottle market by time National Prohibition rolled out to change the social fabric of America for years. (Note: Many individual states enacted their own temperance laws years before National Prohibition went into effect in January of 1920. For example, Oregon went "dry" via the Anderson Act at the end of 1915 providing an effective "end date" for all mouth-blown proprietary liquor (and wine and beer) bottles from Oregon. To our knowledge there are no machine-made liquor bottles embossed with a proprietary firm name from Oregon that pre-date 1916, with the exception of some large (one-half & full gallon) plate molded bulk wine/liquor bottles with glass handles known as "packer" jugs (Illinois Glass Co. 1911 & 1920; Thomas 1998b). It is believed that this general trend for proprietary liquor bottles is true across the country.)
7. Wide mouth food bottles probably followed a similar track as fruit jars: some limited semi-automatic production prior to 1900 with most all machine-made by the early to mid-teens. A mouth-blown, applied finish wide mouth food bottle or jar is pictured to the left; click Crown Brand Queen Olives to view an image of the entire bottle/jar. 8. Patent medicines, bitters, tonics, ink bottles, narrow necked food type bottles (e.g. peppersauce) probably all made the changeover from tooled finishes (mouth-blown) to machine-made throughout the 1910s, with the same trends noted above for local/regional, small company proprietary bottles. |
One of the best references on the transition from mouth-blown to machine-made bottles is found in a Parks Canada publication entitled appropriately enough - Machine-made Glass Containers and the End of Production for Mouth-blown Bottles (Miller & Sullivan 1981).
|
A Tooled (mouth-blown) to Machine-made Finish Transition Dating Example The following is an example of bottle dating related to the transition from mouth-blown to machine-made bottles. The examples used are both embossed identically as follows: GROVES TASTELESS / CHILL TONIC PREPARED BY / PARIS MEDICINE CO. / ST. LOUIS. ("Tasteless" was a reference to the lack of an era typical bad medicinal flavor, not a reference to the refinement of the purchaser.) The bottle on the right in each picture is a mouth-blown example with a tooled finish. The bottle to the left is a machine-made example. Unlike the Peruvian Bitters in the mouth-blown example above, these bottles were not and could not have been produced in the same mold. The two manufacturing methods are too different for the same mold to function in both manufacturing processes.
One assumption we can safely make here is that the mouth-blown example is older than the machine-made version. This almost has to be true unless the Paris Medicine Company was procuring bottles from several different glass companies at the same time. This is possible as the changeover from mouth-blown bottles to machines spanned the period between 1905 and the early 1920s. It is conceivable that a narrow necked machine-made bottle like this could date as early as 1910-1912 and the mouth-blown bottle date as late as the early 1920s. However, it is much more likely that the mouth-blown bottle pre-dates the machine-made one.
The mouth-blown bottle has the embossing inside a fairly obvious plate, indicating that the bottle was made in a plate mold. This is a hint - but not proof by any means - that the product at that time did not necessarily generate enough sales to warrant an individual proprietary mold. Instead, the bottle was blown in a plate mold which could have been used for many other proprietary medicinal or druggist bottles by simply replacing the plate with a different one engraved with another product or company. A plate mold was significantly cheaper for the purchaser than an entire individual proprietary mold (Toulouse 1969b; Miller & Pacey 1985). The machine-made bottle was produced in an individual proprietary mold on an automatic bottle machine - specifically the Owen Automatic Bottle Machine. Since the expense of setting up a fully automatic machine - particularly the Owens machine - was quite high, it must be assumed that the Grove's Tonic was generating enough sales by around WWI to justify the expense (Miller & Sullivan 1981). Empirical observations indicate that the product was indeed quite successful as these bottles are very common today (the machine-made Groves was found by the author at a local garage sale!).
However, Fike also noted that the machine-made version dates after 1924 based on the diamond marking on the base, which was interpreted as a product of the Diamond Glass Co. (Royersford, PA.) which began operations in 1924. A close inspection of our example shows that there is a "I" in the middle of diamond (hard to see but there) which indicates manufacture by the Illinois Glass Co. (Alton, IL). Miller & McNichol (2002) note that Illinois Glass Co. was first licensed in 1910 for the Owens Automatic Bottle Machine and began producing various types of bottles in 1911. However, we also know that the company used the "I in a diamond" marking between 1916 and 1929 (Toulouse 1971) and possibly as early as 1912 (Lockhart pers. comm. 2004). Though it is possible that Fike's described example was just a diamond and made by Diamond Glass, the fact that the "I" is very hard to see indicates that it was probably missed upon casual inspection. We now have a date for the machine-made Groves of possibly as early as 1912 (or 1916) to possibly as late as 1929, though the aqua glass is indicative of a somewhat earlier date which would be consistent with our earlier estimate of 1915 to 1925. The point of this exercise was to show an example of how the estimated dating ranges based on general manufacturing characteristics are arrived at. It is also an example of the "detective work" usually necessary to track down enough information to build an adequate story about any particular historic bottle; the kind of work that users of this site would have to pursue in order to fully "explain" a given bottle. Some information one will find is very useful; other information can be confounding. In this example, much of the additional information teased out of the references and the bottles themselves did little to refine the basic diagnostic dating from the initial estimates. The information does help, however, with the understanding of the historical context and "meaning" of the bottles. Regardless of all that, it is just plain fascinating and fun to pursue and discover these interesting stories from our past. |
Additional note:
One of the best sources for information
on mold seams is in Dr. Julian Toulouse's often cited two-part article entitled
"A Primer on Mold Seams" in the November and December 1969 editions of the long
defunct magazine The Western Collector (Toulouse 1969b). Faster
loading "jpg" scans of
this milestone work are available by clicking on the following links - 2
magazine pages per scan, 20 magazine pages in total. The page numbers listed here coincide with the pages of
the original articles. (Articles reproduced courtesy of Dr. Cecil Munsey.)
Part I -
pages 526-527,
pages 528-529,
pages 530-531,
pages 532-533,
pages 534-535.
Part II -
pages 578-579,
pages 580-581,
pages 582-583,
pages 584-585,
pages 586-587.
A better quality version of the entire article, which is more suitable for printing, is available by
clicking on the following link:
" Primer on Mold Seams" - Parts I & II
This "pdf" file is viewable in Adobe Acrobat Reader®.
|
This is the end of Part I: Methods of Finishing. Additional information related to finishes is found on the following two pages. Click the highlighted title to view the pages: Part II:
Types
or Styles of Finishes - This section is comprised of three separate
pages and deals with the different types of
bottle finishes, the naming of finishes, and finish dating. |
SEARCHING THIS WEBSITE:
To do a word/phrase
or image search of this website
one must use the following Google search link:
Search the SHA/BLM Historic Glass Bottle Identification & Information
Website
(Note: Search results for this website will be just below the
final top-of-the-page Google paid ads.)
4/5/2025
Return to the top of this page.
This website created and managed by:
Bill Lindsey
Bureau of Land Management (retired) -
Klamath Falls, Oregon
Questions? See
FAQ #21.
Copyright © 2025 Bill Lindsey. All rights reserved. Viewers are encouraged, for personal or classroom use, to download limited copies of posted material. No material may be copied for commercial purposes. Author reserves the right to update this information as appropriate.