- What issues are involved in cleaning artifacts?
- What are good techniques for cleaning excavated artifacts. (from terrestrial sites)
- What are good techniques for cleaning artifacts from waterlogged sites?
- What techniques are considered harmful for cleaning excavated artifacts?
- What are soluble and insoluble salts?
- Why is the presence of soluble salts important?
- Why and how should I check for the presence of soluble salts in artifacts?
- What is the difference between testing for chlorides and testing for soluble salts?
- What is desalinization?
- What techniques are used to measure the salt content of desalination baths?
- Can I clean most artifacts with water and dishwashing detergent?
- How should I store archaeological artifacts for curation?
- How do I create a desiccated microclimate for storage?
- What are “archival” storage materials?
- What are humidity indicator strips?
- What is a stable system for labeling artifacts?
- How do I mix Acryloid B-72 for labeling artifacts?
- Where can I buy Acryloid B-72?
What issues are involved in cleaning archaeological artifacts?

Photo by E. Williams. Used by permission of the Colonial Williamsburg Foundation.
“Cleaning” is a term that has different meanings for different practitioners, and tends to be used rather casually in the context of archaeological artifacts. Cleaning can mean the brushing or washing of loose soil and other burial deposits from artifacts, or may mean the removal of more adherent crusts and residues. One cleaning activity commonly performed on archaeological sites or in processing labs is washing and brushing in water. Most often, cleaning of archaeological artifacts is undertaken so that the surface and form of an object can be revealed, allowing the object to be identified and studied. It is also done so that excess soil or other non-essential burial deposits that may be damp, heavy, or salt-laden, and therefore potentially damaging, are not introduced into a collection.
However, it must be remembered that cleaning an artifact is an irreversible action and that is should always be approached with care. It may not be advisable to clean an artifact at all. For example, there are times when the material adhering to an artifact is valuable to the archaeologist; the original material of the artifact itself may be loose and damaged and therefore easily lost by cleaning; or information can be contained in the soil, corrosion products, crusts, residues, invisible residues, and break edges of an artifact. Therefore, to avoid the inadvertent removal of diagnostic information, or damage to an artifact, cleaning should not be an automatic, unconsidered part of artifact processing.
Cleaning or deciding not to clean – is an important part of artifact processing. Good practice involves assessing the artifacts, choosing the most appropriate cleaning tools and techniques, and documenting any cleaning that is performed.
Assessment: Artifacts can be assessed, preferably under the guidance of both an archaeologist and a conservator, to determine if cleaning will be beneficial or detrimental. Hundreds of artifacts may be processed daily at an archaeological site or in a processing laboratory, so any system of assessment should be efficient. All personnel involved in handling the artifacts should be fully informed as to the assessment criteria, so they can recognize potentially important deposits. Many important deposits are difficult to identify, particularly without magnification, or to the untrained eye. Certain decomposition or corrosion products may look like unimportant debris.
If an artifact does not have obscuring deposits on it, then it is usually best not to clean. This saves time and labor and minimizes the potential for damage due to handling. It is more likely, however, that artifacts will be covered in burial deposits of some kind. When determining how an artifact should be cleaned, the following factors should be considered:
- The material(s) and technology of the artifact. Some material types cannot withstand immersion in or contact with water and may fall apart dramatically. A potsherd decorated with a fugitive pigment or made of poorly fired clay can be damaged even by gentle dry-brushing.
- The condition of the artifact. An object with a flaking or crumbly surface should not be cleaned without further assessment and documentation. The broken edges of friable prehistoric pottery sherds may be damaged during washing, making it more difficult to find join edges and reconstruct a pot. A crushed bone may be held together by compacted soil, so removing the soil may result in collapse of the object.
- The analytical potential of the artifact. Artifacts or samples to be used in instrumental analysis should not be cleaned except under special circumstances and with supervision from the analyst.
- The context of the artifact. If, for example, the artifact comes from an organic-rich soil deposit, the adhering soil may contain seed remains, which may be important for environmental analysis. An artifact from a burned deposit may contain evidence of the burning. Artifacts associated with metals processing may contain tiny metal or slag droplets.
- The potential of the artifact to preserve other materials. Some types of artifacts have a high probability of containing important residues or deposits. For example, intact vessels often contain remains of their original contents, either as a visible deposit, or invisibly absorbed into the fabric. Lithic tools may have blood or phytolith residues on the surface. Metal artifacts may incorporate remnants of associated organic materials in their corrosion products. These artifacts should not be cleaned, even if such deposits are not clearly visible.
It is essential to inform those who are processing artifacts to be aware of these factors and on the lookout for relevant features. If inexperienced personnel are tasked with washing artifacts, for example, they may not be aware of the evidence that some objects may contain. Under these circumstances, experienced personnel can perform the assessment and separation of artifacts before they reach the washing stage. In particular, artifacts with high sampling and research potential, or from particular contexts, should be identified as such by the archaeologist and removed from the regular processing stream so that they will not undergo any cleaning or excess handling of any type.
Choosing the right cleaning tools and techniques:
The type of cleaning performed on artifacts will vary according to the artifact condition and the nature of the deposits. Most often, gently removing loose, dry soil with a dry brush is optimal. Some artifacts, such as robust, undecorated pottery sherds, can be washed in buckets of water. Artifacts from waterlogged deposits can usually be cleaned with a gentle spray or stream of water. Some frequently used techniques, such as acid-cleaning of pottery sherds, have the potential to be highly damaging.
Recording: As essential as using the proper cleaning techniques and tools is the full recording of the cleaning that was performed. These records may prove essential in later determining an artifact’s research potential. If, for example, material was removed from or introduced to an object, or the object was potentially contaminated by handling processes, or the object had microscopic marks added to its surface by brushing, the analyst may not be able to use the artifact for research or may need to compensate for these changes. Any number of sensitive analytical techniques used to study archaeological artifacts may identify such introduced features, causing confusion in the interpretation. Also, improper cleaning methods, such as acid stripping or the use of commercial detergents, may leave unwanted deposits. Documentation of the cleaning processes will help the analyst to make better assessments of the object’s research potential.
Equally, it is important to document when an artifact has not undergone cleaning. For example, an archaeologist may deliberately choose to set aside a sample of pottery sherds that were not put through the standard washing process for future analysis. If this decision is not clearly documented, another person may come along, see the soil-encrusted sherds, and decide to clean them up.
What are good techniques for cleaning artifacts excavated from non-waterlogged sites?
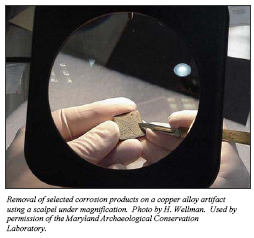
Removal of selected corrosion products on a copper alloy artifact using a scalpel under magnification. Photo by H. Wellman. Used by permission of the Maryland Archaeological Conservation Laboratory.
On site or in the processing laboratory, different artifact materials require different types of cleaning, and some are better off with no cleaning at all.
If it has been determined that an artifact or group of artifacts can and should be cleaned, appropriate methods and tools must be chosen. The table below provides guidelines for different types of artifact materials. The technique and the care with which the cleaning is dis as important as the tools used.
Gentle dry-brushing of surface soil with a soft-bristled paintbrush (not a toothbrush or stiff stencil brush) is the preferred cleaning method for most materials. However, even this can be damaging if the artifact has a powdery paint surface, or the surface is flaking, crumbly, granular, or is otherwise in poor condition. If the artifact is suitable for dry-brushing, the operator should brush gently in one direction only, and pay attention to what debris is being brushed off. Doing the work on a clean, light-colored table (or a table covered with white paper or oilcloth) will make it easier to see what is being removed.
Occasionally, burial deposits are more tenacious, so other methods of cleaning may be necessary. Compacted soil may be dislodged by applying gentle pressure with a wooden cocktail stick (bamboo applicator) or other, similar, soft-edged tool. Metal tools may easily scratch most archaeological materials, so are not recommended; trowels, metal nails, scalpels, dental tools, and other such tools are not appropriate. If a deposit is so compact that it cannot be easily dislodged, it should not be removed until it can be assessed further. Perhaps one of the most common cleaning techniques is washing artifacts in water, sometimes accompanied by brushing with a soft, natural-bristle or nylon-bristle brush. This technique is generally suitable for robust, stable, low-porosity, non-water-reactive artifact materials that have no surface or structural problems. Examples are robust pottery sherds, un-deteriorated glass, un-deteriorated animal bones, stone tools, bricks, slag, coal, and stable shells. Washing in water is not appropriate for metals, deteriorated glass, and most non-bony organic materials such as leather, textiles, and wood.
Many states and archives have specific guidelines governing the processing and washing of artifacts. Some general points to remember when washing artifacts are:
- Always check the artifact for pigment, traces of gilding or loose pieces prior to washing as these can easily be lost during washing. If pigment or gilding is present or the object appears to be quite fragile, do not wash it.
- Never place an artifact directly under a stream of water as this can cause fragile surfaces to be lost. Always wet an artifact indirectly.
- Use the softest brush possible and brush rather than scrub the surface to remove stubborn dirt.
- Always support an artifact as fully as possible when lifting it out of water-never pick it up by just one end or one component as damage may occur.
- Do not wash metals. Exposure to water can activate many forms of corrosion and may lead to rapid deterioration of the artifact.
- Allow artifacts to dry slowly. Never direct hot air onto them or place them in direct sunlight in order to dry.
- Minimize handling when the artifacts are wet, as objects can be extremely fragile when wet.
- Do not wash the following classes of materials: overpainted porcelain, organic material, metals, materials to be sampled for analysis, objects with loose pigment or other surface decoration, objects with residues of food, blood, charring, metals processing, or other evidence.
- Never use acids or commercial detergents to wash artifacts as they can leave behind harmful residues
Table 4ai: Appropriate cleaning methods for different types of non-waterlogged materials.
| Artifact material |
Cleaning Method |
Conditions to beware of |
| Ceramics: high-fired, robust, usually glazed (hard paste, e.g., ironstone, stoneware, porcelain) |
Dry-brush with soft paintbrush. Immerse in water, brush with soft nylon brush. |
Lifting or crumbly glaze. Traces of contents or use. Old repairs. Abrasion of break edges |
| Ceramics: low-fired earthenware, painted, slipped, other applied coating (soft, porous paste, glazed or unglazed) |
Dry-brush with soft paintbrush. Dislodge soil with soft tools. If robust, dip or immerse in water to loosen soil, brush with soft nylon brush. |
All conditions noted above. Loose or powdery pigment or other applied substance. Loose temper. |
| Glass |
Dry-brush with soft paintbrush. Dislodge soil with soft tools. If clear and robust, possibly dip in water to soften soil. |
Flaking, delaminating, iridescence. Adherent crusts (may remove original surface if pried off). Traces of contents, use, sealing agents. Further deterioration in the presence of water |
| Stone |
Dry-brush with soft paintbrush. Dislodge soil with soft tools. If nonporous, immerse in water to loosen soil, brush with soft nylon brush. |
Powdering, spalling, delaminating, crumbling. Traces of wear. Residues of food, blood, phytoliths. |
| Bone, antler, ivory |
Dry-brush with soft paintbrush. Dislodge soil with soft tools. For bone or antler only: If robust, dip or immerse in water to loosen soil. |
Powdering, crumbling, softness. Major cracks and fractures. Incised decoration, butchering marks, applied color. |
| Metals |
Dry-brush with soft paintbrush. Dislodge soil with soft tools. Best to not clean |
Organic remains attached, or incorporated into corrosion. Loose corrosion layers. Multiple components. Corrosion in the presence of water. |
| Leather |
Do not clean. |
Disintegrating collagen fibers. Remains of stitching, laces, pegs, eyelets, coloring. Remains of fatty tissue. |
| Horn, tortoiseshell |
Dry-brush with soft paintbrush. Dislodge soil with soft tools. |
Delaminating, softness. |
| Rubber, plastics |
Dry-brush with soft paintbrush. Dislodge soil with soft tools. |
Soft, crumbling surface. Thin, torn edges. |
| Textiles |
Do not clean. Remove loose dry soil with an air-puffer. |
Disintegrating fibers, brittleness, no strength. Embedded sand grains, soil, crusts. |
What are good techniques for cleaning artifacts excavated from waterlogged sites?
Artifacts from waterlogged terrestrial sites are generally covered in mud. Those from underwater sites may be covered in hard crusts. Waterlogged artifacts are often highly deteriorated, even if they look robust, and may have soft surfaces that can be easily damaged; also, mud, crusts, or other burial deposits may provide support to the structure of the object, so artifacts must be assessed to determine the effect of removing the deposits. See also
What issues are involved in cleaning artifacts?
Artifacts from wet sites have the advantage of being wet already, so in most cases will not be harmed by immersion in water to clean them. If it is determined that surface mud or other deposits should be removed, sometimes dipping the object in a container of water is enough to dislodge the deposits. If the object is particularly large or fragile, loose mud can be cleaned off with a gentle stream or spray of water. The material being washed off should be inspected to make sure no diagnostic deposits are removed. The mud that preserves artifacts so well on waterlogged sites also preserves all kinds of micro-botanical and micro-faunal remains, fatty tissue deposits, and other materials that might not be easily visible or recognizable. It is common to save the mud that is washed off of artifacts, for further analysis. Muddy contents inside ceramic vessels, glass bottles, leather shoes, and other such closed contexts should not be removed without assessing the sampling potential, as these environments usually preserve valuable, unique information.
If necessary, fingers or a soft-bristle brush can be used to remove mud from some artifact types. More tenacious deposits on waterlogged artifacts are best left alone to be evaluated in the laboratory. After loose sediments are removed, the artifacts can be placed into clean wet storage.
| Artifact Material |
Cleaning Method |
Conditions To Beware Of |
| Ceramics: high-fired, robust, usually glazed (hard paste, e.g., ironstone, stoneware, porcelain) |
Immerse in water, brush with soft or medium brush. |
Lifting or crumbly glaze. Traces of contents or use. Historic repairs. |
| Ceramics: low-fired earthenware, painted, slipped, other applied coating (soft, porous paste, glazed or unglazed) |
Immerse in water, brush with soft brush. |
Loose or lifting glaze or other applied decoration. Traces of contents. Historic repairs Loose temper. |
| Glass |
Immerse in water, push off mud with fingers or soft brush. |
Mushy, flaking, delaminating surface. Adherent crusts (may remove original surface if pried off). Traces of contents, use, and/or sealing agents. |
| Stone |
Immerse in water, brush with soft or medium brush. |
Spalling, delaminating, crumbling. Traces of wear. Residues of food, blood, phytoliths. |
| Bone, antler, ivory |
Immerse in water, push off mud with fingers, soft brush. |
Crumbling, softness. Major cracks and fractures. Incised decoration, butchering marks, applied color. Phytoliths and plaque around teeth |
| Metals |
Dip in water to remove loose mud only. Best to not clean. |
Organic remains attached, or incorporated into corrosion. Loose corrosion layers. Multiple components. Due to rapid corrosion of metals in presence of water, object may be more fragile than it appears |
| Wood |
Immerse in water, spray very lightly with water, or use gentle stream of water to remove loose mud only. |
Soft, spongy surfaces that are easily marked and deformed. Coatings, attachments, multiple components. |
| Leather |
Do not clean. |
Loose collagen fibers. Delamination of grain surfaces. Remains of stitching, laces, pegs, eyelets, coloring. Remains of fatty tissue. |
| Horn, tortoiseshell |
Do not clean. |
Delaminating, softness. |
| Rubber, plastics |
Immerse in water, brush with soft brush. |
Soft, crumbling surface. Thin, torn edges. |
| Textiles |
Do not clean. |
Disintegrating fibers, no strength. Embedded sand grains, crusts. |
What techniques are considered harmful for cleaning excavated artifacts?
Whether or not a cleaning technique is harmful to an artifact depends on the material the artifact is made from, its condition, the nature of the deposit being cleaned, and, above all, the manner in which the cleaning is performed. These variables are numerous, so only general guidelines can be offered.
TABLE 4b: Examples of harmful methods of cleaning excavated artifacts.
| Cleaning Method |
Harm Caused |
| Scrubbing or vigorous brushing, with nylon or other brushes. |
Removes surface, creates disfiguring marks on surface. |
| Long-term immersion in water. |
Softens and weakens components, leaches out components, causes disintegration of some materials, strong potential for mold growth. |
| Immersing in acid to remove corrosion products. |
Dissolves carbonate and metal components, bubbling reaction causes physical damage, leaves harmful residues if not rinsed fully, etches metals. |
| Scraping or prying with trowel or other metal tools. |
Scratches, gouges or flattens surfaces, can lift original surface attached to removed deposit. |
| Brushing with metal brushes. |
Severely scratches surfaces, leaves metal flakes embedded in surface. |
| Applying chemicals or detergents. |
May attack components depending on chemical, leaves residues that may be harmful. |
| Using dishwashing soap. |
Leaves residues. |
| Holding under running water. |
Dislodges loose components, marks soft surfaces. |
| Wiping with paper towels. |
Smears soft surfaces, leaves paper fibers on artifact that require further cleaning to remove and may serve as foci for biological growth. |
| Ultrsonic cleaning (without evaluation of condition). |
Can cause cracks to break open, cause disintegration and cause pitting.. |
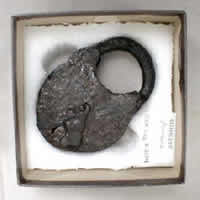
What are soluble and insoluble salts?
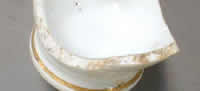
Small lid showing salts formation on the surface. Used by permission of E. Williams.
Soluble salts are crystalline compounds that are solids at particular concentrations and environmental conditions, but react readily with moisture (water) to convert from solid to liquid. In moist or humid environmental conditions, they will take up water and dissolve into solution, while in drier conditions, they will lose water and crystallize to solids. The soluble salts commonly encountered on archaeological sites are combinations of negatively charged ions (or anions) such as chlorides, nitrates, or sulphates and positively charged ions (or cations) such as sodium, potassium, or calcium. Table salt, or sodium chloride, is a soluble salt familiar to most people.
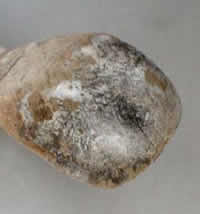
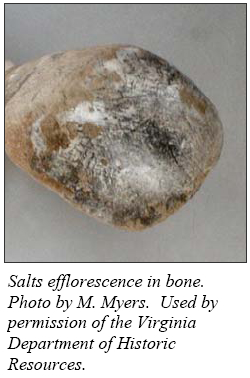
Salts efflorescence in bone. Photo by M. Myers. Used by permission of the Virginia Department of Historic Resources.
Soluble salts present in the soil are deposited in porous archaeological materials by groundwater during burial (or by seawater in marine environments). They may also be deposited in artifacts by acid-cleaning, or may form on artifacts in acidic storage conditions. When salt-contaminated artifacts are excavated from a moist burial environment (or dried after acid-cleaning), the salts crystallize as the artifact dries out. As the crystals grow within the pores of an artifact, they expand volumetrically and may exert great pressure, causing physical damage to the material. The repeated dissolution and recrystallization of soluble salts during periods of fluctuating relative humidity in artifact storage is particularly damaging.
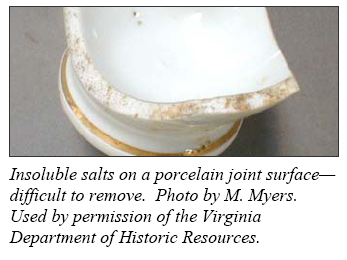
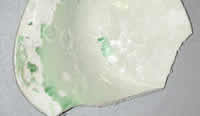
Insoluble salts on a porcelain joint surface-difficult to remove. Photo by M. Myers. Used by permission of the Virginia Department of Historic Resources.
Salts with a solubility greater than 1g per 100g water at 20°C are classed as soluble; salts with a solubility less than 1g per 100g water at 20°C are classed as insoluble. Insoluble salts are also common deposits on archaeological artifacts. These salts are stable and do not react readily with moisture, so they do not cause the same kind of damage as soluble salts. They may, however, obscure an artifact surface, and sometimes penetrate a porous artifact surface, making it difficult to remove without causing surface loss.
| All |
sodium potassium ammonium |
salts are soluble |
|
| All |
nitrates |
are soluble |
|
| All |
sulphates |
are soluble except |
silver sulphate Ag2SO4 barium sulphate Ba2SO4 calcium sulphate CaSO4 lead sulphate PbSO4 |
| All |
chlorides |
are soluble except |
silver chloride AgCl lead chloride PbCl2 |
| All |
carbonates sulphides sulphites |
are insoluble except |
those of Na+, K+, and NH4+ |
Back to Top
Why is the presence of soluble salts important?
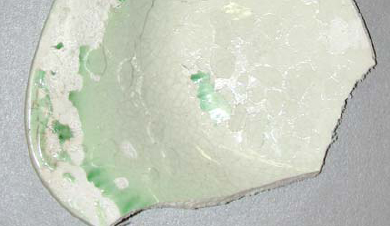
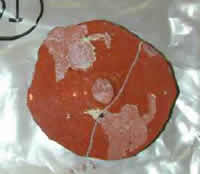
Glaze buckling and lifting as a result of salts. Note the large areas where the glaze has been lost. Used by permission of Emily Williams.
When soluble salts crystallize as water evaporates, they undergo a great increase in volume. When crystallization occurs within a porous artifact (such as bone, ivory or some ceramics) it can cause physical damage. This physical damage is usually manifested as spalling of the object’s surface. It may also take the form of a white powdery efflorescence or bloom on the surface of the object. In some cases large white crystals may also form. These effects may be seen immediately after excavation, or after several years of storage. Glaze buckling and lifting as a result of salts. Note the large areas where the glaze has been lost.
If you are excavating materials within a marine or estuarine context, a privy or a well, or from areas where evaporation exceeds precipitation, you should expect high levels of soluble salts and may wish to test accordingly. Some materials from agricultural settings may have high levels of salts depending on land use and fertilizer patterns, as many fertilizers contain nitrates. Additionally, if you have an artifact in the collection that is showing signs of instability, such as active corrosion in ferrous and/or cuprous materials or spalling and/or crystal formation on the exterior of porous materials such as bone and ceramics, you may want to check for soluble salts. You may want to check for soluble salts.
How should I check for the presence of soluble salts in artifacts?
There are several ways to check for soluble salts. In the field one can take a soil sample from the context and send it to a firm that specializes in the chemical analysis of soils. The analysis will provide quantitative results that indicate how many chlorides, nitrates and sulphates are in that soil sample. Although this will not give you the specific amount of soluble salts in your object (as each object absorbs salts differently), a high level in the soil will indicate that you may have a potentially serious problem. However, even very low salt levels in an object (on the order of several ppm) can cause damage over time if the object is not maintained in a stable and appropriate environment.
A more direct way to test qualitatively for the presence of soluble salts is to take a small sample of the corrosion products or the crystalline surface material from an artifact and extract any salts in a small amount of water. Ideally, one should try to gather up material that has already fallen off of the object so as not to risk further damage to the artifact. Never attempt to soak the artifact itself as this may cause damage. Place the sample in a test tube with a small amount of distilled water (not more than 15ml.) Do not use tap water as it can contain relatively high contents of chlorides and other salts, depending on both the location and season, and may bias your test. Cover the test tube and allow it to sit for a little while and then test for chlorides using a method such as the silver nitrate test, Quantab method, the Hach indicator or the LaMotte Titration kit.
If the result is positive you will need to contact a conservator to help desalinate and stabilize the artifact. If you have desalinated an artifact in the past, do not assume that the same procedure can be used, as each object presents individual challenges and a number of condition factors may need to be assessed prior to developing a desalination protocol for the artifact.
Bear in mind that many of the chloride-testing techniques described above are designed as quick field tests for industrial use. Some are not overly sensitive and do not detect low levels of salts, which can nonetheless be harmful to archaeological artifacts. A negative result may not in fact indicate the absence of soluble salts in the artifact.
What is the difference between testing for soluble salts and testing for chlorides?
Chlorides are just one type of soluble salt. A general test for soluble salts will measure or indicate the presence of all soluble salts that might be in a sample; it will not discriminate between different salts. A test for chlorides is more specific, identifying only the chloride in the sample; there may be other salts present as well, but the tests specific to chlorides will not provide that information.
When desalinating or testing non-metal artifacts, it is not necessary to measure chlorides specifically. Measuring total dissolved solids or conductivity is sufficient, since those techniques measure the level of ionic activity in the water, which is a reflection of the total soluble salt content. However, some of the chloride-measuring tests, such as the silver nitrate test, are easy and inexpensive, so are frequently used for monitoring general desalination.
When it comes to the stabilization of metal artifacts, the chloride ion becomes more important, and a general test of soluble salt content is not sufficient. Other salts can provide the electrolyte for metal corrosion, but chlorides in particular take part in destructive, cyclical corrosion reactions in copper and iron. To effectively stabilize metal artifacts, it is particularly important to identify the presence of chlorides specifically.
What is desalination?
Desalination is the process of removing soluble salts from an artifact, typically through repeated baths in distilled or deionized water. Certain salts, such as some chlorides, nitrates, and sulphates, are easily soluble in water and can be absorbed into porous materials buried in the ground. In drier conditions, these same salts lose water and crystallize to solids. As they crystallize, their volume increases and they can cause physical damage to the fabric of an artifact. For this reason, it is often essential to remove soluble salts if they are present.
Desalination is usually necessary when artifacts have come from environments known to have a high level of soluble salts, such as marine contexts, privies, areas of brackish water and certain terrestrial sites. However, it is not routinely carried out if there is not a clear reason for the treatment. It requires large volumes of good-quality water, measuring equipment, containers, time, and labor, and can be damaging to some artifacts. If the presence of soluble salts is confirmed, artifacts should be carefully assessed as to their suitability for desalination prior to commencing treatment. Even when soluble salt contamination is obvious, exceptions might be made if the soluble salt crusts are holding a fractured object together, supporting lifted pigment, or otherwise creating unstable conditions. In such cases, forms of other conservation treatments may be necessary before desalination can be carried out. Also, certain types of artifacts, such as poorly fired ceramics, should never undergo desalination because of the damage or alterations that would be caused by immersion in or contact with water. If metals require desalination, it may be necessary to use chemical baths other than water, since water can stimulate rapid corrosion.
If desalination is carried out poorly or incompletely, there is a risk that the treatment may cause damage to the artifact. If the desalination process is stopped too early, salts may be left in the artifact to cause problems later. Additionally, in cases where the salt content is very high, osmotic pressure caused by the differences in salt content between the artifact and the desalination bath can cause damage to the artifact unless steps are taken to reduce these differences. It is possible to desalinate an object too much. This leads to the removal or “leaching out” of original components.
Salt levels in desalination baths need to be measured to assess the progression of the desalination and to determine the end point. It is important that instruments are calibrated correctly and that the measurements are done on a regular basis (i.e. every Monday morning) in order to ensure that values can be compared from one week to another. Desalination should be carried out by a conservator or in consultation with a conservator and in certain circumstances, particularly those involving marine artifacts, it may be desirable to begin the process at the site.
After desalination, the next step in the conservation treatment will depend on the material and condition of the artifact. Some artifacts, like robust ceramics from terrestrial sites, can be dried after desalination, while others will need more complex treatments.
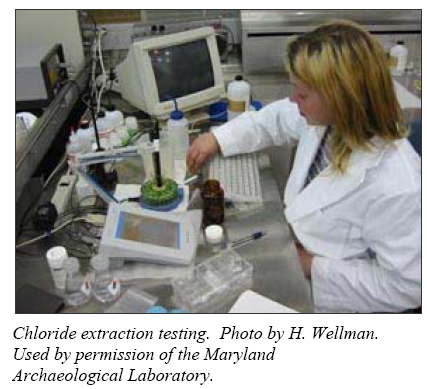
What techniques are used to measure the salt content of desalination baths?

Chloride extraction testing. Photo by H. Wellman. Used by permission of the Maryland Archaeological Laboratory.
Desalination is typically accomplished by soaking an artifact in successive baths of good-quality water. Through this process, water-soluble salts diffuse from the artifact into the less salty water. The salt content of the water baths must be measured regularly in order to check the progress of the desalination. Monitoring is necessary to prevent damage to artifacts caused by excessive soaking or incomplete removal of salts.
In order for desalination measurements to be meaningful, they need to be conducted with some regularity and standardization. In all but the most controlled conditions, measurements between different desalination baths (of different objects) will not be directly comparable because of variations in water volume, object mass, periodicity of measurements, and measuring instruments.
Measurements are typically carried out using either a generalized technique, such as a conductivity meter or a total dissolved solids (TDS) meter, or a chloride specific technique such as a the silver nitrate test or a chloride specific-ion electrode attached to a pH/ mV meter. The accuracy and precision of the techniques depend on many factors, including the quality of the instrument, the sensitivity of the instrument or titration technique, and the sample preparation and handling. All measuring instruments have specific storage and maintenance needs. They also require frequent calibration with standard solutions, which can be made in a laboratory, or purchased from laboratory supply companies. Chemical reagents used in measurements have specific environmental storage needs and limited shelf life. Spot tests require small quantities of hazardous chemical reagents, so should be performed with caution, only after reading all safety and disposal requirements for those chemicals. Also, the reagents need to be of high purity and precisely prepared in order for results to be meaningful.
Generalized Techniques:
- A conductivity meter measures the ability of a solution to conduct an electrical current. Ions, such as salts, in a solution increase the electrical activity of the solution, so the more ions, the higher the conductivity. The unit of measurement is usually microSiemens/cm or micromhos/cm. The higher the conductivity reading of a desalination bath, the “saltier” it is. Conductivity meters range from inexpensive but useful hand-held field units with limited accuracy and life expectancy, to complex, expensive, precision units. Conductivity does not measure or identify specific salts.
- A total dissolved solids (TDS) meter measures the concentration of all components dissolved in a solution. It does not measure or identify specific salts. The unit of measurement is usually parts per million (ppm). Most TDS meters calculate the TDS value from the conductivity value, using a conversion equation, which varies according to the meter and the type of solution being measured. For normal desalination procedures there is no advantage to getting a TDS meter rather than a conductivity meter.
Chloride specific techniques:
The following techniques are just a selection of those commonly used to check for chlorides in artifact desalination baths or in samples removed from an artifact. Inclusion of specific product brands does not imply an endorsement of that product. Many different test kits are available for measuring chloride content, particularly from companies that specialize in water quality analysis.
- Silver nitrate test. The silver nitrate test is a qualitative to semi-quantitative test to identify the presence of chlorides. It can be performed on a sample removed from the object, or on a sample of the desalination bath. Place 15ml of a liquid sample in a small test tube. If it is a solid sample, place it in a test tube and add 5 drops of distilled water. Add 2 drops of 5% nitric acid. Follow with 2 drops of 0.1N silver nitrate. Any chloride in the sample will react with the silver ion to form insoluble silver chloride, a white, cloudy precipitate. This is best seen by holding the container against a dark background. It is best to perform the test on a control sample (distilled water alone) at the same time to ensure the reagents are not contaminated. A faint cloudiness indicates a lower chloride content than a thick cloudiness.
- This test can be made semi-quantitative by mixing up accurate standard solutions of sodium chloride of different known chloride contents (measured in ppm chloride). Perform the test on 15ml of each standard, and then compare the cloudiness of the artifact sample solution to the cloudiness of the known solutions to find the closest match. [References: Odegaard et al. as ref’d above, p.108-109. And NPS Conserve-O-Gram 6/3 (1993), “Testing for Chlorides with Silver Nitrate.”]
- Quantab Titrator Strips (Environmental Test Systems, Inc.) are small plastic strips embedded with silver dichromate. Each strip is a one-use chromatography test. The strip is dipped into the sample solution and the solution is absorbed up through the reagent column. The brown silver dichromate reacts with chloride in the sample to produce silver chloride, which appears whitish on the strip. The height of the white silver chloride peak corresponds to a chloride level (ppm) listed in a conversion table. The strips provide a quick first test in the field or laboratory to determine the general range of chloride levels, and the readings correlate well with those from other methods. They are portable, have a good shelf life and are available from most laboratory suppliers. At approximately $1 US per strip, however, they are too expensive for repetitive or large-scale use. They can detect chlorides above 30 ppm.
- LaMotte Chloride Test Kit. This is a water analysis titration kit with several reagents. A few drops of potassium chromate are added to a 10ml sample in the vial provided. This turns the solution yellow. Silver nitrate is added dropwise until the solution changes from yellow to red-orange. This indicates that all chloride has reacted, and the excess silver is reacting with chromate ion to form the red-orange silver chromate precipitate. The amount (ml) of silver nitrate required to produce this reaction is converted to chloride concentration (ppm) with a conversion table. The test is relatively inexpensive and easy to use, but determining the titration end point (color change) can be a matter of personal judgment, especially if the sample is contaminated or cloudy, so there is potential for significant error. The waste products contain silver compounds, which are considered hazardous materials in the USA. Kits are available to detect chlorides in the range of 0-50 ppm.
- The Hach Titrator kit. This is another water analysis kit with several reagents. A titrator apparatus is used to dispense known volumes of mercuric nitrate into a sample prepared with diphenylcarbazone, a colored reagent. When the color changes from yellow to light pink (caused by excess mercuric ion), the amount of reagent dispensed is compared to a conversion table to determine the concentration of chloride. The dispenser is somewhat awkward to use, and the waste products contain mercury compounds. Hach also has a kit using silver nitrate, as described for the LaMotte test above.
- The Jenway Chloride Meter measures the consumption of silver ions in the chloride sample, and is simple and fast to use. It releases silver ions at a fixed rate from an electrode into an aliquot of sample. Chloride ions bond with the silver ions, and the overall conductivity of the solution is reduced. When all the chloride ions have reacted, conductivity ceases to change, and the device calculates chloride concentration from the amount of silver consumed. It is principally designed for clinical work and it is sensitive to contaminants and other ionic species, which would probably exclude samples from electrolytic or chemical reduction baths. The silver electrodes also require frequent polishing. The waste products contain silver compounds.
- Chloride specific-ion electrode attached to a pH/mV meter. A chloride specific-ion electrode has an ion-selective membrane that allows passage of the chloride ion only. It measures the chloride ion activity in a solution, which corresponds to the concentration in ppm. The electrode requires regular maintenance, which may include changing internal solutions or keeping the sensor polished, depending on the style of electrode. Measurement requires extensive sample preparation (pH must be neutral, and samples should be filtered), and calibration with precisely made standards. Sample preparation and meter calibration can take twice as long as sample measuring, and the addition of neutralizers (nitric acid) and Ionic Strength Adjusters (sodium nitrate) can dilute the sample. Once prepared, measuring is fast and easy by dipping the electrode into the solution, and reading the result on a digital output. The initial cost of meter and electrode are high, and the procedure requires a constant supply of calibration standards. There are both bench-top and portable field models. Waste products are not hazardous.
What techniques are considered harmful for cleaning excavated artifacts?
Whether or not a cleaning technique is harmful to an artifact depends on the material the artifact is made from, its condition, the nature of the deposit being cleaned, and, above all, the manner in which the cleaning is performed. These variables are numerous, so only general guidelines can be offered. Be sure to see:
What issues are involved in cleaning excavated artifacts? and
What are good techniques for cleaning freshly excavated artifacts?
TABLE 4b: Examples of harmful methods of cleaning excavated artifacts.
| Cleaning Method |
Harm Caused |
| Scrubbing or vigorous brushing, with nylon or other brushes. |
Removes surface, creates disfiguring marks on surface. |
| Long-term immersion in water. |
Softens and weakens components, leaches out components, causes disintegration of some materials, strong potential for mold growth. |
| Immersing in acid to remove corrosion products. |
Dissolves carbonate and metal components, bubbling reaction causes physical damage, leaves harmful residues if not rinsed fully, etches metals. |
| Scraping or prying with trowel or other metal tools. |
Scratches, gouges or flattens surfaces, can lift original surface attached to removed deposit. |
| Brushing with metal brushes. |
Severely scratches surfaces, leaves metal flakes embedded in surface. |
| Applying chemicals or detergents. |
May attack components depending on chemical, leaves residues that may be harmful. |
| Using dishwashing soap. |
Leaves residues. |
| Holding under running water. |
Dislodges loose components, marks soft surfaces. |
| Wiping with paper towels. |
Smears soft surfaces, leaves paper fibers on artifact that require further cleaning to remove and may serve as foci for biological growth. |
| Ultrsonic cleaning (without evaluation of condition). |
Can cause cracks to break open, cause disintegration and cause pitting. |
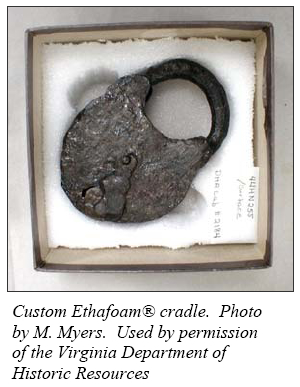
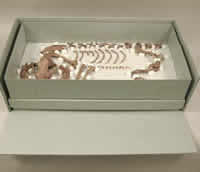
How should I store archaeological artifacts for curation?
Custom Ethafoam® cradle. Photo by M. Myers. Used by permission of the Virginia Department of Historic Resources
Creating a stable storage environment for unstable archaeological artifacts first requires an understanding of the nature of the instability, and then a determination of which actions are most suitable to correct those problems. Most artifact damage falls into three areas: mechanical instability, chemical instability, and biological instability. They are often interrelated. By creating the proper storage environment, these problems can be minimized without extensive conservation treatment.
Mechanical/ Structural Instability
Mechanical instability can result from internal weak points on an object (joins, hinges), natural fragility (low-fired ceramics, many organic materials), or induced weakness (metal corrosion, organic decay). Without proper handling and support, mechanical weakness can lead to breakage, abrasion, bending, and distortion of the artifact.
The simplest cure for mechanical instability is proper packaging and support with foam padding, corrugated board underlay, and form-fitting pads. There are a number of publications that describe techniques for supporting artifacts and properly packaging archaeological objects (see bibliography). Additionally, most basic conservation texts address this in detail. Where necessary, support trays and padding should be an integral part of the handling and packing system so that the support always gets handled, not the object. Sturdy containers and covers will protect fragile objects from impact and shock.
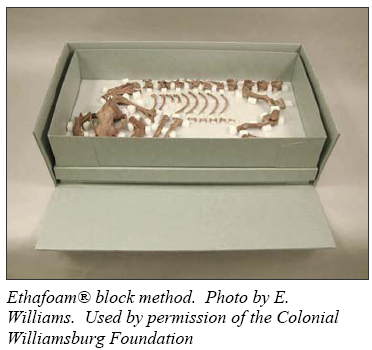
Ethafoam® block method. Photo by E. Williams. Used by permission of the Colonial Williamsburg Foundation
Chemical Instability
Chemical instability usually results from some component of the artifact reacting to some component of the storage environment. The most common example is the corrosion of metal in the presence of high moisture levels in the air (relative humidity, RH). More rarely, different components within an object can be aggressive towards each other, though there is usually an external catalyst such as moisture or temperature that will accelerate the instability. A good example of this is the way in which rapid fluctuations in relative humidity can cause salt crystallization within a porous ceramic resulting in spalling and even total loss.
Atmospheric pollutants can also contribute to the chemical instability of artifacts. Perhaps one of the best-known examples of this is the way in which silver will tarnish in the presence of even minute levels of sulphur. Similarly, lead is very vulnerable to attack from organic acids, such as formic and acetic acids, which are often present in non-archival storage materials (such as acidic paper and formaldehyde-based plywood glues). For this reason, one must ensure that all packing and storage materials are of proven archival quality. In most cases of chemical instability, altering the storage environment will remove catalysts, and slow the degradation process. It is almost impossible to completely halt a decay process, even with intensive conservation treatment. With most archaeological collections, environmental controls and the provision of archival packing materials are the most cost-effective and efficient ways of dealing with the problem.
Biological Instability
Biological decay is caused by micro- or macro-organisms that feed on components of the artifacts, or leave behind waste products that can cause chemical decay. The culprits may range from fungi and bacteria to insects and rats. The first level of defense against the agents of biological decay is to avoid allowing them into your storeroom in the first place. Where possible, objects and packaging should be cleaned of micro-organisms, and the storage area should be sealed and monitored to control the invasion of vermin or insects. Micro-organisms and insects can often be controlled (though not eradicated) by freezing or anoxic treatments. Toxic eradication is not recommended, since it may leave residues harmful to both humans and objects. There is also concern that some fumigants may affect the molecular bonding of some materials, such as paper.
Environmental controls can also control biological decay, since most organisms are sensitive to levels of humidity and temperature. Low temperature storage will slow most fungi, mold, and bacteria, and stop the life cycles of many pests. Low RH will also force many microorganisms and pests into a dormant phase. However, care must be taken not to ensure that the RH does not fall into a range that is detrimental to the artifacts (i.e. below 45% RH for any collections containing organic material. Constant monitoring is crucial in order to identify and halt outbreaks before they spread.
Storage Environments
A good storage area must include controls for temperature, relative humidity, pollutants, pests and other degradative factors. In particular rapid and extreme cycles of wet and dry conditions, which cause cycles of shrinkage and expansion of artifact components, can cause significant damage and encourage degradation. It is therefore important that the storage system be able to maintain stable temperature and relative humidity levels, and that when fluctuations do occur, they are slow and gradual.
Since most archaeological collections contain mixed materials, all of which require different storage conditions, it is usually impossible to provide one single set of environmental parameters that will ensure the safety of all artifacts in the collection. For this reason, microclimates are often employed. A microclimate often takes the form of a smaller, sealed container with an internal environmental control. This control usually takes the form of a moisture absorbing agent such as silica gel or Revolutionary Preservation® (RP) System, or a moisture buffer like Artsorb®.
Since high relative humidity can promote many types of deterioration, most microclimates for archaeological materials involve providing a low RH environment. Silica gel is the most commonly used desiccant in storage and display cases as it is efficient and relatively inexpensive. Silica gel is an amorphous silica crystal capable of absorbing and holding large quantities of atmospheric moisture when properly prepared and used. It can maintain a very low relative humidity (i.e. less than 20% RH), which is useful for storing archaeological iron, as long as the gel is used in the proper proportions, monitored and regenerated periodically. There are two forms of silica gel: non-indicating gel, which is clear, and indicating gel, which is colored and experiences a color change as it becomes saturated. The indicating silica gel can be used to quickly and easily monitor the relative humidity in the storage environment, as the color change is clearly visible. Indicating gel is usually significantly more expensive than non-indicating gel, so a cost effective way to use it is to mix one part indicating gel with three parts non-indicating gel. The most common form of indicating silica gel contains cobalt chloride and is deep blue when dry and pink when damp (above approximately 40% RH). Cobalt compounds have been shown to cause cancer in laboratory animals, and have been classified in Europe as a possible human carcinogen. Therefore, this form of silica gel requires special handling and disposal as a hazardous material. Use of silica gel containing cobalt chloride should be discontinued or phased out as stocks are used up. Heavy-metal-free alternatives are Sorbead® Orange, which turns from orange to translucent as it becomes damp, and Silica Gel Yellow, which changes from yellow to green to deep blue as it absorbs more moisture. All silica gel should be handled carefully to avoid breathing the dust, and disposed of as hazardous waste. The cobalt blue indicating silica gel is more hazardous; check local regulations to determine proper disposal. If you are using the cobalt blue gel mixed with non-indicating gel, all the non-indicating silica gel used in the same batch with the blue gel will have to be handled and disposed of as cobalt-containing hazardous material.
Art-Sorb® is a variation on silica gel, advertised as having five times the moisture buffering capacity as regular silica gel. It comes in bead form or impregnated in a non-woven sheet of archival polyethylene/polypropylene fibers, which can be useful in some storage and display situations. It comes buffered to specific median RH levels (ca. 40-75%), and is designed to hold the environment at that level in a sealed container. This is most appropriate for storing organic materials like bone, wood, or textile, which shrink and become brittle at the extreme desiccation levels usually associated with silica gel storage (normal silica gel can be conditioned to these higher RH levels, but it is most commonly used for creating low RH environments).
Since oxygen is another catalyst of degradation, it is sometimes beneficial to reduce or exclude oxygen from the artifact storage environment. Mitsubishi Gas Co. produces several products that scavenge oxygen out of a sealed container or pouch. Two of them, Ageless® and RP-K®, remove oxygen but do not affect the moisture content in the pouch. These products are particularly useful for pest eradication and the stabilization of organic materials that are oxygen sensitive. However, they are not recommended for storing archaeological metal, as they require moisture in the container for operation, and will therefore not adequately protect the artifact. The third product, RP-A®, is a desiccating oxygen scavenger that removes both moisture and oxygen from a sealed container’s atmosphere. It holds great promise for the storage of archaeological iron and a growing number of museums and conservation labs are beginning to experiment with it. The scavenging agent cannot be regenerated and must be used in conjunction with specific barrier film-either Marvelseal® or Escal®. Regular polyethylene artifact bags or sheeting are permeable to moisture and oxygen, so are not suitable for use with these scavengers. Marvelseal® is a three layer film, consisting of a strong polyester plastic outer layer, a middle layer of extremely thin aluminum foil, and an inner sealing layer of low density polyethylene (LDPE). The foil is an excellent barrier for both moisture and humidity but is opaque. Once the artifact is sealed into it, it is not visible unless a window of another material is created or the pouch is opened. Escal®, on the other hand is transparent, yet remains an excellent barrier to most gases. The outer layer of Escal® barrier film is polypropylene, the barrier layer is a vacuum-deposited ceramic on a polyvinyl acetate (PVA) substrate and the inner (sealing) layer is polyethylene. When either film is used, it must be sealed thoroughly and in order to access the artifact the seal must be broken, necessitating the use of new materials. Therefore, the use of any scavenging system, although very effective, is best suited for artifacts that are not accessed regularly.
Additional Resources:
For detailed descriptions of silica gel’s properties and uses, see Silica Gel, Canadian Conservation Institute Technical Bulletin 10, Silica Gel, 1984, ISBN 0-662-53370-4.
For information on the disposal of silica gel, see Cobalt Indicating Silica Gel Health and Safety Update, National Park Service Conserve-O-Gram number 2/15 (June 2001). It can be accessed from: http://www.cr.nps.gov/museum/publications/conserveogram/02-15.pdf Information on using Artsorb: http://www.cwaller.de/english.htm?howto.htm~information
How do I create a desiccated microclimate for storage?
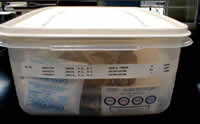
Photo by M. Myers, used by permission of the Virginia Department of Historic Resources
The creation of microclimates, or smaller zones in which the climate varies from those areas surrounding it, is an important concept for any form of cultural heritage storage. Microclimates can be created within existing storage facilities in order to meet a number of preservation needs ranging from the necessity for ultra-dry storage (i.e. less than 20%RH) to wet storage or oxygen free storage. In an archaeological context, the most commonly used microclimate is the desiccated one. This is usually created for the storage of archaeological metals and the goal is generally to create an environment with a relative humidity lower than 20% RH.
The simplest way to create a desiccated micro-environment is to use several polyethylene ziplock bags sealed one inside the other. First make a perforated pouch of silica gel by pricking a polyethylene ziplock bag over its entire surface with a bamboo skewer, paperclip, or similar tool, and then filling it with silica gel (make sure that the holes are large enough to allow airflow but not large enough to allow silica gel to escape). Place this pouch of silica gel into a larger, un-perforated 4mil polyethylene ziplock bag with the artifact(s). Add a humidity-indicating strip that can be read through the bag, in order to monitor the RH at the artifact. Place this double-bag inside a third un-perforated 4mil polyethylene ziplock bag, and seal the entire set of bags. Multiple artifacts in individual bags may be grouped together with the silica gel, as long as each artifact bag is also perforated for the free passage of moisture into the silica gel. Bags that are thinner than 4mil will not have strong enough seams to restrict the entrance of external moisture, and may not bear the weight of the artifacts within. If the artifacts do not fit inside standard ziplock bags, custom bags can be made with 4mil polyethylene sheet and a heated seam-sealer. Since the polyethylene bags and sheeting are somewhat permeable to moisture vapor, this system will be more effective (remain desiccated longer) if the sealed bags are placed inside another sealed container.
Another way of creating a microclimate is to use food-quality air-tight freezer boxes made from polyethylene/polypropylene, such as those made by Rubbermaid® or Tupperware®. Place the perforated pouch of silica gel into the box together with the artifacts and a humidity-indicating strip, seal the lid tightly (you can ‘burp’ out excess air to improve the seal), and placed into a standard storage box for handling. Two large Rubbermaid® Model No. 3863-87 boxes (approximately 36x26x13cm, 2.2 gallon/8.3 liter capacity) will fit neatly into a standard Coroplast box (40x30x26cm) with room for other bagged materials. The tighter the polyethylene lid seals on the container, the less air exchange will occur, and the longer the gel will stay desiccated.
In order to calculate the amount of silica gel needed to desiccate the environment of a container, calculate the volume of the container (multiply the length by the width by the depth of the container). For every 5 liters (5000 cm3) of volume within the container add 400 grams of silica gel.
Because there is still some exchange with the exterior environment no matter how tight a seal is, microclimate containers should be monitored semi-annually. The silica gel will also require regeneration periodically to remove the moisture it has absorbed. To regenerate the silica gel, spread the gel on a baking sheet or Pyrex (oven-resistant glass) tray, place it in an oven set at 110° C ( 230°F) and bake it for four hours.
Additional Resources:
For detailed descriptions of silica gel’s properties and uses, see Silica Gel, Canadian Conservation Institute Technical Bulletin 10, Silica Gel, 1984, ISBN 0-662-53370-4.
For information on the disposal of silica gel, see Cobalt Indicating Silica Gel Health and Safety Update, National Park Service Conserve-O-Gram number 2/15 (June 2001). It can be accessed from: http://www.cr.nps.gov/museum/publications/conserveogram/02-15.pdf
What are archival storage materials?
Archival storage materials refer to those materials used for packaging and storage that are permanent, durable, and chemically stable and that can safely be used for preservation purposes. Examples of archival materials include acid-free folders and tissue paper that contain no alum-rosin sizing or lignin. Archival plastic bags are those that do not contain chloride or volatile plasticizers. Many of the materials sold by archival supply stores have been subjected to a number of tests to determine their long-term stability, or are manufactured to strict standards. However, not every material sold by archival supply stores is necessarily ideal for the storage of archaeological materials, so it is important to know exactly what something is made of. Suppliers should be able to answer questions about the properties of their products, so do ask if there is any doubt. Additionally, any supplies coming from an archival supply store should have been stored in a clean environment prior to shipping so be sure to check for damage to the packaging of any purchases. A number of archival storage materials and their suppliers are detailed in the supply list.
Conservators often test materials prior to using them, to be sure they are not harmful to artifacts. The Beilstein Test , a test for the presence of chlorides in materials such as plastics, is just one of the tests that can be used. The Oddy test is an accelerated aging test used to look at the effects of storage and exhibit materials on artifacts (particularly metal artifacts). A pH pen can be used to quickly determine if paper is acid free.
There are a number of materials that are not archivally stable, which have been used to store collections in the past. These include corrugated cardboard boxes, manila folders, rubber bands, “scotch” tape, and newspaper, all which are unstable and quickly degrade, causing damage to artifacts and leaving them vulnerable to further damage. The table below (table 4l) details some of the non-archival materials used in the past, their negative effects and the materials with which they may be replaced.
| Materials used in past |
Effects |
Archival materials which may be used instead |
| Rubber bands-used to attach labels to artifacts or to hold several pieces of an artifact together, or to hold papers together in the site archive |
Rubber bands degrade quite rapidly (within as little as 10 years) and may leave sticky disfiguring residues on the artifact. Additionally, the rubber band can cut into materials, such as paper, -causing tears. |
Cotton tying tape (twill tape) |
| Newspaper-used for padding, wrapping and other purposes |
Newspaper and a number of other paper products contain a high amount of lignin, which renders them highly acidic. Additionally, newsprint can transfer to object surfaces. |
Acid-free tissue |
| “Scotch” tape, masking tape, Dixie cups, match boxes-used to hold artifacts |
Release acidic byproducts that cause damage to the artifacts stored in these materials. |
Polyethylene ziplock bags, clear polystyrene boxes and acid free trays |
| Beer flats, commercial cardboard boxes, shoe boxes |
Release acidic byproducts that cause damage to the artifacts stored in these materials. |
Blueboard, acid-free corrugated cardboard boxes, corrugated polyethylene boxes. |
| Wooden cabinets or boxes |
Wooden cabinets can off-gas acetic acid and formaldehyde, which can cause accelerated corrosion of metal artifacts. |
Powder coated metal cabinets and shelving units |
| Saran Wrap-used to wrap artifacts |
Saran Wrap is made from polyvinyl chloride (PVC). As PVC breaks down it can emit hydrochloric acid and can cause corrosion of metal artifacts. |
Polyethylene film |
| Cotton wool-used as padding in boxes and bags |
Cotton wool can snag uneven edges on artifacts, and leave cotton fibers attached to surfaces. |
Polyethylene foams (Ethafoam®, Volara), acid free tissue |
| Metal paper clips and staples-used to hold papers together |
Corrode and stain paper, leave imprints, corroded piece break apart and lodge in unwanted places. |
Eliminate them, or use plastic or stainless steel varieties |
What are humidity indicator strips?
Humidity indicator strips or cards are small strips of paper (approximately 10 cm x 2 cm) that use a color indication method to detect relative humidity. One common version is made of heavy cardstock that incorporates a strip impregnated with cobalt chloride; the impregnated strip is divided into small colored segments. As the humidity increases, the chemically impregnated segments change from a blue color (dry) through lavender, to a pink color (humid). As the humidity level decreases the spots change from a pink color (humid), through lavender, to a blue color (dry). While these indicator strips are not very precise, they are useful for practically and economically monitoring relative humidity in storage containers and exhibit cases.
Humidity indicator strips are more precise than the color-change self-indicating silica gel crystals, as those crystals do not react below 30-40% rH, and only indicate when the gel is completely exhausted. An indicator strip reacts at much lower levels (10-20% rH), and will warn you to regenerate the silica gel before the rH gets too high. The indicator strips do not have an infinite life span. In addition, in damp conditions the dyes on the strip can bleed into each other, rendering it inaccurate.
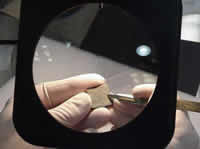
What is a stable system for labeling artifacts?
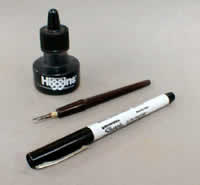
Photo by M. Myers. Used by permission of the Virginia Department of Historic Resources.
Registration or accession numbers are commonly applied to artifacts to aid in identification and as a security device. Ideally, it is best to apply the number directly onto an object so that it cannot become separated from the object. There are many systems being utilized for applying numbers directly to objects. Most involve applying a coating of lacquer, applying the number with ink, and applying a topcoat of lacquer to seal it. The rationale for applying a bottom coat is so that the inked numbers will not bleed into the artifact and disfigure it. The topcoat is applied over the inked number to protect the number from abrasion and loss during normal wear and tear of object handling. Topcoats and bottom coats should dissolve in different solvents so that numbers may be removed and reapplied if necessary without too much stress to the object.
One effective method for labeling artifacts is to apply Acryloid B-72 as a bottom coat, write the number, and then apply Acryloid B-67 as a top coat. Acryloid B-72 and B-67 are stable acrylic resins that can be applied (and removed) with different solvents. This technique is recommended for artifacts such as ceramics, glass, metal and bone. It should not be used for plastic or rubber objects as the solvents can damage them. It is also not suitable for many organic materials or fragile artifacts. The procedure for this system is as follows:
- Select a small, inconspicuous area on the body of the object. Choose an area that is easily visible, not subject to frequent abrasion, and is as nonporous and small as possible.
- Apply a layer of 15% Acryloid B-72 in acetone with a small paintbrush to the selected area and allow it to dry for 15-20 minutes or until it is no longer tacky to the touch. (It is not necessary to apply a bottom coat to artifacts already coated with B-72 or Incralac).
- Apply the accession number on top of the dry layer of B-72 using either water based designer’s gouache applied with a small paint brush or write the number using a Rapidograph pen filled with black pigment based ink or Dr. Ph. Martin’s Pen-White for technical pens.
- Allow the ink to dry for 15-20 minutes.
- Apply a topcoat to the number with 20%Acryloid B-67 in naphtha or Stoddard solvent. Allow the topcoat to dry for 15-20 minutes.
General points to remember regarding numbering artifacts:
- Before handling the object always make sure that it is structurally sound and can be handled safely.
- Always check the numbering protocols of the repository where the object will reside before applying a number, as the requirements of each repository vary slightly.
- Do not apply numbers to objects awaiting conservation treatment, objects that are actively spalling, or some very fragile objects. In these cases, it is best to place the artifact in a labeled polyethylene bag along with a label made from spun-bonded polyethylene paper (trade name = Tyvek®). This paper is archival and resistant to water and tearing.
- Consider the best place to number the artifact before starting. Clearly, it is not sensible to apply a number to the face of a coin as it may obscure important information.
- Write numbers clearly.
- To avoid needless handling try to standardize the placement of numbers as much as is sensible, so that the user can easily locate them.
- Nail polish is NOT RECOMMENDED for use in numbering as it contains cellulose nitrate, which will turn yellow, shrink, and stain the artifacts over time. Additionally, it becomes brittle over time and will flake off.
- Both naptha and acetone are flammable and hazardous solvents, so dispense only small amounts of the topcoat and bottom coat at a time and perform numbering in well-ventilated areas.
- Never use labels with pressure sensitive adhesives to number artifacts. Many have a rubber-based adhesive that will yellow. Others, especially those touted as “acid-free,” have acrylic adhesives that can cold flow into your object and may be impossible to remove with time.
- On dark colored objects, mixing titanium dioxide pigment into the bottom coat will create a white label that will be easier to read. Alternatively, white ink may be used for the numbers themselves.
- Be sure that the artifact will not be damaged by the solvents in the top and bottom coats of the labeling system. For example, many solvents will damage plastic artifacts.
See also Use of Acryloid B-72 Lacquer for Labeling Museum Objects National Park Service Conserve-O-Gram 1/4 (1993) available on-line at http://www.cr.nps.gov/museum/publications/conserveogram/01-04.pdf
How do I mix Acryloid B-72 and Acryloid B-67 for labeling artifacts?
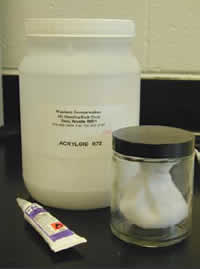
Photo by E. Williams, used by permission of the Colonial Williamsburg Foundation
One system for labeling artifacts involves the application of a bottom coat of Acryloid B-72 and a topcoat of Acryloid B-67, with the number written in ink in between. The concentration of B-72 and B-67, and the solvents used, vary between institutions. One common system is described below. This system involves a 15% weight/volume (w/v) solution of Acryloid B-72 in acetone as a “bottom coat”, and a 20% w/v solution of Acryloid B-67 in naphtha for a “top coat”. On dark colored objects, such as metals, mixing titanium dioxide pigment into the bottom coat will create a white label that will be easier to read.
In a weight/volume solution, the final volume of the solution equals the volume of both the solid and the liquid. When mixing a w/v % solution, it is important to remember that you do not add a fixed weight to a fixed volume. Simply adding 10grams of resin to 100ml of solvent makes a solution slightly greater than 100ml and thus LESS THAN 10% resin, depending on the volume of the resin. Take care to add solvent to the resin so that the volume achieved is the correct volume needed for the total solution.
Because graduated laboratory glassware is expensive, and old resin solutions are hard to clean up, mix your resins in disposable clean containers with airtight lids, like jam jars. Handle all chemical compounds with care. All solvents are flammable, and are toxic to some degree, so use them in a fume hood, in a well- ventilated area, or with a respirator (if you have been trained and fitted with a respirator). Wear gloves to protect hands from absorption of chemicals. Clean up any spill immediately. Clearly label all containers. Keep Material Safety Data Sheets (MSDS) readily available for reference. MSDS can be acquired from both the MSDS website http://www.msds.com, which supplies free sheets, and by contacting the suppliers.
The suspended cheesecloth bag technique described below makes it easy to dissolve the resin in the solvent – only minimal stirring is required.
Materials needed:
- Acryloid B-72 crystals
- Acryloid B-67 crystals
- Acetone
- Naphtha
- Scale (capable of measuring in grams) for weighing resin crystals
- Graduated beaker or cylinder for measuring solvents
- Mixing container with airtight lid (i.e., jam jar), marked for the total volume needed (i.e., 100ml)
- Cheesecloth
- Nitrile gloves
- Respirator and/ or Fume Hood/Extractor
To prepare 100ml of 15% Acryloid B-72 solution for base coat:
- Mark a jar to reflect 100 ml content.
- Weigh out 15 g Acryloid B-72.
- Cut a square of cheesecloth.
- Tie or knot the cloth around the Acryloid B-72 crystals.
- Suspend the cheesecloth bag in the jar (polypropylene twine or other solvent-resistant twine is useful for this).
- Add acetone to the 100 ml mark. Put lid on jar.
- It will take about 15 minutes for the Acryloid B-72 to go into solution.
- When all the resin has dissolved, remove the cheesecloth and allow it to dry by evaporation in the fume hood or a well-ventilated area before discarding.
To prepare 100ml of 20% Acryloid B-67 Solution for top coat:
- Mark a jar to reflect 100 ml content.
- Weigh out 20 g Acryloid B-67.
- Cut a square of cheesecloth.
- Tie or knot the cloth around the Acryloid B-67 crystals.
- Suspend the cheesecloth bag in the jar (polypropylene twine or other solvent-resistant twine is useful for this).
- Add naphtha to the 100 ml mark. Put lid on jar.
- It will take about 30-45 minutes for the Acryloid B-67 to go into solution.
- When all the resin has dissolved, remove the cheesecloth and allow it to dry by evaporation in the fume hood or a well-ventilated area before discarding.
To prepare a 15% Acryloid B-72 Solution with Titanium Dioxide for base coat:
- Put 10g of titanium dioxide in your marked container.
- Add Acryloid B-72 and acetone as above to make a 10% solution.
- When the B-72 is dissolved, stir well.
Where can I buy Acryloid B-72 and Acryloid B-67?
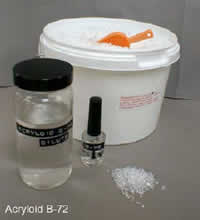
Photo by M. Myers. Used by permission of the Virginia Department of Historic Resources
These two thermoplastic synthetic resins have been tested by conservation scientists for light-fastness, strength, and reversibility, using a variety of artificial ageing techniques. They are considered stable and are used regularly by conservators. They can be purchased as solutions already dissolved in a solvent, or as dry beads. The bead form is particularly useful, as it allows solutions to be customized to different concentrations and with different solvents. Rohm & Haas, the US manufacturer of Acryloid resins, will not sell them directly, but in the Mid-Atlantic they are available from:
Conservation Resources International, L.L.C.
5532 Port Royal Rd.
Springfield, Virginia 22151
Tel: 1-800-634-6932
www.conservationresources.com
In supplier catalogs look for: Acryloid B-72 or Paraloid B-72 for the solids (beads); or HMG Acryloid B-72 for small tubes of pre-mixed resin. Paraloid B-72 Lacquer, as a coating, is frequently used to apply a small isolation patch on artifacts for labeling. It is now available, premixed in acetone, in jars with a brush applicator in the cap, both the clear and in an opaque (white) formulation, from:
University Products
Tel: 1-800-628-1912
www.universityproducts.com
Copyright © 2006 Colleen Brady, Molly Gleeson, Melba Myers, Claire Peachey, Betty Seifert, Howard Wellman, Emily Williams, Lisa Young. All rights reserved. Commercial use or publication of text and graphic images is prohibited. Authors reserve the right to update this information as appropriate.