Mouth-blown bottles portion
of
the Dating Key
HOME:
Bottle Dating: Mouth-blown bottles
Click here to move directly to the list of mouth-blown dating questions.
MOUTH-BLOWN BOTTLES
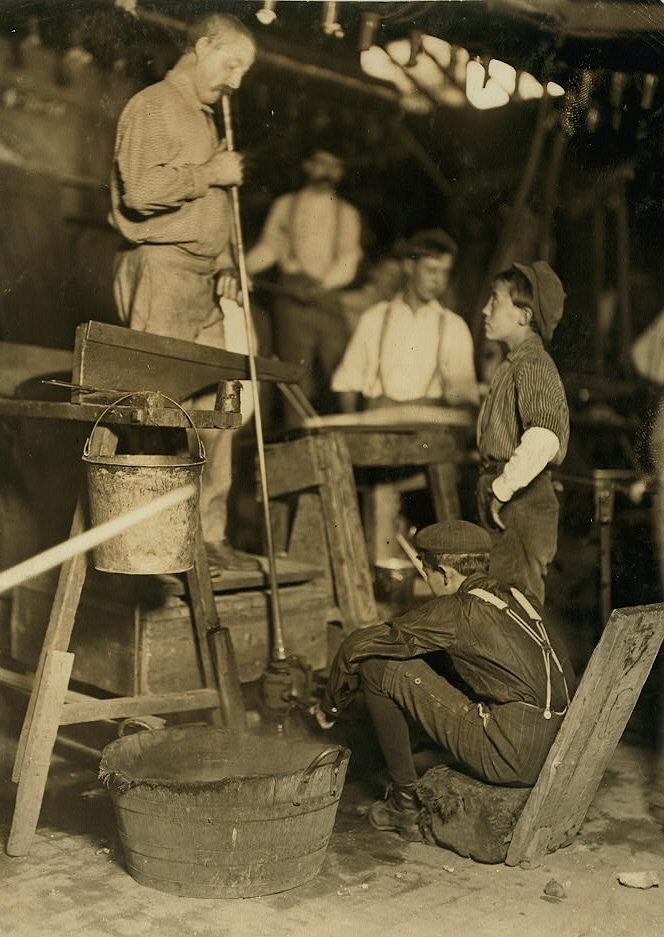
The 1908 image to the right was taken at the Seneca Glass Works in Morgantown, WV. and shows a gaffer (with the blowpipe) at work with his "mold tender" boy (seated). The mold boy (aka a servitor) would open and close the mold (at the base of the pipe behind the wash tub) as directed by the gaffer. In front of the gaffer in this image (to his right) is the chair where much work was done with blowpipe manipulation prior to lowering the parison into the mold expansion. A second boy looks on with (possible) admiration of the gaffer as they were the highest paid and most elite workers on the glass factory floor and among the highest paid of all skilled laborers during the 19th century (Barnett 1926). Being a gaffer was also the position that glass factory boys aspired towards (Skrabec 2007). Directly in front of the standing boy is most likely the marver which was a flat table used for parison manipulation. The caption to the photo is: "Blower and Mold Boy, Seneca Glass Works, Morgantown, W. Va. Location: Morgantown, West Virginia." (Lewis Hine photo, Library of Congress). For more details about the production of mouth-blown bottles visit the Glassmaking & Glassmakers page. In addition, the following linked 1910 article outlines the process very well: New York Herald, Inc. 1910. Making a Milk Bottle. As reprinted in the Arkansas Gazette (Little Rock, AR.), April 3, 1910. This is an excellent period article on the making of mouth-blown milk bottles from mixing the glass batch to the final product. Although nominally about making milk bottles, the article is a well articulated sequence of steps and processes for making about any mouth-blown bottle of the late mouth-blown period, i.e., the early 1900s. It is fairly short and well worth reading! This article is available as a PDF file on this website at the following link: http://www.sha.org/bottle/pdffiles/ArkansasGazette04-03-1910.pdf (Another version of the same N.Y. Herald article but with better illustrations can be found at the following link: http://www.sha.org/bottle/pdffiles/EvansvilleCourier&Press05-1910.pdf ) The large majority of mouth-blown bottles (probably at least 98%) date to or prior to the World War I era (1914-1918) with at least 75% likely dating prior to 1900 (empirical estimate). A few American glass companies continued hand-blowing some types of bottles into the mid-20th century (Toulouse 1971). However, as noted in Jones & Sullivan (1989) "Hand-blown bottles lasted into the 1930s but only for small run types such as pharmaceutical bottles, cosmetic wares, and demijohns. Their quantities would be very small in any post-1920 archeological assemblage." The following link is to an amazing early 20th century film clip of a mouth-blown shop blowing bottles. It shows two gaffers and one mold boy/servitor in smooth and efficient action. The gaffer makes the gather from the glass pot/tank in the background, rolls and pre-forms the parison on the marver (table to the left), then quickly drops the parison into the mold which the mold boy efficiently snaps shut. The gaffer quickly inflates the bottle and efficiently bursts-off the blowpipe while pulling the blowpipe away from the mold. (This is particularly interesting to see and shows that shearing or cracking-off wasn't always used or even necessary.) The mold boy then removes the bottle from the mold with tongs while the gaffer knocks off the residual glass from the end of the blowpipe and then moves back to the glass pot/tank to make another gather. The second gaffer is doing all of this on a staggered timing sequence with the first gaffer which allows the team ("shop") to produce a bottle - albeit without post-blowpipe tooling of a finish - about every 20 seconds! Film clip is compliments of the Owens-Illinois Glass Company. (Thanks to Phil Perry, a now retired engineer with that company!) |
Mouth-blown utilitarian bottles have several important diagnostic characteristics which can be helpful for dating. The primary features common to most mouth-blown bottles are addressed by Questions #4 through #7 which are listed below. Click the question link to jump directly to that question though it is recommended that users run through questions #4 through #7 consecutively since the answers for some lead directly to other later questions:
Question #4: Does the base of the bottle have some type of pontil scar or mark? Question #5: Does the bottle finish ("lip") have an applied finish, tooled finish, or a finish that does not fit either of these categories or you do not know? Question #6: Does the bottle have some type of mold seam or seams on the base, i.e., within the extreme outside edges of the base? Question #7: Are there mold formed air venting marks on the shoulder, body, and/or base of the bottle? Question (not numbered): Does the bottle have embossed (or labeled) contents or volume capacity information? Question (not numbered): Does the bottle have any type of glass/bottle makers markings embossed on the base (typically) or body (occasionally)? |
Other datable diagnostic features and bottle type specific date ranges for the listed diagnostic features are discussed in more depth within other portions of this website. In particular, the information found within the Bottle Typing & Diagnostic Shapes complex of pages is of particular use.
Note: If you are keying a bottle with a ground lip or finish, only questions #6 & #7 will help refine your dating quest since ground lip bottles and jars are rarely pontil marked (Question #4) and that finishing method is not covered under Question #5 (it falls out as "C" - Other Finishes - under Question #5). For a discussion of ground finish click Bottle Finishes & Closures and/or Ground Finish to view portions of other pages within this website that cover this subject.
Lets begin with
Question #4
right below...
|
|
|
|
|
|
|
Pontil marks come in several different stylistic types with variation within the different styles. Probably at least 95% of pontil scarred utilitarian bottles date to or before the Civil War era (1860-1865). |
QUESTION #4: Does the base of the bottle have some type of pontil scar or mark?
A
pontil
scar or mark is a very useful mid-19th century diagnostic
dating
characteristic. There are several dramatically different type pontil marks, all of
which are a mark or scar on the bottle base left by a type of
pontil rod.
There is also a lot variety possible within each category of pontil marks.
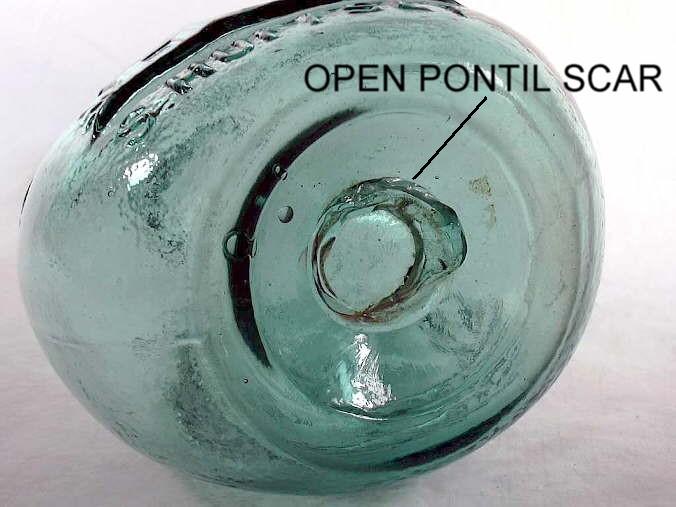
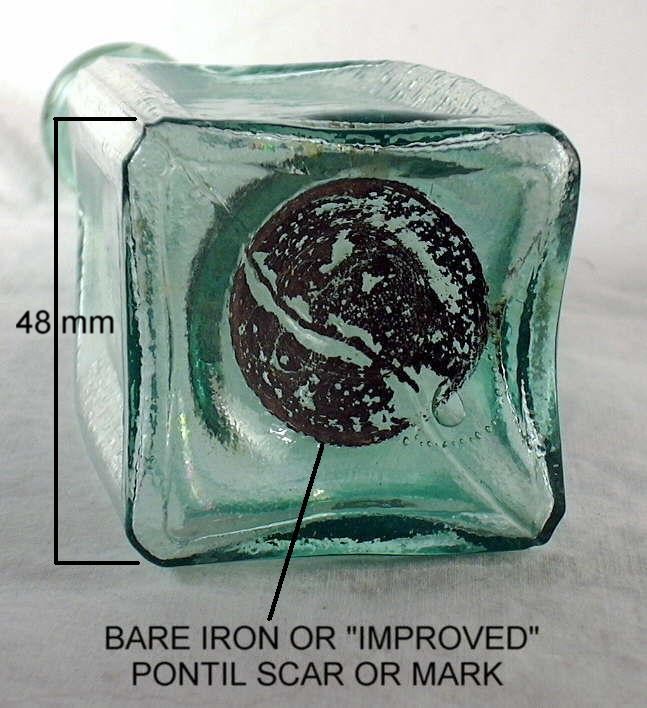
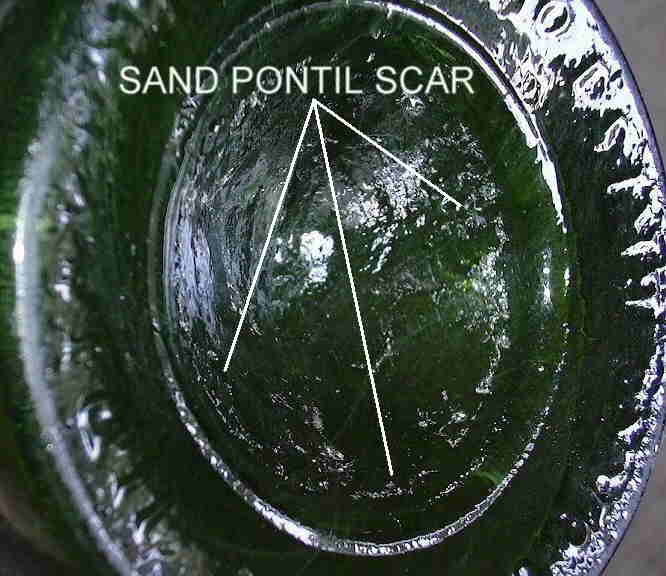
Typical examples of the 3 major pontil types - blow-pipe, glass-tipped or "open" pontil
scars; iron or "improved" pontil scars; and sand (disk) pontil scar - are pictured to
the right. Visit the
Pontil Marks or Scars page for much more information on pontil rods,
pontil scars, and the empontilling process. Between the mid 1840s
and the mid 1860s the pontil rod was gradually
replaced by various
snap case
tools which typically leave no distinct markings on the bottle
(Barber 1900; Jones & Sullivan 1989).
YES - The base of the bottle does have some type of pontil mark or scar. Utilitarian bottles with pontil marks usually date from or prior to the American Civil War era, i.e., ≤1860-1865, and virtually always prior to the early 1870s, though can date much earlier than the earliest timeframe this website covers (late 18th century). (Many "specialty" bottles can have pontil scars after this period, though common utilitarian bottles follow these time frames quite closely; click specialty bottle pontil scars for more information.)
NOTE: This is the end of the key for
pontil-marked bottles as the remaining questions deal with post-Civil War
era bottles and do not add any further dating refinement.
For more information and dating
information on pontil marks it is highly recommended that a user review the
Pontil Marks or Scars page. If you are seeking information on what type
bottle you have, go to the
Bottle Typing & Diagnostic Shapes page which also will lead users to additional dating
information.
NO - The base
of the bottle does not have any evidence of a pontil mark though the
base may have
a mold line(s) and/or embossing, or be totally smooth and unmarked.
The vast majority (probably 95%+) of mouth-blown utilitarian bottles without pontil marks date after
the Civil War, i.e., were made after 1865 although some "smooth" base
bottles (those without any evidence of any type of pontil scar) can occasionally date from the 1850s,
though very rarely prior to that decade.
Move to QUESTION #5 for more dating refinement.
NOTE: At this point in the bottle dating
key, diagnostic characteristics for mouth-blown bottles become
generally less precise for dating all bottles and more bottle type specific.
For example,
colorless glass prescription drug bottles have
somewhat
different diagnostic dating timelines than
amber glass beer bottles in
regards to the finish (Question #5) and base features (Question #6). The
following Questions #5, #6, and #7 can help with dating, but also
function to channel a user to specifics found
elsewhere on this website. In particular consult the
Bottle Typing & Diagnostic Shapes complex of pages
for more bottle type specific dating.
QUESTION #5: Does the bottle finish ("lip") have an:
A. Applied finish?
B. Tooled finish?
C. Finish that does not fit either of these categories
or you do
not know?
Unless familiar with these terms, a user must view the
descriptions below for both A & B to properly differentiate those
finishing methods from each other in order answer Question #5.
The two main finish
manufacturing techniques (A & B above) can
be difficult traits to differentiate from each other, though are very useful
for dating.
The applied vs.
tooled finish dating reliability is considered of moderate accuracy due to the wide time span
that glassmakers adopted the new tooling methodology.
A lot of finishing variability exists between types or classes of
bottles though within a given
type of bottle, the finishing method can be a
very helpful dating tool. An assortment of different finishes (e.g.,
sheared, laid-on rings) have features which defy inclusion into a simple key,
though can be dating diagnostic depending on the particular type or class of bottle
that the finish is found on. The user is advised to
consult the
Bottle Finishes & Closures
and the
Bottle Typing & Diagnostic Shapes pages
for more finish and bottle type specific dating information. (Click
HERE to move down the page for a link to an PDF version of an article by
the author that is a comprehensive primer on the different types of
mouth-blown finishing methods. It is entitled "The Finishing
Touch.")
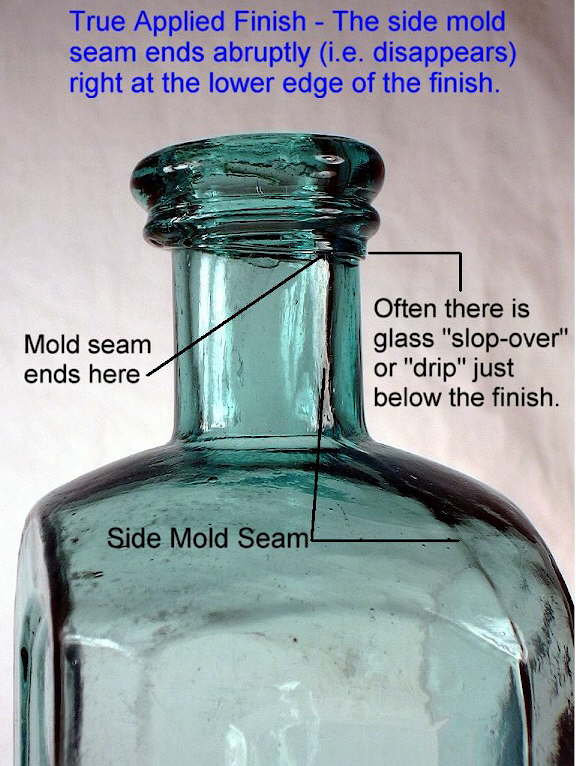 "True" applied finish (lip) with the side mold seam stopping abruptly at the base of the finish. Bottle is a Lindsey's Blood Searcher (patent medicine from Hollidaysburg, PA) - ca 1858-1865. |
|
|
A. "True" Applied Finish - This finish is most accurately called an applied finish but is also referred to as an applied lip. The picture to the left shows a bottle with a distinct applied finish. This finish results from the separate application of a measured quantity of hot glass at the point where the bottle was removed from the blowpipe, i.e., the upper, unfinished neck. After glass application, most applied finishes were also tooled to shape. Click on Bottle Finishes & Closures page to view the portion of that page which covers this subject in depth.
Many collectors and archaeologists inaccurately use the term "applied lip" to refer to
any formed finish on a mouth-blown (non machine-made) bottle where the side mold seam terminates
below the
rim of the finish (Fully explained as
Question #2 on the main Bottle Dating page.) This website uses the term
"applied finish" to refer only to a finish formed/made of separately
applied glass, i.e., a "true" applied finish.
Diagnostic characteristics of an applied finish include several or all of the following:
a. The mold seam ends abruptly at the lower edge of the
finish (shown in picture). Be aware that the mold seams in the upper
neck portions of an applied finish bottle can be very hard to detect due to
neck re-firing during the finish application process or just the
emasculating effect of the hot glass to finer features like mold seams.
b. There is usually a small quantity of excess glass slopping over onto the
neck of the bottle just below the finish (shown in picture). Sometimes
the excess slop-over is not evident or the finish glass was actually
inadequate in quantity resulting in a finish that is "missing" some
portions. This is evidenced by unfilled spots on the top of the finish
and/or ragged unevenness at the base of the finish.
c. The visual presence of a line or ridge inside the applied finish glass which
can often be felt with the little finger inside the
bore. (Note: this ridge is not
visible in the picture but can be distinctly felt on this bottle with the
authors pinkie finger.) This
line/ridge is the "interface" between the blowpipe severed neck and applied finish
glass and can vary from very distinct to virtually non-existent.
d. Concentric horizontal tooling marks from a
finishing tool will be present on the finish itself
but not on the upper neck just below the finish like on most tooled
finish bottles.
Most applied finishes had to be hand tooled after the glass application in
order to achieve the desired shape.
e. On some applied
finishes there can be a grouping of small, short fissures or cracks
("crazing") in the area where the finishing glass was applied to the sheared/cracked-off neck end. This feature is
rarely seen on tooled finishes (next section) and typically quite indicative of an applied finish.
Applied finish bottles typically date between 1820 and 1890, though there is much variety depending on type or class of bottles. In general, based on empirical evidence, the larger the bottle the later applied finishes were utilized. Consult the Bottle Finishes & Closures page, which covers this complex subject in depth. Also consult the Bottle Typing & Diagnostic Shapes page for more bottle type specific dating of applied finishes.
Move to Question #6 for additional dating refinement if the above question is true.
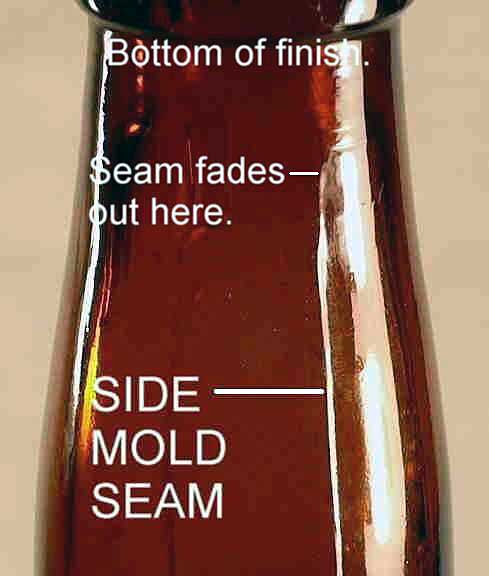
B. Tooled Finish - The lower picture to the above left shows an early 20th century beer bottle with a tooled finish. The tooled (aka "wiped" or "improved tooled") finish was usually a result of the glass for the finish being blown with the rest of the bottle in the mold then the finish hand tooled to a more precise shape once the still hot (and pliable) bottle was removed from the mold, often after re-firing the bore at the blowpipe detachment point. In short, the finish glass was not applied to the severed neck of the bottle in a separate hand operation. Click on Bottle Finishes & Closures page to view the portion of that page which covers this subject in depth including some exceptions and variations.
Diagnostic characteristics of a tooled finish include several or all of the following:
a.
The side mold seam distinctly fades out on the neck of the bottle typically
within an inch of the bottom of the finish (see above picture) though
sometimes it will disappear within the finish itself but short of the rim.
The terminal end of the seam will often bend slightly in the direction that
the "finishing" or "lipping" tool was rotated.
b. Concentric horizontal tooling marks are usually present on
both the finish and the upper portion of the neck above where the side mold
seam fades or disappears; these rings show faintly in the picture above.
Sometimes the side mold seams can be observed faintly "underneath"
or within the tooling marks or rings. The mold seam can occasionally
proceed faintly almost all the way to
the top of the finish. This residual seam evidence is likely a result of the
glass beginning to cool and solidify while being hand tooled allowing finish mold
seam traces to remain and/or how tightly the
finishing/lipping tool was pressed.
Evidence of the vertical side mold seam(s) within the confines of the finish positively identifies the finish glass as
having been mold blown and not separately applied.
c. The absence of a line or ridge inside the finish as would be found on a
"true" applied finish since there was no separate application of finishing
glass. The glass inside the neck at the finish/neck interface feels
smooth to the touch with no ridge evident (this is not possible to tell from
picture).
d. There is often a visible change in the thickness of the glass on each side
of the bottle neck inside the bore beginning at the point where the seam disappears and the
tooling marks begin. This is usually just a subtle "hump" on the inside
surface of the glass where the tip of the finishing tool ended. Click tooled
neck
to see an illustration of this feature which is difficult to photograph. Click
Hawaiian beer bottle to see a picture that does show this feature relatively well on
the upper neck of a Hawaiian beer bottle
estimated to date between 1908-1911 (Elliot & Gould 1988).
The changeover from applied finishes to tooled finishes appears to have been in the 1880s, with a large majority of bottles produced after 1890 exhibiting this finishing method. Hand tooled finishes largely disappeared between 1910 and the early 1920s with the ever increasing dominance of automatic bottle making machines (see the Machine-made Bottles portion of the Dating page ).
Once again there was a lot of variation in the changeover from applied to tooled finishes depending on the type of bottle. In general, based on empirical evidence, the smaller the bottle the earlier that tooled finishes were generally adopted. For example, small proprietary drug store bottles appear to have almost totally made the changeover to tooled finishes by the late 1870s, larger square "bitters" type bottles appear to have not completed this changeover to tooled finishes until the mid to late 1880s, and beer bottles until the early and possibly mid-1890s (Lockhart pers. comm. 2006). Click on Bottle Finishes & Closures page to view the portion of that page which covers this subject in depth. Also consult the Bottle Typing & Diagnostic Shapes page for more bottle type specific dating of tooled finishes.
Move to
Question #6 for additional
dating refinement if the above question is true.
C. "Other" Finishes or Do Not Know
- The universe of mouth-blown historic bottles contains many finishes or
finish processes which do not fit neatly into a key. If your bottle falls out here
("C") the best
course of action is to consult the
Bottle Finishes & Closures page, which covers this subject in
depth, or to check the extensive
Bottle Typing & Diagnostic Shapes page to find the finish or bottle
type you are seeking information on. A user may also move to
Question #6 for additional
dating refinement based on other bottle features.
|
NOTE: The author of this website has prepared a summary of the mouth-blown bottle finishing methods section found on the Bottle Finishes & Closures page which is available as a downloadable and printable (pdf) article entitled: "The Finishing Touch: A Primer on Mouth-blown Bottle Finishing Methods with an Emphasis on "Applied" vs. "Tooled" Finish Manufacturing." Along with covering the primary methods of finishing mouth blown bottles, the bottle also covers bottle type/typology specific dating ranges (pages 22-25). The article is 32 pages and full of useful illustrations; it is highly recommended reading to determine precisely what the above questions ask. |
|
|
|
|
|
|
QUESTION #6: Does the bottle have some type of mold seam or seams on the base, i.e., within the extreme outside edges of the base?
Base mold seams can be indicators of age
though there are enough exceptions that the dependability of this diagnostic
feature is only moderate. In addition, the mold seams on many bottles
may be difficult or even impossible
to discern for a variety of reasons. Visit the
Bottle
Bases page for expanded information on this subject. (Note:
Base embossing is not pertinent to either a "YES" or "NO" answer here as
embossing
can be present on bottles from any of the mold types.)
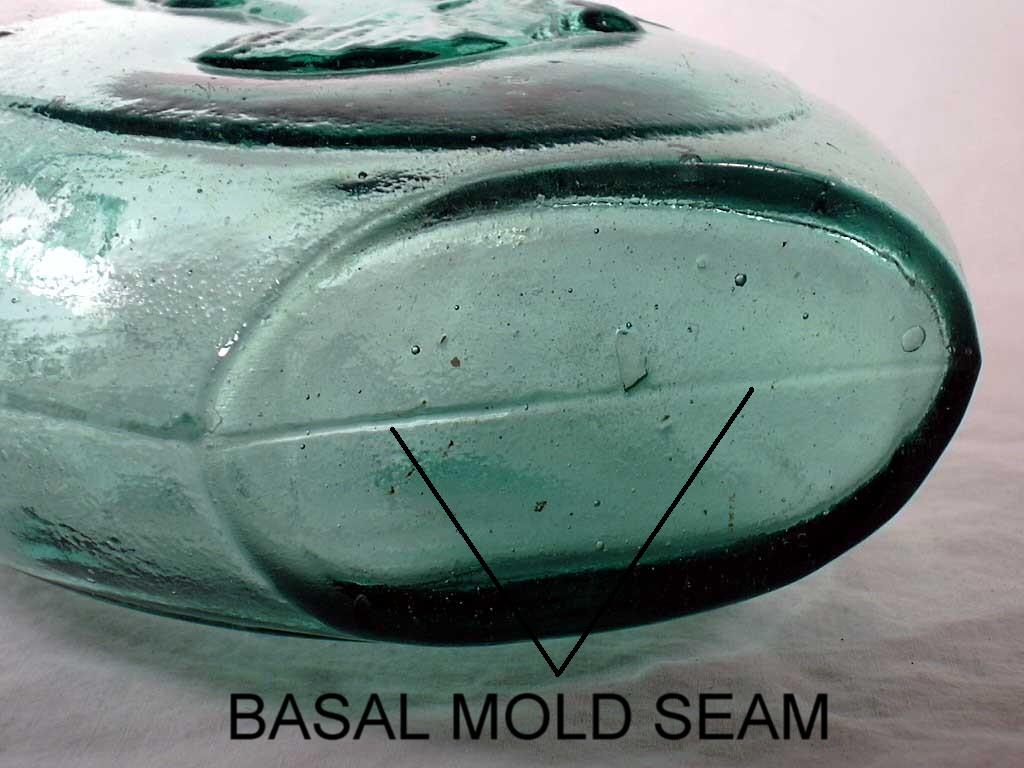
YES
- Within the confines of the bottle base there is a mold seam or seams; see
top two pictures to the right. Base mold seams on mouth-blown bottles can be straight, round, oval, keyed, or notched.
However, all
versions include a continuation of the side (body) mold seams onto at least the outer
edge of the base where the side seams
merge with the base seams (post-bottom mold) or actually are the base seams (hinge
mold). Bottles with these base types usually date no later than 1890-1895
though earlier cut-off dates are
associated with certain mold types and within
some bottle categories. These exceptions are covered more fully
on the Bottle
Bases and
Bottle Typing & Diagnostic Shapes page, though a couple can be useful for dating refinement here:
- Bottles with a
straight mold seam bisecting the entire base, like shown in the picture to the top
right, are
often referred to as having been produced in a "hinge mold" or
having a "snap-case" base.
(More accurately, all mouth-blown bottles without a pontil mark were held
for finishing with some type of snap case device regardless of the type of
base mold seam.) The mold seam on hinge mold bottles is really just
a continuation of the side mold seams.
Bottles with the straight mold seam bisecting the base (with no
pontil scar)
predominately date between 1855 and early/mid-1870s based on empirical
observations, though it is also corroborated by Toulouse (1969). For an illustration of a hinge mold click
hinge mold. For more information on the subject of hinge molds see that section of the
Bottle Bases
page.
- Bottles with a "key mold" base (with no pontil scar) also
typically date between 1855 and the early/mid-1870s.
A key mold base is a distinct variation of a hinge mold base which is not straight
but instead arches or notches up in the central portion of the base
(Toulouse 1969b). However, the base seam is also a
continuation of the side molds seams since these true two-piece molds had no separate base
plate like the two mold types that follow (post-bottom and cup-bottom mold
conformations). For an
illustrated image of a key mold base
click on
key mold. For more information on the subject of key molds see
that section of the
Bottle Bases
page.
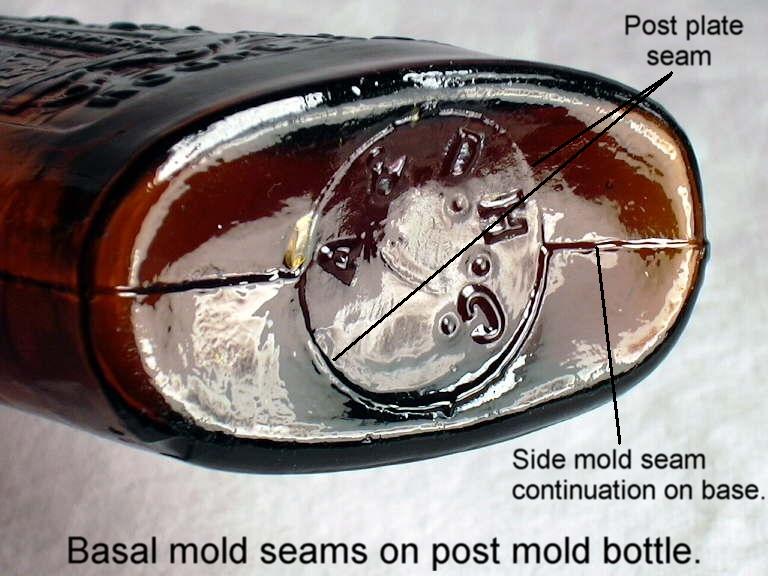
- Bottles bases with a centered round or oval mold seam within the confines
of the base were produced in a
post-bottom mold; usually
simply called a "post mold."
With this mold type a variably large section of the base
is formed by a separate mold base plate or section. A picture of a
post-bottom
mold produced bottle is to the above right - middle image. Post-bottom mold bottles
(with no pontil scar) usually date between the mid to late 1850s and 1890, although there are significant dating
differences between different types of bottles; a subject explored in depth
on the
Bottle Bases page. For an illustration of a
post-bottom mold click
post-bottom mold. Click on
post-bottom mold bottle illustration to see a simple drawing that shows the typical
side and base mold seam configuration of a post-bottom mold produced bottle.
Move to Question #7 for additional dating refinement.
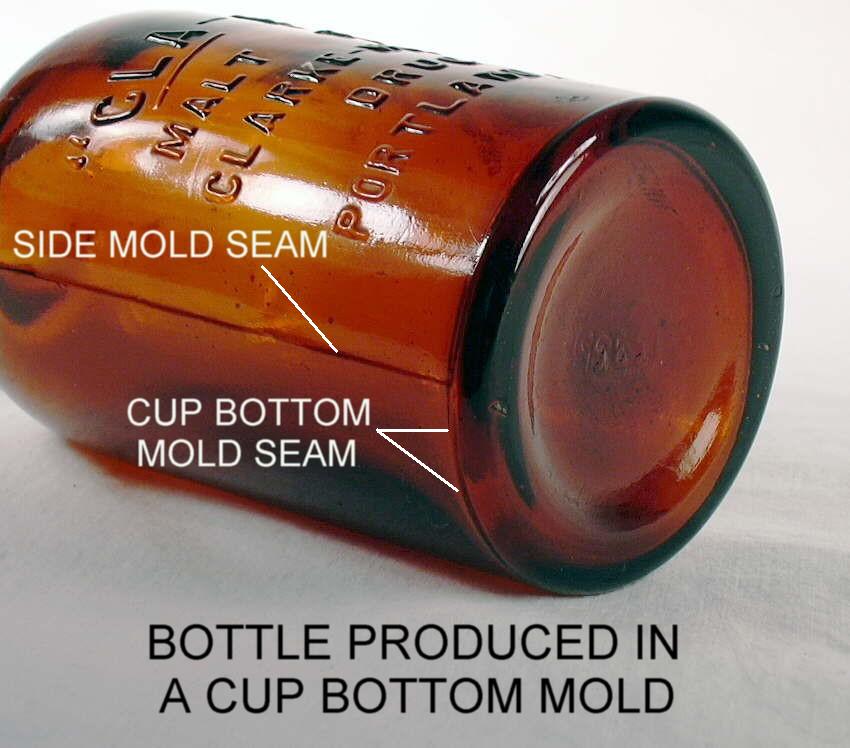
NO - Within the confines of the base there are no apparent mold seams, though there will probably be a mold seam on the heel of the bottle at the lower edge of the body just above the base resting point. (See the bottom image to the above right.) This heel seam may be distinct, though it is often faint or invisible as it is commonly hidden in the ridge or edge at the body/heel transition point or interface. However, even if this heel seam is not apparent, a cup-bottom mold produced bottle is conclusively indicated by the side mold seams ending at the heel with no continuation around the heel edge and onto the base. Mouth blown bottles with these described diagnostic features were produced in a "cup-bottom mold."
Cup-bottom molded bottles are produced in a mold where the base forming portion of the mold "cups" the hot glass for the base of the bottle to be. For an illustration of this type mold click cup-bottom mold. This type mold conformation was (and still is) the dominant type used on automatic bottle machines (Toulouse 1969b), though the information noted here is only for mouth-blown bottles. For more information on the subject of cup-bottom molds see that section of the Bottle Bases page.
Cup-mold produced bottles can date back to at least the 1860s (especially for druggist and smaller bottles) though the majority date from the mid 1880s to the late 1910s - the effective end of the mouth-blown bottle era. Mouth-blown bottles from the early 20th century (1900-1920) were almost always produced in cup-bottom molds, with the exception of heavy glass beer and soda bottles. More bottle type specific information relative to cup-bottom mold produced bottles is found scattered through the various bottle type specific pages that make up the Bottle Typing & Diagnostic Shapes complex of pages. A summary of specific bottle type dating timelines relative to the above mold base types can be found on the Bottle Bases page at the following link: bottle base typology dating timelines.
Move to
Question #7 for additional dating
refinement.
 |
QUESTION #7: Are there mold formed air venting marks on the shoulder, body, and/or base of the bottle?
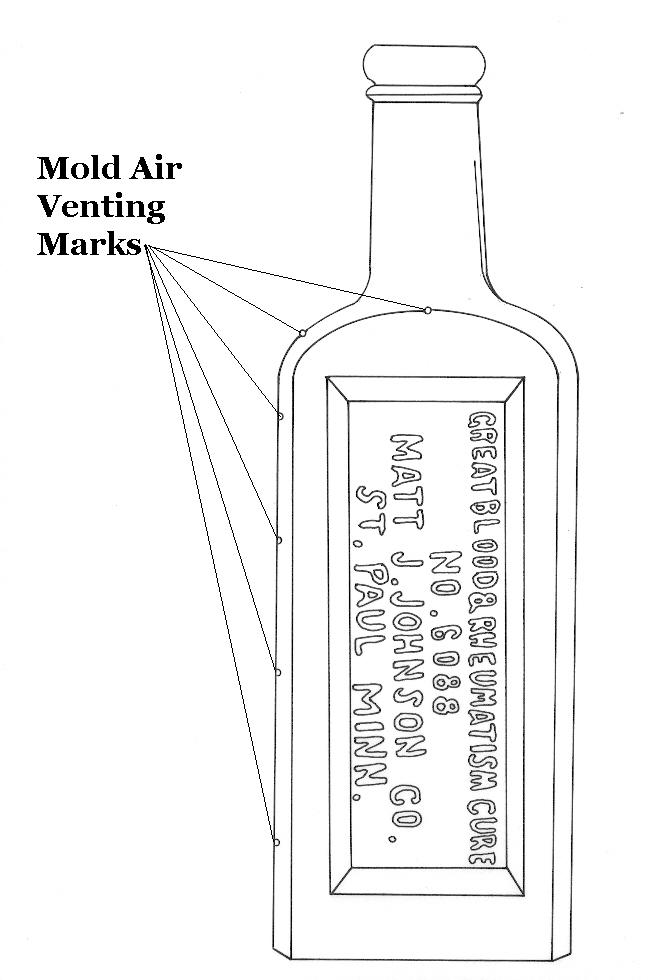
Air venting marks are usually very small bumps that can be found just about anywhere on the surface of a bottle but are most common on the shoulders, corners, base, mold seams, and sometimes incorporated within the embossing pattern itself. Air vent bumps are typically as small or a bit smaller than a pin-head and appear like embossed "period" dots. These markings result from small holes drilled in the mold which allowed for the release of hot gases as the bottle was being blown and expanded.
Click on the photo to the left to view
an illustration of the same bottle showing where the air venting marks are
located. The places to look on a bottle in order of likely probability
of being present are as follows: shoulder(s), on the body, vertical body edges
(square or rectangular bottles), on the base (click on
base venting for
an illustration), incorporated into the side
mold seam (often hard to determine), or integrated within the embossing pattern. Air
venting marks can be found in several or even all of these locations on the
same bottle. In general, the more air venting a bottle exhibits the
later the bottles was manufactured within the time span such was used on
mouth-blown bottles (described below). (Note: the
information for this Question was based largely on an amalgam of Thomas
(1974, 1977, 1998a & b, 2002), Elliott & Gould (1988), other references
which provide company dating information, and empirical
observations by the author of this website.)
YES - There appears to be one or more air venting marks on the surface of the bottle. Mouth-blown bottles with air venting marks typically date from or after 1885-1890. Mold air venting began being used significantly in the early to mid-1880s and appear to have been a fairly quickly accepted technique becoming an industry standard by about 1890. Few American made mouth-blown bottles after that date are not air vented, though foreign made items will often lack air venting into the early 1900s (empirical observations).
Check the surface of the bottle carefully as air venting marks can be very difficult to see and are sometimes easier to feel. One clue to consider in your search for vent marks is that bottles made in molds with air venting usually have sharper, more distinct embossing than bottles without vent marks, though this characteristic can be difficult to discern except to the experienced eye.
The advent of air venting largely coincides chronologically with the adoption period for molded and tooled finishes, as described in Question #5 above. Based on empirical observations, however, mold air venting appears to have been accepted by glassmakers for all types of bottles faster than tooled finishes replaced applied finishes. This makes the presence of air venting a somewhat more reliable diagnostic dating break for a wider array of bottle types than the finish method. (Of course, using both diagnostic features helps refine the dating better.)
Depending on the location and type of
mold air venting, additional dating refinement is possible; consult the
pertinent section of the
Bottle Body Characteristics & Mold Seams
page for more information. As a general rule, the more air
venting marks present on the surface of a mouth-blown bottle the later the
bottle was likely produced. More specifically, just one air vent bump
each on the front and back shoulder (cylindrical bottles) or the body
shoulder corners opposite the vertical side mold seams (square or
rectangular bottles) tend to be the earliest (mid to late 1880s to
mid-1890s) with multiple air venting marks scattered around the bottle -
including those integrated into the embossing
pattern and/or on the base - being the latest dating (1905-1920).
NO - There appears to be no air venting marks on the body of the bottle. Mouth-blown American made bottles without air venting marks typically date from - or prior to - 1885-1890. Look closely at the entire surface of the bottle as air venting marks can be very difficult to discern and occasionally are not visible even though the mold may indeed have been vented. An additional diagnostic indication is that bottles produced in non-air vented molds tend to have more rounded and flattened embossing, though this characteristic can be difficult to discern even to the experienced eye and can be caused in other ways (e.g., the parison not fully inflated or the mold was not properly cleaned). See the Bottle Body Characteristics & Mold Seams page for more information on mold air venting, embossing, and related topics.
|
The following questions are also found on the "Machine-made bottles portion of the Dating Key" page (as #16 and #18) but are both pertinent to mouth-blown bottles. They are added below as unnumbered questions. |
QUESTION: Does the bottle have embossed (or labeled) contents or volume capacity information?
 It was
very uncommon until the early 20th century for the capacity or volume of the
contents of a bottle to be noted in the embossing or on the label (or closure
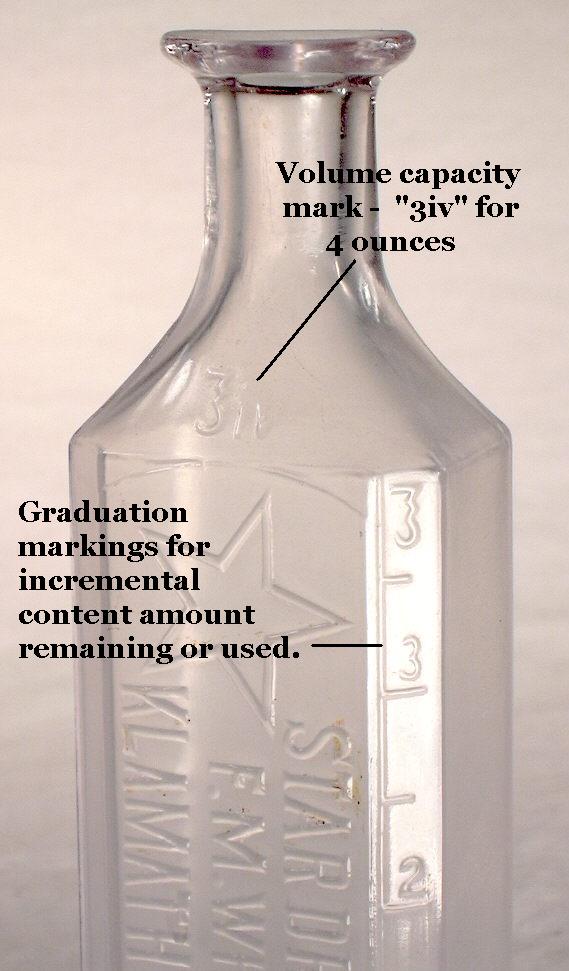
sometimes). The image to the right shows a very late mouth-blown druggist
bottle (1914 to early 1920s) from Spokane, WA. that has the volume capacity ("12
oz.") embossed on the shoulder. The origin of volume designations is explained in an article by Bill Lockhart dealing with El Paso,
TX. soda bottlers published in The Artifact in 2003; part of which is
quoted below. (Note: This article was also re-published in Bottles and
Extras in 2006 (Lockhart 2006a) and available at this link:
A Tale of Two Machines and A Revolution in Soft Drink Bottling.)
It was
very uncommon until the early 20th century for the capacity or volume of the
contents of a bottle to be noted in the embossing or on the label (or closure
sometimes). The image to the right shows a very late mouth-blown druggist
bottle (1914 to early 1920s) from Spokane, WA. that has the volume capacity ("12
oz.") embossed on the shoulder. The origin of volume designations is explained in an article by Bill Lockhart dealing with El Paso,
TX. soda bottlers published in The Artifact in 2003; part of which is
quoted below. (Note: This article was also re-published in Bottles and
Extras in 2006 (Lockhart 2006a) and available at this link:
A Tale of Two Machines and A Revolution in Soft Drink Bottling.)
On March 3, 1913, Congress passed H. R. 22526, generally known as the Gould Amendment to the Pure Food and Drug Act of 1906. Although the Pure Food and Drug Act demanded a great deal of labeling information, it did not require the inclusion of volume specification. The Gould Amendment corrected that oversight when it stated that the "quantity of the contents be . . . plainly and conspicuously marked on the outside of the package in terms of weight, measure, or numerical count" but continued to explain that "reasonable variations shall be permitted." Although the law went into effect immediately, it clarified that "no penalty of fine, imprisonment, or confiscation shall be enforced for any violation of its provisions as to domestic products prepared or foreign products imported prior to eighteen months after its passage" (U. S. 1913:732). In other words, the industry actually had a grace period in required compliance until September 3, 1914.
In order to be in compliance with the Gould Amendment, soda bottlers in El Paso (along with those in the rest of the U. S.) had to include volume information on their containers by no later than September 1914. All bottles bearing volume data can therefore be dated as no earlier than 1913 and probably not until 1914. Thus far, I have found no datable, mouth-blown, El Paso soda bottles containing volume information. However, a few machine-made bottles from both the Magnolia Coca-Cola Bottling Co. and the Empire Bottling Works, El Paso’s two largest bottlers at that time, contain no volume information. This suggests that they were produced prior to the Gould Amendment or at least no later than 1914. All other machine-made bottles that I have examined, filled by El Paso bottlers, bore volume information. (Lockhart 2003)
 Given this information, it appears that the
majority (if not all) of mouth-blown beverage, food, and medicinal bottles with
embossed (or labeled) specific capacity or volume information likely date from
1913 or 1914 or later. Since mouth-blown bottles largely disappeared by
the mid 1920s, this gives a pretty tight time frame for mouth-blown bottles with
volume information. This information is of no use for bottles without volume embossing with no label still present or for bottles that did not hold a
beverage, food, or medicinal product, all of which were regulated by the Pure
Food and Drug Act of 1906.
Given this information, it appears that the
majority (if not all) of mouth-blown beverage, food, and medicinal bottles with
embossed (or labeled) specific capacity or volume information likely date from
1913 or 1914 or later. Since mouth-blown bottles largely disappeared by
the mid 1920s, this gives a pretty tight time frame for mouth-blown bottles with
volume information. This information is of no use for bottles without volume embossing with no label still present or for bottles that did not hold a
beverage, food, or medicinal product, all of which were regulated by the Pure
Food and Drug Act of 1906.
There are several notable exceptions to the above discussion. The first is that many later mouth-blown liquor or spirits bottles commonly had volume notations embossed in the glass (e.g., "FULL QUART", "ONE PINT") or on the label as early as at least 1900, though many/most date from the 1913 law or after. Click Donnelly Rye to see an example that probably dates as early as 1910. Volume notation on liquor bottles was apparently a marketing issue and seems to be related to the rise of mail-order liquor which is briefly discussed under the Tall, slender bodied, straight neck spirits cylinders (late 19th & 20th century) section on the Liquor & Spirits Bottles page.
The other important exception is with mouth-blown druggist/prescription bottles which had volume notations commonly embossed on them beginning very close to 1900 (picture to the right). This issue is discussed in more depth within the "Druggist/Prescription" bottle section on the "Medicinal/Chemical/Druggist" bottle typing page. Click Druggist Bottle Dating Summary/Notes to view this discussion.
QUESTION: Does the bottle have any type of glass/bottle makers markings embossed on the base (typically) or body (occasionally)?
 Mouth-blown
(and machine-made) bottles will frequently have embossing on the
base (image to the right and the most common location),
heel, and/or
body which identifies the actual manufacturer of the bottle. Be
aware that many times the embossing on a bottle base
is not a manufacturers or "makers mark" but instead is either related to the
product the bottle contained, the user of the bottle, or is for internal manufacturer related
tracking (e.g., mold or catalog designations) of little use in dating or
typology.
Mouth-blown
(and machine-made) bottles will frequently have embossing on the
base (image to the right and the most common location),
heel, and/or
body which identifies the actual manufacturer of the bottle. Be
aware that many times the embossing on a bottle base
is not a manufacturers or "makers mark" but instead is either related to the
product the bottle contained, the user of the bottle, or is for internal manufacturer related
tracking (e.g., mold or catalog designations) of little use in dating or
typology.
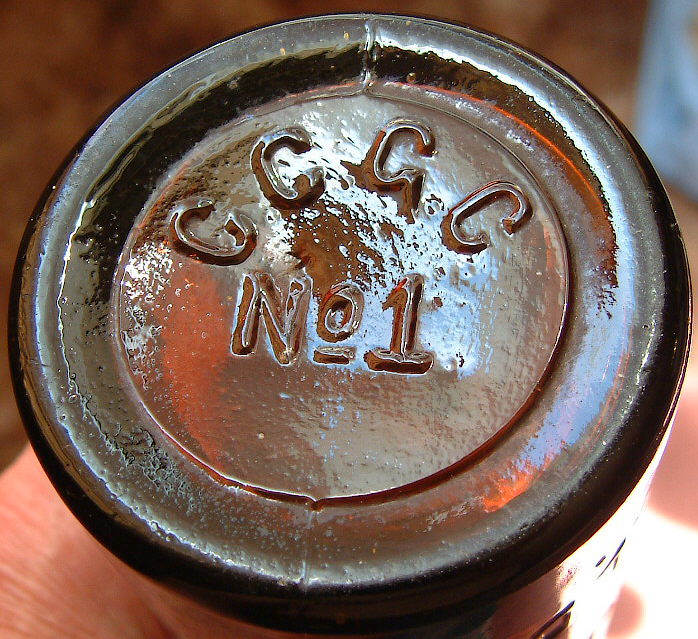
When present, however, makers marks - in hand with answers to the other questions noted prior - will often allow for a distinct narrowing of the date range in which a given bottles was likely produced. For example, the mark to the right (C. C. G. C.) is on the base of a "quart" mouth-blown export style beer bottle manufactured by the Cream City Glass Company (Milwaukee, WI.) which operated from 1888 to 1894 (Toulouse 1971; Lockhart pers. comm. 2007). As one can see, when present makers marks can be one of the best dating refinement tools of all! Incidentally, the No 1 on the bottle base is of unknown meaning although it could be for the first mold made for this style or for the intra-factory bottle blowing group ("shop" #1) that used the mold at the glass company...or something totally unrelated.
To assist with this endeavor please consult the Bottle & Glass Makers Markings page which contains links to scores of articles posted on this website which were largely produced by members of the Bottle Research Group (BRG). These articles deal with specific makers markings and the history of the companies behind those markings. This will be a "work-in-progress" over the coming years as scores more BRG articles (including revisions and updates of past articles) are planned to be "e-published" via this website on an array of other bottle makers.
In order to make full use of this comprehensive information, however, one has to know what mark or marks were used by what glass or bottle manufacturing company. If not known and the marking is either a clearly identifiable alphabetical letter or letters (like A. B. Co. for the American Bottle Company) or a distinct logo or symbol, a user must first determine the origin of that makers marking. This can be done by using the appropriate "Makers Markings Logo Table" to ascertain which mark/marks were used by what company.
|
Makers Markings Logo Tables
All the above articles and tables are now (early 2021) considered final although any may be revised in the future as new information is available. |
Once a makers marking is identified one can go to the Bottle & Glass Makers Markings page (link below) to (hopefully) find the glass makers article that pertains to the mark, if an article does exist for that particular maker.
Click the following link to
go directly to that listing of makers marking articles:
Bottle Makers
Articles
|
This completes the portion of the key that deals with mouth-blown bottles as this is the end of diagnostic features which have general or broad utility for most types of mouth-blown bottles made up to about 1915-1920. Consider the answers and dating overlap information provided by the above questions together in arriving at a likely age range for your bottle. For some examples of how to use this information to refine your date range see the EXAMPLES page. There is also a plethora of other physical attributes of bottles that can variably allow for more precise dating, e.g., degree of crudeness, style of finish or lip, shape, color, embossing characteristics, closure types, other mold variations, etc. These other features tend to be accurate or useful only at the specific bottle type or category level and are impossible to incorporate into a simple key. From this point a user must consult other pages on this site for additional information on a given bottle. The titles of (and links to) all of the pages contained within this site can be viewed by clicking on Website Map. Peruse the titles to see if any may help with your quest for information. It is suggested, however, that a user first consult the Bottle Typing & Diagnostic Shapes page for bottle type identification which includes additional bottle category specific dating information. From that page the user will also be directed to other potentially useful website pages. Happy hunting! |
SEARCHING THIS WEBSITE:
To do a word/phrase
or image search of this website
one must use the following Google search link:
Search the SHA/BLM Historic Glass Bottle Identification & Information
Website
(Note: Search results for this website will be just below the
final top-of-the-page Google paid ads.)
1/1/2024
Return to the top of this page.
This website created and managed by:
Bill Lindsey
Bureau of Land Management (retired) -
Klamath Falls, Oregon
Questions? See
FAQ #21.
Copyright © 2024 Bill Lindsey. All rights reserved. Viewers are encouraged, for personal or classroom use, to download limited copies of posted material. No material may be copied for commercial purposes. Author reserves the right to update this information as appropriate.