


Disaster Planning for Collections
- What is disaster planning and why is it important?
- What resources exist to help in disaster planning?
- What supplies do I need to keep on hand to respond to a water disaster event?
- What do I do if my library or archive floods?
- What is the difference between freezing and freeze-drying flood damaged documents?
What is disaster planning and why is it important?
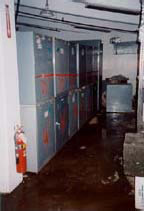
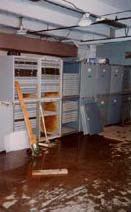
Historic Jamestowne collections storage-shortly after Hurricane Isabel. The red line shows the water line. Photos by E. Williams. Used by permission of Colonial Williamsburg.
Disasters affecting collections are typically emergency situations that involve large quantities of artifacts and/or serious damage that require immediate action. Not all emergencies become disastrous if control is quickly and effectively exerted. However, emergencies do have a tendency to worsen rapidly and progressively and it is this runaway quality that makes them so dangerous.
In order to minimize the effects of a disaster one must anticipate and avoid emergencies, retain control when an emergency occurs and recover control as soon as possible if it is lost. These three actions correspond well to the three key steps of disaster planning:
- Identifying and defining threats: Perhaps the first and most important step in mitigating the potential effects of disasters is to identify the specific risks. Risks can normally be broken down into two categories: natural threats (i.e. flooding) and man-made ones (i.e. arson).
- Planning a response: Once the principal risks have been identified the next step is to assemble a team and begin planning a response.
The key steps of this process are to:
- Identify and assign responsibility
- Educate the planning committee and the staff about the threats.
- Assess the collection and set priorities
- Identify potential hazards
- Assess prevention and protection needs
- Consider fiscal implications
- Write the plan
- Practice the plan
Preventing damage: Implement changes, make improvements and practice disaster response techniques.
What resources exist to help in disaster planning?
There is no single uniform emergency plan. There are elements that are applicable to any institution but the plan must reflect and meet the specific needs of its originating institution. There are many resources available to help write a disaster plan. The Getty Conservation Institute has published a highly accessible and easily digestible book on the topic. CRM magazine has also devoted two recent issues to the topic of disasters and both are available in hardcopy and on-line.
- Dorge and Jones (1999) Building an Emergency Plan: A guide for Museums and Other Cultural Institutions. Los Angeles: The Getty Conservation Institution.
- Cultural Resource Management vol 24 (8)
- Cultural Resource Management vol 23 (6)
It may also be possible to obtain a copy of a fellow institution’s plan to use as a starting point; modifications can be made to meet your needs.
Information on specific areas of risk within a region or locale may also be obtained by contacting the National Weather Service, Local Flood Control Boards, Insurance companies, and the local Fire Department.
During a disaster large numbers of skilled hands may be needed to assess and rapidly relocate collections. It may also be necessary to rapidly locate resources and expertise. Most conservation organizations have a disaster response unit consisting of conservators who are willing or able to help in case of disaster. Contact details for the main regional conservation organizations are as follows:
- Washington Conservation Guild (WCG)
http://palimpsest.stanford.edu/wcg/intro.html - Virginia Conservation Association (VCA)
Disaster response: (804) 342-9674
http://www.virginiaconservationassociation.org - American Institute for Conservation (AIC)
Main office: (202) 452-9545
http://aic.stanford.edu
Disaster response can be complicated by the fact that disasters are emotional and difficult events. Everyone reacts differently to them but it can be psychologically difficult for curators, archaeologists, and librarians to see the effects of the disaster on their collection. Developing mutual aid agreements with nearby institutions and CRM firms can help address this, as staff from other institutions may not have the same emotional ties to your artifacts. Remember, however, that in the case of a regional disaster, traditional communication and transportation systems may be impaired and you may need to rely on alternative methods or go beyond your local area.
Additional Resources:
Williams, E. (2004) Disaster Planning for Archaeological Collections
Journal of Middle Atlantic Archaeology (20):119-125
Conservation Center for Art and Historic Artifacts (CCAHA) (2005) Mid-Atlantic Resource Guide for Disaster Preparedness. Available at:
http://www.ccaha.org/emergency_resource.php
Heritage Preservation, a national preservation advocacy organization, has created a Emergency Response and Salvage wheel that provides specific information on how to salvage cultural material in the event of a disaster. The wheel retails for $12.95 and is available by phone at 1 (888) 979-2233 or at:
http://www.heritagepreservation.org/programs/Wheel1.htm
What supplies do I need to keep on hand to respond to a water disaster event?

Example of Emergency Response Bucket. Photo by M. Myers used by permission of the Department of Historic Resources
Disaster recovery supplies station
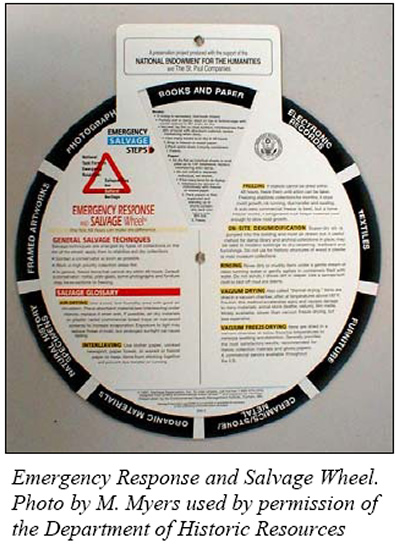
Emergency Response and Salvage Wheel. Photo by M. Myers used by permission of the Department of Historic Resources
The following list of supplies is an example of the type of materials that can be kept on hand in a 50-gal rolling trashcan. Other items can be added.
- Ten packages of white paper towels
- Two rolls of plastic sheeting
- Four rolls of duct tape
- Six large sponges
- Four cans of Lysol
- Two flashlights (one lamp type and one hand held)
- Two ‘D’ batteries and one 6-volt battery (batteries should be replaced annually)
- A copy of the organization’s Disaster Recovery Plan in a sturdy binder: may include maps that show where in the building different parts of the collections are stored and emergency contact information for staff.
- Large ziplock bag containing administrative materials: notepads; pencils; sharpies, and one disposable camera (film expiration date should be checked annually)
- Four boxes of tape with dispenser
- Four pairs of scissors
- One or more three gallon bucket-immediate temporary use for leaks
- One wet-dry vacuum (stored near the rolling trash can)
- One Emergency Response and Salvage Wheel. Available from Heritage Preservation, Inc. To order call: 1 (888) 979-2233 or http://www.heritagepreservation.org/programs/Wheel1.htm
What do I do if my library or archive floods?
This information is copied from the Emergency Response and Salvage Wheel, copyright 1997, National Institute for the Conservation of Cultural Property, Inc.
For large quantities of flooded material, vacuum freeze-drying is an efficient way to dry frozen papers.

- Books: Freeze or dry within 48 hours
- If rinsing is necessary, hold book closed.
- Partially wet or damp: stand on top or bottom edge with covers open at a 90° angle; air dry.
- Very wet: lay flat on clean surface; interleave less than 20% of book with absorbent material; replace interleaving when damp.

Top: Triage, removing non-unique material. Bottom: damage to original maps and drawings.
Photos by M. Myers. Used by permission from the Virginia Department of Historic Resources
If too many books to air dry in 48 hours:
- Wrap in freezer or waxed paper. Coated pages will stick together. Interleave if possible.
- Pack spine down in sturdy containers.
- Freeze [and keep frozen until they can be dried safely].
- Books may be freeze dried.
- Paper: Freeze or dry within 48 hours
- Air dry as individual sheets or small piles up to ¼”. Interleave; replace interleaving when damp.
- Do not unfold or separate individual, wet sheets.

Interleaving damp maps and field notes with absorbent material
If too many items for air drying:
- Interleave (by groups or individually) with freezer or waxed paper.
- Pack papers or files supported and standing up in sturdy containers; pack containers only 90% full).
- Freeze [and keep frozen until they can be dried safely].
Photographs:
- Remove from paper/plastic enclosures or frames. Save all information about the photos.
- Carefully rinse with cool, clean water as necessary.
- Do not touch or blot surfaces.
- Air dry: hang with clips on non-image areas or lay flat on absorbent paper. Keep photos from contact with adjacent surfaces or each other.
- If there are too many for immediate attention, either:
- Keep photos (except historic photos) in a container of clean water no more than 48 hours. Air dry.
- Freeze if cannot dry in timely manner. If possible, interleave each photo with freezer paper or waxed paper. Do not vacuum dry. Thaw and air-dry as soon as possible.
- Do not freeze glass plate negatives.
Consulting a conservator:
The above steps may be taken without professional assistance. But you may want to consult a paper or photographic conservator when the articles are drying, and in case objects have stuck together when drying.
The American Institute for the Conservation of Historic and Artistic Works maintains an on-line disaster response resource page: http://aic.stanford.edu/library/online/disaster/index.html
For the Metro DC and Baltimore area, the Washington Conservation Guild has published a guide to conservation and conservators, which lists area contract conservators. The URL is: http://palimpsest.stanford.edu/wcg/book.html
See also: What supplies do I need to keep on hand to respond to a water disaster event?
What is the difference between freezing and freeze-drying flood damaged documents?
The difference between freezing and freeze-drying is that one inactivates the water in an object and the other aids in the removal of the water. Water from flooding etc. can cause both chemical and physical damage to materials. Additionally, its presence can catalyze other forms of decay. However, rapid drying of wet artifacts can lead to damage in the form of dimensional changes. Water also has a high surface energy that leads to a high surface tension (think of how a thin film of water can hold two panes of glass together). This high energy will hold water in micro pores and capillaries with the result that air drying will remove some but not all of the water in a wet object. Also as the water evaporates from larger capillaries, the receding water front pulls the surfaces of the capillary together. If the walls are frail, collapse can follow. In the case of wet paper this can also lead to pages becoming stuck together.
Unfortunately in flood situations the number of books or documents affected is typically very high. Freezing these materials allows the deterioration caused by the water to be halted and the materials held until disaster responders and conservators have time to assess the condition of the material and deal with them on an individual basis. However it does not remove the need to deal with the materials. Although the water has been removed the object has not been truly stabilized as removing it from the freezer or power failures could render it wet again.
Freeze-drying is often used to permanently dry such materials as it is a relatively gentle and slow form of drying organic materials and it allows the issues of surface tension to be eliminated. In freeze-drying the object is frozen and then a vacuum is pulled which causes the water to sublime off (meaning that it passes from the solid ice form to the gaseous vapor state without passing through the liquid state). The vapor is given off to the surrounding chamber and is then trapped by freezing it on a much colder external condenser. During the process the internal temperature or weight of the object may be monitored to determine when an end point has been reached.
Copyright © 2006 Colleen Brady, Molly Gleeson, Melba Myers, Claire Peachey, Betty Seifert, Howard Wellman, Emily Williams, Lisa Young. All rights reserved. Commercial use or publication of text and graphic images is prohibited. Authors reserve the right to update this information as appropriate.